Lyric SIXCT: Program to Lyric
Related Products

Related Categories
Description
Lyric SIXCT: Program to Lyric
Transcript
Hi, DIYers. Sterling with Alarm Grid here. And today we're going to show you how to program a Honeywell Lyric 6CT. If you've seen our First Impressions video on this device, I actually called it a CT500. That was the first initial product name or number, and it seems they've already changed that. We're still in beta, so it could change again. But right now, they're calling it a 6CT, CT for contact and 6 because it's a 6 series sensor.
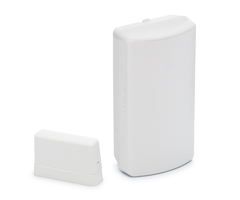
So, unlike the 5800 series sensors that the traditional Honeywell security systems have used, those sensors are still compatible with the Lyric because it is backwards compatible. But this is the brand new 6 technology. It's a Wi-Fi device. It works on the 2.4 gigahertz frequency range, designed to not interfere with any Wi-Fi signals in your house. Really high tech device, it actually has a MAC address instead of a serial number. So this is basically like a little computer.
It's firmware updateable. The inside looks a lot like a 5816 sensor. You've got your tamper. You've got your internal screw terminals if you're going to use it wired out to a wired sensor, and you've got your battery. No antenna anymore. The antenna is built right into the case design here, which makes it a little lower profile. We've been told already that this device...our initial feedback was, "It's a little bit bigger than we like." We like the 5811 sensors which are smaller. But we're expecting that they're going to release another sensor that'll be much smaller as well.
So, that'll be coming. But for now, this is the device to protect doors and windows if you have a Honeywell Wireless Lyric system. It consists of the contact and the magnet. When the magnet is on the side with the hash marks, there's a hash mark here and there's another one underneath this sticker here, these two hash marks indicate where the magnet needs to go. So basically, you're putting this on the door, this on the frame. When the door opens, the magnet is pulling away from the sensor, which is faulting the zone and going into alarm mode if you're armed to Away or Stay.
So, that's how the device works. Again, the 6CT, we're going to show you how to program that to the Lyric system. I just want to kind of go over the idea of programming on the Lyric. So, it's a little bit different than the LYNX Touch, and the idea is that they're expecting Lyric systems to be monitored, or at least Honeywell is. Not that the LYNX Touch wasn't a device that was much better used with monitoring. It certainly is. If you're planning to use just a local system, Lyric is probably not the right system for you. But if you're at all interested in total connect services or alarm monitoring services, then the Lyric has a lot of functionality and features that a LYNX Touch doesn't offer at this time.
So, you can program sensors directly at the panel here, or through AlarmNet 360, your alarm provider can program them in batches, a bunch of sensors at once and push it down to your system. As long as the sensors are installed and near the panel, they'll auto-enroll and learn into the panel. So if you're going to work with your monitoring provider for the programming, that's an easy way to do it. Or you certainly can just program them right to the panel locally, and then when you're ready for monitoring your monitoring provider can pull up all that data into the cloud. Your account at AlarmNet will have all of the information about what's been learned into the system.
And so, obviously, the AlarmNet 360 is not something the end user would ever do. So, we're not going to have a video on how to program it from the 360 website. But we do want to show you how to program it locally here at the panel. Because of the way this wireless technology works and that it's a little bit different than the traditional RF technology, one thing that you should always do with any Lyric installation is go ahead and program your first sensor as the furthest sensor away from the system.
So, if you're used to Z-Wave technology, we would say use the first Z-Wave device that's close and then build it out from there. This is the reverse. Go to the very furthest sensor that's going to be in your house, learn that one in first. That way, the system can analyze all the Wi-Fi in the house and has a much better chance of finding the best path back to the panel without any kind of interference. So, best practice when doing a Lyric installation is to learn in your furthest sensor first, and then go back from there to the panel and to the closest sensor here.
In this case, this is our first sensor. We're not in a big house, and with not a lot of Wi-Fi devices. So, it's kind of hard to show on video the right way to do it. So, I'm just going to tell you that that's the right way to do it. This will be our furthest sensor, and we're going to go ahead and install this first. But we want to just show you what's involved at the panel. Let's just assume this has already been installed out at that furthest door from the panel.
So, to do any programming on this system, the first thing you need to do is Security, followed by Tools. Tools is the same you're used to on a LYNX Touch panel. It asks for the master code or the installer code. If you put in a 4112, that's the default installer code and now we're in programming. Well, now we're ready to program. If we hit Program, now we can go to Zones and we can actually program the system.
So, this system supports 130 zones of protection from sensors. The first two zones are hardwired zones. So if you're going to wire zones right into the panel you would use those first two. Otherwise, starting with Zone 3 would be your wireless. Zone 3, 4, 5, and 6 are templated out as front door, back door, window and motion. It doesn't mean you can't change that and call this the living room door instead of the front door. They're just giving you a general head start, because they assume the system is going to be sold with three sensors and a motion, and a key fob, which is kind of the traditional kit design in the industry.
So we're going to go to Zone 3, our front door. The way that we designed this panel location happens to be the furthest 6 series sensor we're going to use. So it's going to be the first one we do. We hit "edit." We're into the screen where we're putting all the parameters for our device. And so, we're going to set our magnet aside for a second, and we're going to open up this sensor.
So, on the back, there's a back plate which removes, which you want to do that first. With the back plate removed, you see a little "Pull to Connect Battery tab." Once that pulls out, we're giving power to this unit. So we talked about a couple key differences in programming this system versus a traditional wireless Honeywell system. One of them is to do the furthest sensor first. The other one is to not give power to the sensor until the moment you're ready to program it in.
So basically, that powering up of the device is the first process of programming your sensor. So if you've already gone and pulled all your tabs, you kind of went a step too far already. It doesn't mean you can't make it work still. But it's not going to work as smooth as if you pull the tab right when you're ready to program. And so, to get to that ready to program state, you go into the zone parameters for the zone you're going to program, and you click into the serial number box.
We've already told you that these devices don't use serial numbers. But it still says, "Enter serial number," and really it's just the MAC address. So, you have RF Type 5800 down here. It's defaulting, thinking it's going to use a 5800 series sensor. You can toggle that, and now if it says, "RF Type Contact" it's actually a 6-contact and that's what this will be. But instead, I'm going to take it back to 5800 and let it auto-detect what it is. So to do that, very simple, we don't even have to open this device.
With the back plate removed, we simply pull this connector tab out, and there's an LED that flashes on the front. We give it about 20 seconds to kind of do its thing. So it's beeping and it's learning. So, can't get much easier than that, right? Not even faulting the device three times like we used to do. As simple as removing the battery tab, giving power to the unit. Learn in the sensor as the MAC address, and read/contact. To lock this in we can hit "done," or we can fault the device.
So now that it's kind of learned, if we put the magnet to the proper side of the sensor and simulate the door opening and closing, it's locked it in here. So you'll notice that this screen looks very similar to a LYNX Touch zone programming screen. Aside from the longer MAC address in the serial number box, everything else is pretty much the same. The other thing that is different, though, is this box in the top right. It used to say "loop". When it's a 5800 series sensor it'll say "loop", and you have to choose Loop number one, two, three, four, so on. Most devices are Loop 1. Some devices can do more than one action. You would select a unique loop to tell the system which action is happening.
In this case, because this sensor can be used as the sensor with a magnet or because it has that internal set of screw contacts that can be wired out to an external contact, it can also be used just as a wireless transmitter. Just to activate and send a wired contact going into an alarm can transmit back to this over a wire, which then wirelessly transmits back to the panel. Instead of choosing loop number one or two, it's actually saying "service read" or "contact". Because we activated it with the internal read switch, it learned it in as "read," which is what we want.
If we did have this wired out to another device, we would've activated that wired sensor to get it to learn in, and it would've learned in on the contact service. So, they tried to make it a little friendlier. To me, I think they could've done a better job. Because when I see "read", I'm wondering, "Is it the read in here? Or is it the read external?" Or if it says "contact", I'm wondering, "Okay, is that this contact? Or is that an external contact?" So, in this case they thought read meant internal read switch. Contact means external contact wired into the sensor.
As long as you auto-enroll it the way that we did, it'll pop up with the right service level. Obviously, if you have an issue when you come out that would be something to look at. If it's faulting and not restoring, that would be the first thing to look is, do we have this service set wrong? In our case, we want it read, and then we can move on to zone descriptor 1. Because it's a template zone, it's already saying "front door", "device type door". Zone descriptor 1 is front. We only have one front door in this property, so there's no reason to add a secondary clarifying word over here. We're just going to leave it "front door". If we had two front doors, we could call it "front west door", "front east door", or "front left door", or "front right door". So that's why you have the option for another zone descriptor. But again, for our purposes "front" is enough.
It will speak this word as well, the device type. If it was going to go on a window, you change it to "window". For our purposes, it's going on a door, so we leave it as a door. This front door is a door that we use when we come and go from the property. Therefore, we select the response type of entry/exit 1. If this was a door that we did not use when the system is armed, we would want to select "perimeter" as zone type. The difference between perimeter and entry/exit 1 is how quickly the alarm will go into alarm mode when the sensor is activated. In the perimeter response type, it'll go into alarm right away, no delays at all. Same idea, if you arm the system and exit through a perimeter door, you'd have a false alarm on your way out. But on the doors you use to come and go, when you make an entry/exit 1, it'll follow the delay time.
The default entry delay is set 30 seconds, and the default exit delay is 60 seconds. Which means, when you arm the system you have 60 seconds to open and close this door without setting off an alarm. As long as the door is closed and you're out within 60 seconds, you're good to go. When you come home and you open the door, you have 30 seconds to get to the keypad and turn it off, or disarm it. So, entry/exit 1, because this is going on a door that we use when the system is armed.
Then, the last three questions are, "alarm report", "chime", and "supervision". Alarm report is whether or not this sensor activation will report to a central station. In this case, we want that to be "yes". The system will be monitored, and of course we want to know if our front door goes into alarm. So we have that set to "yes". The chime is an option, and it's what noise will be displayed or enunciated at the panel when the sensor is faulted in the disarm state. So, if a door opens when the system is disarmed that's called a fault, and a chime is a noise that happens when you fault. You can choose. There's a few different tones or noises that are programmed into this system that you can choose from. So it's a personal preference. I'm going to stick with the standard chime for now, and let the homeowner choose the one that they like best later. So we're going to leave it "chime standard" and that supervision.
Just like with the 5800 series sensors, you want your protected zones to be supervised. That just means the panel will know if it loses connection to this device and/or if this device has a low battery. It can throw up a low battery issue alert or trouble alert. It can also throw up a supervision trouble alert. So you know in advance that this device is having an issue. All right. So basically, we've answered every question, selected every box with the right parameter we want. We can put our back cover on here. Although, when we install it we're going to pop it off again. But just so we don't have it tamper when we come out of programming, I'm going to put this in place, close it down, put the magnet to the right side of the sensor and save our zone parameters.
You could see right away, very cool. We can see a strong battery level and a strong Wi-Fi, or six wireless signal strength back to the panel from this device. Of course, this close we wouldn't expect anything other than that full bars. But now we know visually, if we take this upstairs, we can see if we lose this little bit of signal. It's just a really nice way right in programming to see, "Okay, that health of all my sensors are good. Everyone's got a good, strong battery, and everyone's got a good, strong wireless signal back to the panel."
So, we've programmed our front door. If we exit to the home screen, we are ready to arm and we can simulate the door opening. So this is on the frame, the sensor, and the magnet is on the door. When the door opens, we instantly get a "not ready to arm" fault. Open three, "front door" is displayed here. When we hit zones, we can see "front door is faulted". As soon as we put the magnet back where it belongs the fault goes away, the "ready to arm" goes back to green, and we're good to go. You may say, "Well, why didn't it chime? You told me it would chime when we were faulted in the disarm state." Good question. If you go to Settings and Turn Chime On, it's not on by default. Now, when we open the door to simulate the fault [chime 00:16:04] you can hear the panel literally said, "front door", along with that beep-beep standard chime that we selected.
So we close it up. It goes back to "ready to arm," and that's showing that we've properly programmed this device to our Lyric system. So that is a sensor programming video on the 6CT, which is the wireless Lyric door and window contact. We hope you've enjoyed this video, and if you have any questions on programming your sensors to your Honeywell Lyric system, please do email us support@alarmgrid.com. Also, make sure to subscribe to our channel as we continue to evaluate and dig deeper onto this system. We're going to have a lot more videos coming out around this revolutionary new system. So, subscribe and you'll be up to date.
- Uploaded