Honeywell 5834-4: Program to an L5100
Related Products

Related Categories
Description
This video explains how to program a Honeywell 5834-4 Key fob to a L5100 security system.
Transcript
Hi DIYers, Sterling from Alarm Grid here, and today we're going to show you how to program a 5834-4 wireless key fob to our Lynx Touch wireless security system.
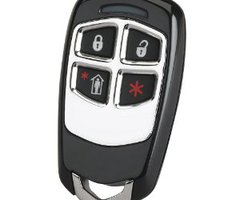
The key fob comes in an L5100PK which is the popular kit that comes with three door and window sensors, one wireless motion, and one wireless key fob, along with the panel, of course. Key fob is a very handy device. It goes on your key chain. It allows you to one-touch arm the system, disarm, arm to stay mode, and then there is a fourth button which can be pre-programmed to do anything you'd like. Most people use it for a panic button.
Of course, all of these buttons can be programmed to be anything, but that is the typical way to go ahead and set this up. So we're going to now show you how to program this to your system so it will work. What you're going to need is your installer code. That's the special four digit code that gets you into the programming menus of the Lynx Touch, different than your master code that you use to arm and disarm. By default, the programmer code is 4-1-1-2.
So from the home screen, which anytime you need to get to the home screen,you press this hard touch key at the bottom right. We're on our home screen. We go ahead and click on More and then Tools. Here's where we're going to enter our installer code 4-1-1-2, and we are now in programming. You're going to click on Program. And different than when you're learning your doors and your motions, which is done under the Zones menu, key fobs are actually programmed in under Keys.
The reason it's a separate menu is that each button on the key fob is a separate zone. This way, actually, you learn all four buttons in a quicker way than individually assigning each zone. It also groups them together so it keeps your zone programming kind of in a nice and neat order. So we're into our key programming. We have no key fobs programmed in yet, so there's nothing showing. What we're going to click on is Add New at the bottom. It gives you a default template here. So Four Button, most key fobs are four. There are available dual button programming as well, so you could go for more buttons but we're going to show you the four for now.
First thing that you want to do is click into Serial Number. And just like all wireless devices, with Lynx Touch there is an auto enroll mode. Or you can simply type in the serial number. So if you wanted to type it in, just like every device there is an 'a' for 'alpha', followed by three numbers, dash, four numbers. Those numbers, not the alpha, those seven digit numbers, that's the serial number. So you could type 0145042. Click done. You would learn it in that way.
We're going to show you also the auto enroll mode, even easier. So you would click in Serial. Let's clear it out as if we didn't just do that. And the easiest way is to just simply activate the button three times. Now with the 5834-4, to reduce false alarms on the panic button, all of the function keys you actually have to press and hold for three seconds for them to actually activate. So we're going to auto enroll by pressing and holding for three seconds. That was one activation. You hear the panel beep. Nothing has shown yet. Second time, press and hold. It actually gives us the serial number along with the loop number of that button. And then the last time you press and hold, it kicks you back out to this screen. The device has been enrolled.
So, like I said, each button is a separate zone. You can see button key one, zone 49. Button key two, zone 50. Button key three, 51. And then button key four, zone 52. By default, it's going to set it up to match the icons on the key fob. So the Lock icon is your 'arm away'. That means all zones are protected, motions indoors and windows. Our Unlock icon is the 'disarm'. Our icon with the man inside the house is' arm stay' which is, again, where the motion detectors are de-active, but your doors and windows are active. And by default it does not program the panic button, so you'll see no response. If you want the panic, all you have to do is click in the no response, choose your response type. Most panics, you do either 24 hour silent or 24 hour audible.
For us we're going to use this. We're going to have it on our bedside table. At night, if we ever hear something that sounds suspicious in the middle of the night, we want our siren to go off, so we're going to program it to be 24 hour audible. Simply click it, and now we've mapped our fourth button to this 24 hour audible. It auto enrolls the correct loops so all four of these zones are programmed with the same serial number. But each of these zones has a special loop assigned to this button. This auto enroll mode is smart enough to pair the button to the right action. The last step before you save is that every key fob needs to be mapped to a user.
So within the Lynx Touch you have your master code. That is user 02. The installer is actually 01. You don't want to map a key fob to your installer codes, so you want to start with the master. And if you have sub users, so maybe you and your wife have separate codes or you and your kids have separate codes, what you would do is each person that has a key fob you can assign each fob to a separate use number. For us, we just have our master, so we click on User. It actually shows our different users that we do have, but because we only have one key fob we're just going to assign it to master.
You now have your device paired to the serial number, and you have your device paired to a user. You can click Save. It now shows we do have a key enrolled here. You can add additional keys. The Lynx Touch can handle up to 63 wireless zones so there's plenty of room to add additional key fobs so everyone in your family can have one. Go ahead and back out. Make sure when you're exiting Program to always allow re-entry, otherwise you'll lock yourself out of programming. You'll have to go through the sequence to get back in. It's much easier to just allow re-entry. Click Yes. Back out one more time to the home screen.
Now, to verify our programming is correct, we're going to go ahead and arm to away mode by pressing and holding. System responds. We have our 60 second exit delay. Just to confirm the disarm is also working, we're going to press and hold the Unlock icon. System disarms. Show you the armed stay. Press and hold. So now our motions are de-active, but our doors and windows are active. That's good for night mode. Once again we're going to show the disarm.
And finally, I'll show you the panic. So again we set it to audible. It's going to be very loud. But you press and hold. Let's do the disarm. And our 5834-4 has been successfully programmed to our Lynx Touch wireless security system.
If you need any help programming your key fob or choosing the right buttons, please give us a call or e-mail us at support@AlarmGrid.com.
- Uploaded
- Duration: