Setting Up The 5800C2W with a Lyric Controller
Related Products
Related Categories
Description
In this video, Joe from Alarm Grid shows users how to conduct the installation for a Honeywell 5800C2W. This is a wired to wireless converter module that allows hardwired sensors to be used with a compatible 345 MHz wireless alarm control panel. This includes the wireless AIO Honeywell Lyric System.
Normally if a user gets a new wireless system like a Lyric, they will just buy compatible wireless sensors. But not all users are starting from scratch. They may have an existing hardwired system and sensors. If the hardwired sensors still work properly, then they don't necessarily need to be replaced. A wired to wireless converter module like the Honeywell 5800C2W will let the user extend the lifespan of these sensors by integrating them with their new Lyric System.
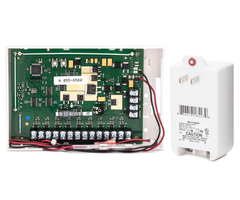
The process for setting up a Honeywell 5800C2W starts with connecting hardwired sensors to the module itself. The 5800C2W can support up to 9 hardwired zones. It cannot support any life-safety sensors, such as smoke detectors and carbon monoxide sensors. It is designed for security sensors only. Users often find that installing the 5800C2W in the old location of their previous wired panel is a good idea. This way, they can conveniently connect all the wired sensors right to the 5800C2W.
The 5800C2W will also require power. it uses a 15.5VDC plug-in transformer as its main power source. Using a backup battery is also recommended in case the electricity goes out. All of the appropriate power connections should be made. Remember to follow proper polarity when wiring. From there, all of the hardwired sensors can be learned-in with the Lyric Controller. The user should put the system into its wireless enrollment mode and activate the hardwired sensors to learn them in.
The 5800C2W will send out a wireless 345 MHz signal to the Lyric whenever one of the hardwired sensors is activated. The Lyric will then treat the 5800C2W zones as any other wireless system zones. One thing to remember when using a 5800C2W module is that any trouble conditions affecting the module will always appear on the lowest calibrated zone.
http://alrm.gd/get-monitored
Transcript
Hi, DIYers. Joe here from Alarm Grid. And today, we're going to talk about setting up the 5800C2W with a Lyric controller. Now, there's a bunch of reasons which you may want to do this. One of the main ones is if you have an existing wired panel in the house and you want to continue to use the wired zones that are attached to the panel, but you're replacing the panel entirely and replacing it with the Lyric controller. What the 5800C2W is going to allow you to do is land nine hardwired zones onto the 5800C2W and then program them wirelessly into the Lyric controller. So let's cover the 5800C2W first, and then we're going to show you how to program it into the system. So right here, we do have a 5800C2W. This works on the 345 megahertz frequency, which all the 5800 devices also do work on. And they are compatible. And it is compatible with the Lyric controller. As you can see, the board does have a bunch of terminals on it. These terminals down here are where we're going to be able to land your zones. The device itself is going to be able to take nine hardwired zones and program them into the Lyric system. It also has your DC power input. It gets 15.5 volts of DC from its provided transformer that you will get in the box when you order it. And it also has a power output that you can use to power some devices. It doesn't provide a lot of power, though. So it's not really recommended to be used as a main power source for DC power devices. There's a few things that you're going to want to check, though, before you do install the 5800C2W. If your wired system is currently working and it's on, we do recommend that you go around the house and you open and close all the doors and windows, activate the motions, and find out what zone number all of the zones are so that you can correspond them to the zones that you want on the 5800C2W and even label them before you place them on the unit. After you power down your main system, it's going to be kind of tricky to figure out which wire is which, and this will save you that step. There's another thing that you can do, is that if the power cable or the power wire that provides the AC or DC power to your main wired system works, you can actually continue to use that wire. You just have to undo the transformer at one end of it and then, obviously, take it off of your main alarm system, connect it to your 5800C2W, connect the 5800C2W's transformer to the other end of that power cable. And it will be able to provide power. There's a couple of things that you may also be able to take from your main alarm system. One of the main ones is resistors. On the 5800C2W, the way that it actually sees that a zone is connected to one of the terminals is that it needs to have a 1 to 10k resistor attached. The unit does ship with nine 2.2k resistors, which will work if you don't have them available. But if you do find that the existing alarm wiring does have resistors attached to it in your main alarm cabinet, then you can simply take those wires off of the terminals, put them on the 5800C2W, and it will work just fine. One of the other important things to know about the 5800C2W is that it reports all of its trouble conditions on the first zone that's calibrated. So there's nine zones on the 5800C2W. And when you install all of your wiring, the lowest numbered zone is going to be your first zone calibrated, which will send the trouble signals to your alarm panel. This can get confusing to some customers if you don't know exactly what to look for. How this will show up is that, let's say you install just one single zone on the 5800C2W. As you can see, we shunted zone number one with a resistor just to show this process. This is now seen as closed. So when I go to calibrate this, that's going to be the first calibrated zone. When I program the 5800C2W into the system, all the trouble conditions are going to report on that zone. So if I have that zone labeled as front door, it could get confusing if it says, front door tamper or front door AC loss or front door low battery. It doesn't mean that the front door itself has a low battery. It means that the trouble condition is actually on the 5800C2W and it's just using that zone to report. If you don't want this to show up like that in your main alarm system, you can actually program the first numbered zone into the system with loop number 4. And as you can see, the serial number for the 5800C2W is on this sticker right here. We're going to show you how to program this into the system in a minute, because you're not going to use that explicit serial number. There are actually different numbers that you use from zones 1 through 9. You're just going to add those numbers onto the 0 that you see at the end. We'll show you this on the Lyric in just a moment. Something else you can do with your existing installation is that the 5800C2W can mount in your existing alarm cabinet, or most alarm cabinets. But you probably won't want to put it in there because the metal enclosure is going to shunt the signal. The existing alarm, if it does use a 12 volt 4 amp hour battery, you can continue to use that as a backup battery for the 5800C2W. It's recommended to keep that in the existing alarm cabinet, as it makes installation easy. We just recommend that you install the 5800C2W right outside of the cabinet. And then you can simply route the power wire for the battery into the cabinet, which will give it that backup power. The last thing to know about the 5800C2W is that if you have a requirement of more than nine hardwired zones to program into your system, you can use as many 5800C2Ws as you like. You just need to have different ones for all the other zones. If you're going to use multiple 5800C2Ws, they're all going to need their own power transformer, and they will need their own backup battery. So now, as you can see, we have zone 1 closed on the 5800C2W. Let's see how to program this zone into our Lyric system. Now we're ready to program the 5800C2W into our Lyric controller. We are going to want to do a couple of things on the 5800C2W first, though, before we program it out. So on our device, you can see that there's two buttons right here. The second button down is our calibration button. And what that's going to do, it's going to tell the 5800C2W which zones are connected to it. Now, it's only going to read the zones that do have a 1 to 10k resistor connected to it. And those zones do have to be closed. So if you are installing your zones on the 5800C2W and you have an open door or window, it won't read that as a zone. But as you can see, we only have one zone shunted out, with a 2.2k resistor on zone 1. I did calibrate it before, but just to go through the process, I'll do it again. So I clicked the calibration button. It goes through. And the first light turning green means that it's calibrated. This means that the C2W sees that it only has one zone connected to it. Now, when we go to program it into our system, the zones actually go from 1 through 9. So as you can see, the serial number is 0343510. This number, we're going to have to add 1 to if you're programming it in manually. Or, as we're going to do it, we're going to learn it in. It's going to show up as 0343511. Zone 2 would be 12. Zone 3 would be 13. So on and so forth. The way that I'm going to do this is actually loosen up this terminal. And I'm going to remove one leg of the resistor, and that should allow it to be learned into our Lyric controller. So let's head over to programming and see what that looks like. So now on our Lyric controller, we have to go into zone programming. So I'm going to hit the Tools button, enter our default installer code, 4112. Program, Zones. And then the first two zones are the hardwired zones. And the rest is templated as the Lyric has been defaulted. I'm going to hit Front Door and then Edit. So now I'm in this zone programming. I'm going to click serial number, and now the system is in learn mode. So I'm going to go back to my C2W. And I'm going to loosen up that resistor that we saw in zone 1 to open the zone because I don't have a contact connected. And then I'm going to replace it. As you can see, we got one beep. So I'm going to do it a second time. We got two. I'm going to do it a third time. And there you go. Just like any other 5800 device, it learns in with the three beeps. All the zones in the 5800C2W are going to be loop number 1. And as you can see, that serial number, it is the serial number that we saw. And they added 1 onto the end of it. That shows us that that's the first zone of the terminal set in the 5800C2W. The rest of the programming, you just program it how you'd like and name it how you'd like. And you'll be all set. Usually zone number 1 will be the front door. So Front Door. So then response type is Entry-Exit. Alarm Report, sure. Time is standard. Supervision is supervised. So as we're all set, we're going to click Save. We'll back out to the main menu. And just to prove that it works, when I open this zone, we should see that the front door is open on our Lyric. [THREE BEEPS] Enter front door. The reason that we're seeing the tamper on the front door is because we do have the cover off of the 5800C2W. But it is working as expected. If you do have any questions about the 5800C2W, installing it on your Lyric security system or security systems in general, feel free to head over to our website, www.alarmgrid.com, send us an email to support@alarmgrid.com, or give us a call at 888-818-7728. If you did enjoy the video, feel free to subscribe. And if you want to get feet notific-- if you enjoyed the video, feel free to subscribe. If you want to be notified when we post future videos, hit the Notification button below, and we'll send you an update when we do so. Thanks for watching and have a great day.
- Uploaded