Setting Up The Slideshow Feature on the Qolsys IQ Panel 2 Plus
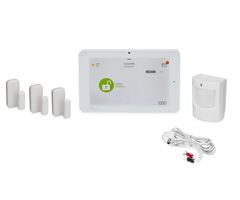
Related Products


Related Categories
- Wireless Touchscreen Alarm Panels
- Small Business Security Systems
- Monitored Home Security Systems
- DIY Wireless Security Systems
- Apartment Security Systems
Description
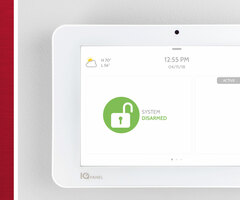
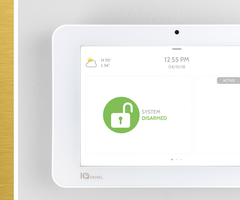
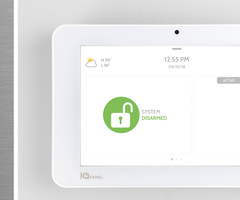
In this video Jorge from Alarm Grid shows you how to set up the slideshow feature on the Qolsys IQ Panel 2 Plus. This is a cool feature that can have your system work like a digital picture frame when it is not in use. This can be more inviting and pleasant than having it appear as a security panel.
In order to use this feature, you will need to load pictures to the IQ Panel 2 Plus System. The camera has a MicroSD port that you can use to load images onto the system. Any image you load must be in a folder called "Photos" on the MicroSD card. The minimum size for any image is 800 by 480 pixels. The maximum size for any image is 1280 by 720 pixels. No image can exceed 5MB. All images need to be in the .JPEG format. The MicroSD card must be formatted in the FAT format. The ExFAT and NTSF formats will not work. Remember, formatting will delete anything that is currently on the MicroSD card, so make sure to do this before adding the images.
When you put images onto the "Photos" folder on the IQ Panel 2 Plus, make sure they appear in the order that you want them to appear when the system runs its slideshow feature. You will add new photos through the Photo Frame option, which can be accessed after pressing the small grey bar at the top of the screen. You can then click the Add button to add new photos to your panel slideshow. Click any image that you want to add so that it is highlighted. You can then add the images to the existing slideshow. You can also replace the current slideshow with the image you have selected. This is useful if you want to get rid of the stock images that come pre-uploaded onto the Qolsys IQ Panel 2 Plus System. The Settings option in the Picture Frame menu will allow you to adjust the settings for the slideshow.
http://alrm.gd/get-monitored
Transcript
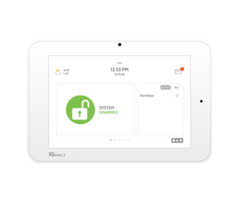
Hey, DIYers. I'm Jorge from Alarm Grid. Today I'm going to be showing you guys how to setup a slide show feature on the IQ 2 or the IQ 2 plus. Doesn't matter what size I'm using, it's going to be the same set up on both of them. Now the IQ 2 has a little slot on the side, on the right hand side if you're looking at it from the front, and that little side compartment is where your micro SD card, this little chip right here, is going to go plugged into. Now before you go ahead and start just plugging in any micro SD card into the system, you do need to follow a couple of guidelines and you also need to make sure the images that you're trying to set as the screen saver on your IQ 2 plus follow these specific formats. Now the images that you download onto this little micro SD card, they first need to be placed into a folder that's called the photos. The next thing you have to worry about is the size of the images. So the size of the image needs to be 800 by 480 minimum, and that's pixels or 1280 by 720 maximum. All right. Now another thing you want to make sure is that the images are in JPEG format, and that the actual size of the image does not exceed more than five megabytes. Now before you actually download images onto your micro as the card, you do want to make sure that it is formatted the correct way. Now when you format it, it's basically going to erase everything that's on the SD card. So make sure it's completely empty. You are going to need to Google how to format an SD card, if you don't know how to do it. it has to be done through your computer and you have to do it with like some settings and everything. So you want to make sure that you're formatting the SD card, and it needs to be formatted as that. It does not work as exFAT or NTFS. Once you have formatted the actual SD card, now you can start adding the images onto your SD card. Now one thing you want to make sure is when you putting the images into the SD card, you guys are adding them in the order you want them to show up on the slideshow. That way when you add them to your IQ 2 Plus, you can just download them in that same order and that way your slide show will have a specific order, the order that you want. Once you've added all the images to your SD card, it's formatted the correct way. All we have left to do now is plug this into the little side that I showed you guys earlier in the video. And we're going to access the slideshow feature on the panel. So you guys won't be able to see the little side compartment right now as I plug it in. But it only goes in one way. So I'm going to plug this into the little side right here you're going to push it in, so that it clicks. You will hear the click or you can even feel the click. I'm going to tap on my top button here for the screen. I'm going to go down to photo frame, and from here you can go to add. And now if you guys have a bunch of images uploaded onto the SD card, make sure if you don't see anything at first you give it a second or to show up. All right. I only have about five images that I'm going to show you guys how to upload to the panel right now. So might not upload it pretty quickly, but if you have like 20 images, which by the way that's all that you can put in that photo folder then you're going to want to give it a second. So now from here, you can do add new photos. So you can just press that. Well, actually it's letting you know please select at least one photo to proceed. So you can check them all. You can highlight them. You'll see a orange border surround them, and then you can hit Add New photos. You can do replace all photos. So if you want to get rid of the stock images that come with the IQ 2 Plus. Some of them are actually pretty nice in high definition, but if you guys want to get rid of them and upload your own images, you can do so. Just replace all photos. It says please don't remove SD card while copying. Do you want to proceed? I can hit, OK. And it gives you a little loading bar, and now everything should be added onto here. Whoops! Let me deselect all of it. I'm trying to figure out where the normal images are. I'm going to back out to the Home screen real quick. Go here. Go back into photo frame. Now you see before we had a whole bunch of stock images, we just replaced them all because we did the release all photos. And now we only have the images I added. You guys again you can always add more. Let me go ahead and go back now. Now you see here it's actually asking you where you want to get the images from. So for instance, I wanted to get my images from the SD card. So mine automatically load it up from there. Give me one second. Let me go back to photo frame. You even have a little video here, that says, how do I load my own pictures into photo frame. So it's actually the videos that come with the IQ 2 Plus. So if you guys, you did a look back at something as well. You can find our video. You can also use that video as well. I'm just going to hit the back arrow key. All right. So after we have all of the images downloaded onto the panel from the SD card, now we can go in and play around with the settings for the slideshow. That's actually if you just -- I'm just going to go to the Home button to show you guys. I'm going to hit the top gray button, the little gray pill. I'm going to hit photo frame. And remember we had a whole bunch of stock images at first. I replaced them all with the images on my SD card. Now I can go in and go to Settings in the top right instead of add. You can go to Settings. The duration. each photo frame image will display for one minute. You can change the duration to two minutes, five minutes. So one minute, two minute or five minutes is your photo duration for each image. Effect. So you can at effect between the photos changing. You have a dissolve or fade to black and then bring in the new image. So you guys can choose which one you guys want to use as well. So there's two options for that. Shuffle. So if you guys wanted the images to be in random order, you can do that. If you guys don't want them to be in random order, you turn the shuffle off. It's just on or off. I'm going to leave mine set to shuffle. Display type. So when touchscreen is enacted the display is photo frame. You can put the display type weather and clock, or you can put the display type to off. So if you don't want the photo frame, you would switch that option to off. Obviously, we're doing this video for photos, so you're going to want to enable photo frame. Now the photo frames start time. That's when the photo frame is going to start depending on the last time you touched the screen of the IQ 2. So, let's say I want to bring it to the lowest which will be five minutes. You have five, 10, 15, 20, 25. So increments of five between five to 25. I'm going to set it to five minutes, just because I want my photo frame to show up as quick as possible after the last time I touch the screen. All right. So now we have night mode start time, night mode end time and night mode settings. So before I get into the night mode start time and the night mode end time, I'm just going to look at the night mode settings. So this is what you're going to want night mode to control. As you see here, I actually have it set to the display, the voices, and the chimes. So what this means is that if I have my night mode start time set to 11:00 PM, I'm just going to hit set. That means at 23:00, which is 11:00 PM, whatever I have enabled in the night mode settings which is my display voice is in chimes, that means all of that will be basically put to sleep. It will tell basically all stop working, right? Not stop working on the panel, the display will go off, there won't be any voice annunciation, and they won't be any chimes. so that It's not to disturb you, hence nighttime. The night mode end time this is whenever you want everything to wake back up. So when you want your display to start, to power back on, or to illuminate again, when you want your voices to start working again and when you want your chimes to start working again. So you can play around with the night mode end time as well. And then after you're done making all your changes in the settings for the photo frame, if you just hit the little house icon here on the bottom, it'll bring you back out to the main screen. And within five minutes you guys should start seeing the photo frames start scrolling through the images. All right, guys. So the five minute timer has passed. Remember I had set it to the five minutes to the lowest time. And now you can see we have our first image here. And remember it's one minute, I think it was one minute, between the images. Again that time could have been adjusted, but in another minute or so you should see the next image come up. But this is what our photo slideshow looks like right now. Obviously your photos are going to be different. Unless you want to use our photos. But, yeah. You're going to have your own photos on your own SD card. They're all going to be showing up on here. And just play around with the settings, get it to whatever you like. Remember pay attention to the formats of the SD card and of the images. If they're not loading onto the panel, it could be because there's something wrong with the format of the image. But, yeah. If you guys have any questions whatsoever, feel free to send us an email to support@alamgrid.com. If you found the video helpful make sure you hit like underneath, subscribe to the YouTube channel and enable notifications so whenever we upload new content you guys get notified. I'm Jorge and I'll see you guys next time.
- Uploaded