The 2GIG GC3e: Syncing the Time
Related Products


Description
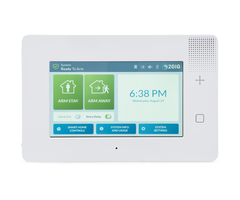
In this video, Jarrett explains how the time is synced on a 2GIG GC3e. If the 2GIG GC3e System is monitored and set up with the Alarm.com service, then the time will be automatically synchronized based on the Zip Code set for the user's Alarm.com account. When the Zip Code on the Alarm.com account is updated, the time associated for the Zip Code will be pushed down to the panel. The time sync may not occur right away, so just be patient. You can try to get the sync to perform more quickly by power rebooting the panel. Once the panel powers back on, syncing with Alarm.com will be one of the first things it does. And with the sync, the time will update based on the set zip code.
It is important to note that an Alarm.com end user is not able to change the Zip Code on their own account. Only the user's alarm monitoring company is able to update this information. The user should contact their monitoring provider and ask them to change the Zip Code if the current information is incorrect. Again, the displayed time and date will update once the information is pulled from Alarm.com, and the "sync" takes effect. The only way that the user can manually change the time locally at the panel is if the GC3e System is not monitored, and therefore, not set up with the Alarm.com service. There is a menu option within the system where you can make time and date adjustments manually. But remember, you can't do this if the system is set up with Alarm.com, as whatever time and date you set on the panel will get overwritten once the system fetches the current information from Alarm.com. One good thing about the fact that the panel automatically gets the time from Alarm.com is that you will not need to update the time for Daylight Savings. Alarm.com will do that for you!
https://www.alarmgrid.com/faq/how-do-i-sync-the-time-on-my-2gig-gc3e
http://alrm.gd/get-monitored
Transcript
Hey, DIYers. Jarrett here from Alarm Grid. Today, we're going to be going over how you would think the time on your GC3e. You don't have to do that, actually. Basically, when you have the GC3e setup with an alarm.com account, the time zone is actually synced directly to the panel. There is a specific zip code that is set within the alarm.com account, which basically sets the time zone for that GC3e. So if you're in Florida and you have a specific Florida zip code, then essentially, the panel is going to be set to Eastern Time Zone due to that zip code that is set within the account. So if you ever wanted to change the time zone on or within your alarm.com account-- sorry. If you wanted to change the zip code within the alarm.com account so that your panel can show a different time zone, then you would have to contact the alarm monitoring company so that they can go ahead and access your account and change that zip code for you. And whenever they change that zip code, again, the time zone is going to be automatically pushed down to this panel. Sometimes, it could take a little bit for it to go ahead and be pushed down. But it will automatically sync over, so you don't have to do anything. And then when it comes to daylight savings time, it's the same exact thing. You don't have to change anything at all. That's already automatically synced to your GC3e. It's already preset within the alarm.com account. So nothing you have to do. If you ever did want to make that change, then you would have to contact the monitoring company to go ahead and change the zip code that is shown on the account. So if your GC3e is not connected to an alarm.com account yet, that's fine. You can manually change the time zone on the panel. Whenever you change the time zone on the panel and you set up that system with alarm.com, the time zone that is going to show at that point will be the one that's set up within alarm.com-- so again, that zip code. That zip code that is set within that account will automatically push that time zone that's associated with that zip code to the panel. But if you do want to go ahead and manually change the date and time on your system, it's very easy. You would just have to go into the System Settings and use your master code. So down here at the bottom right, you have the System Settings. If you tap on that, it'll bring up this keypad, and you want to enter the master code. The default for this panel is 1111. And now what you want to do is go into Date and Time. It should normally be on the second row, so tap on it. It's going to bring you to this window here. Over on the left as, you could see, you have Set Date. So right here, you have month. In the middle, you have day. And then over to the right, it is year. So basically, let's say we were in November. You just go ahead and drag it until you see November. If you want to change the day, go ahead and drag it to, let's say, November 30. And then the year, we'll go back to or we'll go up to 2035. So if everything you've confirmed is good to go, then you would just go ahead and tap on this green arrow over here or the check mark. But before you do that, you want to make sure that the time is setup correctly, too. So over on the right side of that, you're going to see Set Time. You have hour, minute, and AM and PM. So if it's 6 o'clock, let's say 6:55 in the morning, you go ahead and drag the hour until you see 6. You drag the minute to 55 or whichever time it is at that moment. And then if it is AM, you want to switch it to AM. If it's PM, you just drag it up and go to PM. And then once all of that is confirmed, then you go ahead and tap on the green check mark. So we'll go ahead and see if we can set it to 2035. And there you go. Once you click on the check mark at the end, it's just going to take you back to the main screen. And if you want to go ahead and hit the back or go back to the main screen, as you can see here, it's November 30. We are in the year 2035 at this point. And it is now 6:55 AM, even though it's 10 o'clock right now. So that is how you would go ahead and manually change the date and time on your GC3e. But again, keep in mind, once you set up that panel with an alarm.com account, it's going to automatically sync the time zone that is set within that account. So if you wanted to go ahead and have your monitoring company change the time zone for you, first what, you want to do is make sure that your system is setup with an alarm.com account and a monitoring plan. The GC3e can't just connect to alarm.com by itself. You have to go ahead and set up a monitoring service with the alarm company. Now first, before you do that, you need to make sure that your system has a compatible LTE communicator. This system cannot use 3G communicators, especially with the pending 3G shutdown coming up. So there are two LTE communicators that are compatible with this panel. You have a Verizon LTE version and then you have an AT&T LTE version. That's if you're in the US. There are specific Rogers and Telus communicators available if you were in Canada, as well. But for the LTE ones for the US, then we're going to be looking at the LTE-- or I'm sorry, LTEV1-A-GC3. That's the Verizon LTE communicator. And then you have the LTE-A-A-GC3, which is the AT&T LTE communicator. Both work perfectly fine with this panel. We have plenty of customers right now that use them and they work great. Once you confirm that you have that, then the next step is setting up a monitoring plan that can support the alarm.com service. If you want to go ahead-- or if you don't have service already and you want to be monitored through Alarm Grid, go ahead and check out the monitoring plans that we have. The link is in the description below, and you can go ahead and check out all the different plans we have for alarm.com. And once you have that setup, then the next step-- or once you have the monitoring service setup and you have alarm.com activated, then the next step is contacting the alarm company and having them change the zip code that's on the account. Depending on whichever you are, go ahead and give them the correct zip code. And then the alarm.com account will just automatically sync those settings or the time zone to this panel. Now, as I said, the sync isn't going to be immediate all the time. Sometimes, it can be. But if it's not showing immediately, you can do a reboot. And once you've done rebooting the system, then it would show up with that new time zone or the new time. If you want to go ahead and reboot it, you can just mainly reboot it by taking the system off the back plate. You just open it up and then you unplug the battery backup. And then you find the power transformer that is plugged into an outlet that's currently powering up the system. You want to unplug that, too, so the system completely powers down. And then once you've confirmed the system's powered down, just go ahead and power it back up. Plugin the battery backup and then plugin the transformer, and you're done. Once it's powered up, then you should be able to see that new synced time zone that should be showing up on the panel. The last way to go ahead and change the time zone on your system is by accessing your alarm.com account through the website. If you want to go ahead and do that, it's very simple. We're going to go ahead and show you how to do that real quick. OK. So if you wanted to go ahead and change your time zone through the alarm.com accounts, just go ahead and log in to alarm.com through the website. Right now, we are logged into the account through the website at the moment. It's just alarm.com. That's basically what it is. And then once you're logged in, you're going to go into the system Settings. So just tap on the hamburger button at the top left of that screen, depending on the interface that you see here. And then go ahead and type on Settings, and you want to go into Account Management. Once you're in here, hit that hamburger button again and you're going to go to System Information. And then you're going to be within the account management window here. And at the bottom, you'll see Timezone. Right now, it is set to Eastern Standard Time. If you want to go ahead and change it, you just tap on the dropdown or tap on that box, and you'll see all these different options right here to go ahead and change your time zone. So wherever you are, just go ahead and make sure that you're choosing the right one. Once you've done that, just tap on Update, and then it's going to automatically sync the time zone to your system. And that is how you think the time zone on your 2GIG GC3e system. If you have any further questions about the GC3e, or alarm systems in general, please reach us at support@alarmgrid.com or go to our website, alarmgrid.com. If you found this video helpful, please Like and Subscribe. If you want notifications of future videos, please click the bell icon. This is Jarrett from Alarm Grid. You have a wonderful day.
- Uploaded