Add a Honeywell GSMX4G to a VISTA Security System
Related Products


Related Categories
Description
Add a Honeywell GSMX4G to a VISTA Security System
Transcript
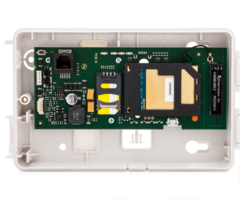
hey DIY is Dylan here with alarmgrid today we are gonna be talking about how to wire in a GSM x4g communicator now we have a model here this is not the GSM x4g this is a LTE X V this is a Verizon module it's one of the newer verizon moderates on LTE network the wiring is exactly the same for this and the other module so we're just using this as an example today I just keep in mind that this is the LTE x 4g the Verizon LTE communicator while the GSM X 4G is an AT&T 4G communicator so to start the communicator gets its power from four wire ECP connection most of time when you're doing these installs it's going to draw power directly from a panel from the ECP bus terminals right there those buses are five through six so four or five six seven four four through seven actually sorry so for the wiring I'm gonna begin to actually how to wire it a little bit later on I just want to talk about more the communicator in the meantime so as mentioned most time you're gonna be doing the wiring directly to the panel sometimes if the panel has too much power being drawn from it already this will not be able to get the proper power needs to operate the operating voltage is about let's see it is about 12v DC for this so if the panel is gain too much power drawn from it another way you can set this up is by using a 24-hour backup battery as well to provide power to the communicator so for the communicator if you're gonna wire it into the battery you're gonna have to have the ground B common from both the panel as well as the battery since you should black wire right here and then that way you can get the proper power it means if of course the panel cannot provide the proper voltage so the operating current for the communicator is about 65 mega milliamps just on standby so when it's not sending out signal when it's not receiving anything when it's kind of just sitting there about 65 milliamps when it does actually send out signal it's gonna be operating about 250 milliamps so that's it either sending out a signal or receiving a signal so there are a couple features about the communicator I want to talk about first the communicator does have a flip open cover so it's consistently connected to the communicator you can't lose to cover or anything flips right up exposes the inside as you can see here we have the Verizon SIM card since this is the LT XV if you had the GSM module that be the AT&T SIM card so right here we've already connected our power wires into the ports on the panel while on the communicator comes with a very very simple connection very easy just plugs right in there and then you're good to go and then obviously the rest of wires you're gonna feed through the little connector right there which will be connecting to the top of the panel basically has like a little screw where you can tighten this in feed the wires through so it's not exposed it's not you know looking too bad you can't really see any of it and then obviously once you start wiring into the panel's lot easier if it's just going directly through it so with this there's also no tamper button so that is a bit of a downside so no tamper button means that if this has ever opened the panel will not alert you if you have ever opened like a sensor a keypad the panel itself sometimes even or like with some of the older communicators I GSM v4g GSM 4G so on and so forth it will trigger a tamper on your keypads it will start to hear a beeping and then you'll be getting alert you know saying check tamper tamp recover for this tamper cover for that this will not tell you that it does have a button in the bottom left hand corner right here that's usually what a temper button would look like however that is non tamper button that's a registration button you can register the communicator by pressing that about 3 times it's not really recommended for that one usually we just have the actual dealers do the registration from their end so let's see so the communicator does have a built-in antenna which is right here there are options for external antenna as well so if you're not getting the proper signal strength from where this is installed get a external antenna wired in as well there's more information about that in the actual user and in install guides so I would recommend just reviewing that if you want to do external antennas okay so a couple things will do now is first will do wiring so first thing we're gonna do is make sure that this can get proper signal so to do that we're gonna first power down our Vista I'm using the LT cable to power on the Vista we do sell this cable it's just for easy install it has a barrel connection right here which powers into the terminals on the actual Vista so to unplug it simply just unplug that my Vista is dead no more power as you can see I don't have a backup battery anything installed so I know that that was my only power source so what we're gonna do try to do this from where I'm standing so we're gonna wire in the red and the black wire so those are the power wires for the communicator and we're going to wire them into terminal 5 for red and then terminal 4 for black so we'll start with black our ground and that is terminal 4 excuse me for getting in the way got that there wire that in okay nice and secure and then we're gonna do our red wire which is our axillary wire and I'm just going to terminal number five so right next door just make sure we have our connections straight on here so it's nice and secure once again excuse me for getting in the way pop that in there it's not too easy doing it from behind but should be good nice and secure give Molly yank alright perfect so now that I have my power connections into the Vista I'm going to power the Vista back on and what we're gonna do is going to wait for these LEDs right here to stop on the signal and just show us the signal is okay so the indication that signal is okay is just gonna stay green it will stay lit it's gonna cycle through them at first and then basically the reason that you want to do this first so as you see we did not connect the data wires the power wires it's basically just having the communicator itself test the signal so if that signal never lights up where it doesn't stay green we know there's no signal here there's no point in solving this it's just gonna be a waste of time doing a lot of work for nothing we need this to show that we have good signal before we proceed now this can take about a you know minutes two minutes just for the sake of timing in the video I've already installed this communicator before I do know that can do signal we've tested it before so in this case we're just gonna you know go ahead we're gonna say the signal is good it's shown good I'm gonna power the system back off again with the LT cable just simply unplug it system powered off how a DS are killed so now what we're gonna do is wire in the data connection so this is gonna be how the communicator is gonna work with the panel and how it's going to communicate with us alarm dealers so that we are going to be doing the yellow cord the yellow wire into terminal 7 for data out and then the green cord we're gonna do terminal 6 for that in so let's go ahead and get that done start with green terminal 6 make sure my connection is good let's see just undo that real quick get our connection good that up there turn it back up get our connection and then finally yellow once again yellow is going into that out which is terminal 7 right next door toss that in there and then let's tighten that back up make sure connections good alright so again just give them a little tug make sure they are nice and secure I think secure we're good to go so we're gonna start off by powering this on now actually before I powered on I just want to review what the LEDs will do so I'm gonna go top to bottom so top are re G which is the registration that is a green colored LED so when it is on it means that the panel is not the panel but the communicator is not registered when it is off so when you do not see an LED on that it means the panel is registered if it's doing a fast blink it means that there is a download in progress what that means is that someone remotely your alarm dealer is connecting into the panel through a program called compass it's basically a programming software so that's what that means it just means someone's connecting through compass to do some programming remotely a slope ring slow blink excuse me is registration in progress so when you do contact your alarm dealer and when you're setting this up with them during the registration you'll see that do a slow blink the next one the TX / rx that is your transmission that is can be a consistent yellow so when that is on it means that transmission is pending waiting to either be sent out or received a periodic blink so kind of like a heartbeat so that's just meaning it's normal it's functioning fine you're gonna see it blink as often as you know once every couple seconds it's gonna be consistent that's fine for a fast blink that means a message is waiting and for a slow blink as well as as I mentioned before with the registration a slow blink on this means the registration is in progress so you will see both the re G and the TX / rx lights do a slow blink during the registration just showing that everything is going through and it's waiting to finish the next one our fault that is could be a red LED so when that is on that means there no contact with the network so the communicator is still functioning with the panel but it's not talking to us it's not talking to AlarmNet 360 which is a Honeywell servers that we register these two if it is off that is normal so if there's no red LED you're good no issues if it's doing a slow blink that means there's a loss of communication what that means is that it's still communicating with AlarmNet but it's not communicating with the panel so that is basically just something that you gotta make sure your connections are good for the fast blink it means there is no contact with the network as well as a loss of communication so it's just not talking to anyone it's not talking to the panel it's not talking to the AlarmNet servers it's not doing anything as you're sitting there again that's something you have to figure out with your alarm company for the registration process of course because they can see signal strength and then for communicating with the panel that's usually your data wires most the time what we see very very simple issue people will swap they read and I'm sorry the yellow and the green so they'll put green to dad out and then yellow to data in that happens quite often usually with like the I GSM v4g communicators the same idea Kier if it's not communicating more than likely it's those data wires let's see so right here are a signal that is gonna be a green LED when that is just on hits showing minimal signal strength if it is blinking and showing marginal signal strength and if it's off it means that the signal I'm sorry the installation is not recommended so as I mentioned before when we had just connected power wires and we're waiting for it to cycle if that did not light up then that means we don't have signal and finally if all the LEDs are blinking when you wire this up just consistently blinking that means there is a hardware issue either with the panel or the communicators have to troubleshoot that and possibly replace one or the other okay so now that that is all out of the way let's go ahead and power this back up so while this is powering back up I mean that's essentially all the wiring right there it's very very simple to wire these and especially because it comes with that pre-built connector right there I mean that's very very simple it's very very helpful for other communicators you would have to wire in to the communicator as you did the panel so each connection that's usually where those data issues come from because people will always get confused they'll do data into that in data out to debt it out and then yeah as I mentioned we've already messed around with this communicator before so I do know that it's registered as the end user you're gonna have to contact your alarm dealer so either by phone by sign up email however they work you're going to contact them you're gonna give them the information off the communicator so that's gonna be the MAC address right there such as 0 0 D 0 and then the Mac CRC 4 F 2 for obviously all the codes will be different for other communicators this is tied up to our servers so once they have that information they're gonna start registering the product if they do come across any issues obviously they can tell you or do it for you depending on you know if it's DIY or if they're actually coming out they can change a couple settings with a keypad for the vista get back communicating and then get it registered then it's pretty much everything I have to say about the communicator if you did want to learn more about it and see more wiring videos learn more about registration sign up for monitoring or anything like that you can check out our website www.plenous.com down there to be notified when we actually released the videos okay well thank you guys very much and have a great day
- Uploaded