Adding a Qolsys Image Sensor to the Qolsys IQ Panel 2
Related Products

Related Categories
Description
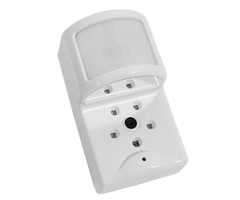
In this video, Joe goes through the process of adding a Qolsys Image Sensor to a Qolsys IQ Panel 2 System. The Qolsys Image Sensor is essentially a motion detection sensor with a built-in camera. The sensor will take a picture whenever it senses motion. The image will then be available on Alarm.com.
The Qolsys Image Sensor communicates with the IQ Panel 2 using wireless ZigBee signals. The IQ Panel 2 System will need to have a Qolsys IQ Card-IS module installed to accept the ZigBee signals and support the image sensor. The IQ Card-IS uses the same antenna as the PowerG daughtercard found inside the Qolsys IQ Panel 2 Plus System. With that in mind, it is not really feasible to use both a Qolsys Image Sensor and PowerG Sensors on the same IQ Panel 2 System. However, there is actually a PowerG Image Sensor called the DSC PG9934P that you can use instead of the Qolsys Image Sensor if your system has a PowerG daughtercard installed. The device can be easily auto-enrolled, and it has a maximum signal range of up to 400 feet in open air environments.
The integrated motion sensor inside the Qolsys Image Sensor is capable of detecting movement from up to 30 feet away. It uses PIR technology to detect movement in all indoor environments, including. The camera's IR flash allows it to produce quality images even in nighttime darkness. The motion sensor offers pet immunity for small animals weighing up to 40 pounds. This means that pet owners won't have to worry about their small pets accidentally setting off the sensor. Any images that is produced will be sent to Alarm.com for easy viewing. The end user can even receive alerts regarding a new image via text and/or email. This is great for confirming an intrusion and providing firm evidence to the authorities. The sensor is also configurable so that you can adjust its sensitivity according to your needs. It produces images with a resolution of 320x240 pixels.
http://alrm.gd/get-monitored
Transcript
Hi, DIYers. Joe from Alarm Grid here, and today, we're going to add an image sensor to programming on our Qolsys IQ2 system. Now, there's a few things to know about adding an image sensor to your system. One is that you're going to have to add the image sensor data board to your system, and this may cause an issue depending on which model system you own.
If you have a regular Qolsys IQ2, that's compatible with 319.5 megahertz security sensors. And that has no other data cards inside of the system. So on that model system, you can add your image sensor data card right into the system, plugin the antenna, and you're good to go.
If you have an IQ2 Panel Plus though, those systems come in different variants. There's one that supports the Honeywell 345 megahertz security sensors, and there's one that supports security sensors that work on the 433 megahertz range. But those systems do come with a PowerG card for PowerG sensors pre-installed inside of the system. Now, you can have both the PowerG and the image sensor data board installed into your system. but you can't use them both at the same time because they both require the same antenna, and there's only one of those antennas inside of the IQ2.
So if you do have an IQ2 Panel Plus and you are using PowerG, you're going to have to make a decision on what's more important. Do you want to use the PowerG sensors, or do you want to use image sensors with the system? With all that being said though, we do have an image sensor data card installed inside of our IQ2. And right over here, I do have a Qolsys image sensor module.
What an image sensor is, it's basically a motion sensor with a picture camera installed. And what it'll do is when it captures motion you can have it programmed so that it'll take a picture which you'll be able to view on your alarm.com account. For more information about this though, reach out to us, Alarm Grid, and we'll give you the full rundown on how this works and how to get set up to use this feature. Today though, we're just going to program this into the system. So on our system, I'm going to slide down from top, click Settings, do Advanced Settings--
Enter user code.
--and then enter our default code, two, two, two, two. I'm going to go to Installation and then Devices and then Security Sensors and then Auto Learn Sensor. Now, on the image sensor, I'm going to open it up. So you just slide down from the top. And then all I'm going to have to do is install the batteries. So following the legend, install one battery there. I Install the other battery there.
As you can see, the red light is illuminated right there on the front. And the system has triggered, letting us know that it did see the sensor and it is able to be learned in. So I'm going to click OK.
As you can see, this sensor type is image sensor. The sensor group has different settings for the image sensor. If you want to change it away from its default Away-Instant Motion. The sensor name, we're able to upgrade this. If we want to add a custom description, we just click that right there. Chime type is set to none. And everything else looks good. To complete the enrollment, we're going to click on Add New.
Sensor added successfully.
And the sensor is programmed into the system. So now, clicking the back arrow, we'll go back to the main menu. And then all that's left is installing the image sensor where it needs to go in your house.
Now, again, the features with the image sensor, you're really going to need an alarm.com account activated on the system to see the pictures that this uploads. And what you're going to have to do to get that, if you don't already have it, is reach out to your security company to make sure that you do have this feature enabled for your system. That's how to program in an image sensor to your Qolsys IQ2. If you do have any questions about this, feel free to give us a call at 888-818-7728, send us an email to support@alarmgrid.com, or head to our website, www.alarmgrid.com.
If you enjoyed the video, feel free to subscribe. If you want to be notified when we post future videos, hit the notification button below, and we'll send you an update when we do so. Thanks for watching, and have a great day.
- Uploaded