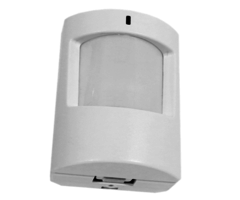
Adding an IQ Motion to a Qolsys IQ Panel 2
Related Products


Related Categories
Description
In this video, Jorge from Alarm Grid explains how to add a Qolsys IQ Motion Sensor to a Qolsys IQ Panel 2. This sensor auto-enrolls with the Qolsys IQ Panel 2 by putting the system into its auto-enrollment mode and then activating the tamper cover on the sensor. The sensor settings must be adjusted.
The process for enrolling the Qolsys IQ Motion Sensor is the same whether you are using an original Qolsys IQ Motion or a newer Qolsys IQ Motion-S. The same steps also apply whether your system is an original Qolsys IQ Panel 2 or a newer Qolsys IQ Panel 2 Plus with 319.5 MHz Daughtercard. Remember that since the IQ Motion and IQ Motion-S both operate at 319.5 MHz, they will only work with the 319.5 MHz IQ Panel 2 Plus. The 345 MHz IQ Panel 2 Plus and the 433 MHz IQ Panel 2 Plus cannot support either of these 319.5 MHz Qolsys Sensors. Fortunately, there are many other wireless motion sensors that you can use with the other IQ Panel 2 Plus Systems.
The Qolsys IQ Motion-S offers a coverage area of up to 30 feet by 40 feet. It can communicate from up to 600 feet away when used in an open air environment. The S-Line version of the motion sensor will utilize rolling code encryption for enhanced wireless security and protection. The motion sensor also offers pet immunity for small animals weighing up to 40 pounds. Just keep in mind that mounting location is very important if you are using a motion sensor with pets. The motion sensor should not be facing towards any furniture or stairwells that pets can climb upon to get within the sensor's field of view. A pet can still activate the motion sensor if it gets in the sensor's FOV.
https://www.alarmgrid.com/faq/how-do-i-add-an-iq-motion-to-a-qolsys-iq-panel-2
http://alrm.gd/get-monitored
Transcript
Hi, DIYers. I'm George from Alarm Grid. Today I'm going to be showing you guys how to learn in an IQ Motion to a Qolsys IQ Panel 2. So this also will be the same if you guys have an IQ Panel 2 Plus, as long as it has the 319.5 legacy daughterboard card. So if you guys are watching this video and you have an IQ 2 Plus, it's going to be the same process. So today I actually have the IQ Motion, but this one is the S-Line encrypted one. If you guys are learning in the normal IQ Motion, again, it's going to be the same exact process. It's just this one transmits with an S-Line line encryption, which we also have a video on if you guys need to check that out. But this one is going to be the same process that you're going to be doing if you have the IQ Motion. It might be different packaging, of course. I think the normal ones are just green. The gold ones usually mean encrypted S-Line. So the first thing we're going to go ahead and do, if a few guys have Qolsys IQ panel 2, keep in mind if you're going to be programming a new sensor you need to have your dealer code or your installer code. Those are the codes that we need to get into the programming of the system. So I'll get into the programming in just a second. I'm going to go ahead and open up the box of my IQ Motion, and we'll go ahead and power it on. So right out of the box, we have the sensor, you have a couple of screws that come with the box so that that way you can screw the backlight into the wall, and then we have two batteries. And you also have your paper in case the video doesn't help you guys enough, you guys can always use the paper. All right, so these are AAA batteries. These, I believe, our alkaline. Let me go ahead and plug them in. There's a little tab here at the bottom of the IQ Motion, if you just simply push in with one finger and then pull away with the other one, it just opens up. Obviously, the negative goes to the negative, and positive on the correct side. And then again, the other one, out it in the same way. And whenever you go ahead and close the sensor back up, there's two little tabs right up here, one, two, and there's two little entry points right here, one, and two, I line those up and then I just snap it shut. Now as soon as you guys power it on, the Motion will actually go into a walk test mode. So what the walk test mode is basically, it's going to start-- it lights up red every single time it detects movement, and it'll continue doing that as long as you continue moving in front of it or as long as it keeps detecting your infrared body heat. And normally, what'll happen is after one minute of inactivity, it exits the walk test mode. So if you guys already have an IQ Motion installed and you guys are trying to program it in, but you guys are noticing that whenever you wave your hand in front of it, it detects you but then it goes into a sleep mode, that's because it's no longer in walk test mode. It's been installed for a while. And in order to place it back into walk test mode, you simply have to remove it from the back plate, so pressing the little button on the bottom, and when you cause that tamper, the sensor goes back into a walk test mode. So that's one technique you can use if you guys already have it installed. If you guys have it installed just remove the back plate. It will go into a walk test mode, and then you guys can go ahead and learn it into your system. Now that we have the sensor in walk test mode, it's going to blink red every single time I wave my hand in front of her or it detects any moving, we're going to go ahead and need to learn it into the actual IQ Panel 2. So to do that, I'm going to press the little top bar here at the top of the Qolsys Panel 2. I'm going to go to Settings. It's just letting me know that I'm not connected to the Wi-Fi. I'm going to go ahead and go into Advanced Settings. This is where you need to enter in your installer code or dealer code. Now if your panel is brand new, it's defaulted, nobody has changed the codes, your default installer code is 1111, your default dealer code is 2222. These codes may have been changed, so you want to make sure you're using the correct code. I'm going to use my installer code for right now, 1111. I'm going to go to installation, Devices, Security Sensors. I'm going to go to Autolearn a Sensor. Once I go into Autolearn Sensor, it goes into a listening mode. This thing is detecting me pretty much anytime I move my hand in front of it to touch the panel. So as soon as I go into Autolearn Sensor, it should pick up on this signal from the motion sensor. Now it's telling me I have sensor E18alpha843 is requesting to be added to your list. Do you want to continue? Now, if you guys are getting a weird number like this, the easiest thing to do, look at the back of the sensor and you will actually see that there is DL and even a TX ID. The DL number, or alphanumeric characters, are the ones that you want to match up. So the DL the back of my Motion says echo1alpha843. That matches exactly what's on the panel right there. So now I've confirmed that the Motion matches the serial number that the panel listened or heard. Now I can go ahead and hit OK. Once I hit OK, again, we're going to go through our options now. Now we have to program the sensor the way you want it to act. So the first thing you'll see is the DL ID number. Again, that's what's on the back of the Motion. You can confirm again. The sensor type, the cool thing about the IQ 2 is it automatically configures that sensor type for you. So it's already set to motion. You normally don't have to change center type, but if for any reason you do, you can always change it to any one of these. But again, it's not a smoke, it's not a CO, it's not a hard wired translator, it's not a key fob, it's not a keypad. So it doesn't make any sense to change it. Normally you would just leave it as a Motion. What you do want to change is the sensor group. You're going to have a couple of different options. It normally defaults it to the normal motion configuration, which is Arm Away Instant motion. So this means that when the system is armed away, the system sets off an instant alarm if somebody walks past that Motion. So what I mean by that, the reason why it's a way is because normally you don't want to have a Motion active when you guys Arm Stay, meaning you guys are staying in the house, because if you guys are sitting in the house and the system is armed, you Arm Stay. And you guys have it program to Arm Stay and you guys walk past the Motion, then the alarm will go off. So normally, you want to set it to Arm Away Instant. Now, there are those of you who may have multiple floors, may have a basement, may have a garage, and you guys know that when the system is Arm Stay, meaning you guys are at home at night sleeping, nobody should be walking through these areas, then you may want to set it to Stay Instant Motion. Let me go in and get more into depth, right. So the Away Instant Motion, what that does is it puts the sensor into an instant alarm when the system is armed away, and that's only if no entry or exit door has been triggered. The reason why I say this is, if you walk in through the front door while the system's armed away, you're coming back home from you from whatever you are doing away from the house, you don't want to open up the front door, it starts the count down, walk past the Motion, and then it sets off the alarm right away. So Away Instant Motion actually follows the entry delay, as long as you guys open up an entry/exit zone. So that would be a good example if I walk in through the front door and I walk past the Motion, I don't want the Motion to go off right away. I want it to follow the delay from the front door. But again, if somebody comes in through a window, they don't set off the Window Motion, and they walk past the Motion, no entry delay has been triggered, then it sets off an alarm immediately. Arm Stay Instant Motion, that will put your system into an immediate alarm while the system is Armed Away, or Armed Stay. So this is the situation. I was talking about earlier. If you guys have a garage, basement, multiple floors, and nobody should be walking around at night, if you want it to set off the alarm right away, you can configure this one as motions and then you can have some other motions that you don't want to be triggered. So if that's the case, you might have some set to Stay Instant Motion and some other ones set to Away Instant Motion. Stay delay and Away Delay. So the Away Delay Motion means that even when the system is in Armed Away, you come into the house, the Motion actually acts as an entry/exit motion. Meaning it's not an instant alarm, it will actually set off an entry delay period. The Stay Delay Motion is the same concept, when the system is Armed Stay or when the system is even Armed Away, then if you walk past that Motion, it will go ahead and start an entry delay countdown so you can disarm the system. And the Safety Motion is if you don't want any alarms, you just want the system to notify you, kind of just like it'll bring up on the screen, hey somebody walked past the Motion or triggered the Motion, but it won't cause any alarms. So that's a Safety Motion. I'm going to leave mine defaulted at Group 17, which is the Away Instant Motion, that's normally what sensors usually go. And for the sensor name, you can give it hallway, family room, kitchen, dining room, upstairs. These are a couple of presets. If want to customize it, I don't know, bedroom one motion, hallway one motion, basement motion, whatever you want you can go into custom description. I'll go ahead and I'll just leave it as family room motion. For the chime, I don't know if you want to add a chime, but if you do, you just have to go ahead and select one of the ones you want. I can do sonar. There's a whole bunch of options you can choose from. If you want it to voice, so if you want the system to actually voice out that, hey, the family room motion has gone off, you can go ahead and select that to be on. And then the source, remember I told you this was an S-Line sensor. That's why you see the source is automatically set to S-Line because it wants to use that encryption. But if for any reason, again, you guys don't want to use the encryption, you guys can switch it just to the non-encrypted RF-319. That's normally what you would see on a regular IQ Motion. But since it's S-Line, I'll leave it as S-Line. And after you're done with this, you have to hit Add New. (MOTION SPEAKING) Sensor added successfully. It will say sensor added-- (MOTION SPEAKING) Family room Motion activated. --sensor added successfully. And it goes back into listening mode so you can add more. As you saw, it picked up on the signal again-- (MOTION SPEAKING) Living room Motion activated --for my motion. And it's already saying it's registered. So I'm just going to hit OK and I'm going to hit the House button so that it's no longer in listening mode. Now when I wave my head in front of it-- (MOTION SPEAKING) Family room Motion activated. --it just said, "Family room motion activated." I'll do it one more time. (MOTION SPEAKING) Family room motion activated. Perfect. So the family room Motion has been activated. And that is pretty much how you pro-- (MOTION SPEAKING) Family room Motion activated. That's pretty much how you program in the IQ motion to your Qolsys IQ Panel 2. If you guys have any questions whatsoever, feel free to send us an email to support@alarmgrid.com. (MOTION SPEAKING) Family room Motion activated. If you find the video helpful, make sure you hit Like underneath, subscribe to the YouTube channel, and hit the little bell icon so when we upload new content you guys get notified. I'm George from Alarm Grid, and I'll see you guys next time. What's wrong with you? [LAUGHTER]
- Uploaded