Adding or Changing User Codes on a 2GIG GC3e
Related Products


Related Categories
- Wireless Touchscreen Alarm Panels
- Small Business Security Systems
- Monitored Home Security Systems
- DIY Wireless Security Systems
- Apartment Security Systems
Description
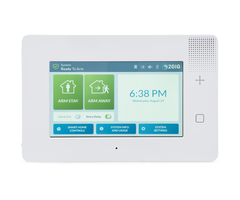
In this video, Michael from Alarm Grid shows you how to add, change, and delete user codes on a 2GIG GC3e Security System. The 2GIG GC3e supports up to ...
Transcript
Hi, DIYers. This is Michael from Alarm Grid. And today, I'm going to show you how to add or change a user code in your 2GIG GC3e security system. Now it's good practice to have everyone have their own user code so that way you can see who's arming or disarming the panel. And they're all set up in the same menu, except for the installer code, which is-- I'll show that in a bit. It's in a different menu. But they're pretty easy to access. I just want one note-- you can't delete the master code, and you can't delete the installer code. Those are wired into the system. But let's get into it. So you choose System Settings in the bottom right corner. And then you can enter in your master code or your installer code. We have our master code at the default. We usually recommend changing it for security purposes. But we can choose 1111. That's the default master code. And then we have our user menu right here in the upper left. And so we're at the screen, where pretty much all the action will be taking place with the exception of the installer code, which I'll get to that in a bit. But if we wanted to add a new user, we can click the button in the upper right, and we can choose a new name. I'm Mike, so we'll will make this Mike. And so then we enter the name, and you can choose Next. And now we're going to enter in our code. I'll just enter in 2222. That will be my code. And we'll click Next. And then it's going to ask us to confirm the code to make sure we didn't make a mistake and make sure it's the code we really want. And we wanted 2222. So we can choose Next. And just a quick little note. You see that our codes are four digits. There was actually a setting you can change to make it six digits. We're not going to worry about that in this video. But that's within programming. But the default is just four digits. So we have Mike added. So let's say we wanted to edit the code. Then click the pencil icon right here. And we can choose whether to make it active or inactive. I want to get in the building, so we're going to keep it active for me. Then we can click here to change the code if we wanted to. Like I said, we're just going to keep ours the same, but if we wanted to change it, we could. Oh, I guess I actually do have to enter in a different code now, because it's registered to me. So let's say I want 3333. We'll do that. And that will be my code, I guess. And then I could change my name if I wanted to, but I like my name, so I'm going to keep it. So one thing I do want to show you when you're adding or editing a code-- this is actually important-- you have to go back and do this after you've added a code, because this is set blank by default. You'll notice this Smart Areas section down here. Normally all of these would be left unchecked. And if you leave them all unchecked, which is the default setting, actually, you're essentially creating a useless code that can't do anything at all. So at the very least, you want to at least go and check the system box, because that will give you control for arming and disarming the system. You can check the other Smart Area partitions if you're using Smart Areas on the system. But if you're just using a single partition, don't have partitions, Smart Areas setup, just at least make sure you go and check the system box. For the master code, all of these are already marked. But if you're making a new user code, make sure to go into the Settings and at least check that system box. Let's say they wanted to keep me out of the building at night. Let's say I was sneaking in and you wanted to keep me out. Then you can set up schedule so that the code only works at certain times. So you could choose a specific date or a date range if you wanted to. We'll just choose every day of the week because let's say I needed to get in here. But let's say only at certain times of the day. Let's say I'm not allowed in the building until 8:00 AM and the latest I can use it-- if I'm not out by, let's see, oh, we'll say 8:00 PM, then I'm in trouble. So let's set it to that. So that it can be scheduled and click the check mark box. So setting a schedule is optional, but that's how you would go about doing it. And it seems the schedule has-- it's down there. OK, we had to just scroll through it. And you see that we have our schedule set. If we wanted to delete it, we could just delete it. And now I'm allowed inside whenever I want. And that's excellent. So that's how you go about changing the user code. And just a quick thing, if you wanted to delete a user code, you just click the trash can icon. And now I have lost all my access to the building. So you can see the duress code down here. So I want to talk about that real quick. So the duress code is what you would use in a hostage or emergency situation. If you were in danger and you want to discreetly call for help, you can enter in a duress code, and then it would send an alert to the central station and help would be sent out. You have to have your system monitored, so make sure to sign it for Alarm Grid monitoring if you're going to use a duress code. Because you won't actually get an alarm on the system, it's just going to send out a discreet signal. And you'll notice you can't actually delete the master code and you can't delete the duress code. You can change them, but you can't delete them from the system. Again, to change them just use the pencil icon. And remember, the adding user icon's up there. So any changes you make will be automatically saved. So you would just go out to the home screen, and you can just press the return arrow a few times, and you'll get there. And so we're at the main screen system. And I want to briefly to show you how you would change the installer code. So what you would do is you'd press the 2GIG logo in the upper right corner. You'd enter in your installer code, which ours is at default 1561. You can also use this code for accessing the user menu, which is a bit unusual, to be honest, but 2GIG allows it, I guess. So then you would use System Configuration. And you'd choose Panel Programming. And just wait about five seconds. And so we're in Panel Programming now. And you see that our installer code, it's question one-- enter installer code. And you can enter in a code to change the installer code. And then you would return out, and it would make you save the changes. But I do want to point out that we don't recommend changing the installer code, because if you do, you could forget it and then you won't be able to look up the new code you set. And then you would be locked out of programming, and that can cause you a lot of issues. You might even need to replace panel. So that would be bad. So just keep your installer code at the default. Don't use this code for arming and disarming. Use your master code or one of the set user codes that you set up. But we're just going to return to the home screen for now. And so that's how you would add or change a user code with your 2GIG GC3e security system. And I just want to give you a quick reminder here just to show you. Because I want to show you how many user codes you have. Actually, I don't think it shows you in this panel. So I believe you get 60. Or maybe it's 100. We'll have it in the description below. But you get a lot of user codes. That's for most situations. You're going to have plenty. But that's how you would add or change a user code on a 2GIG GC3e security system. If you found this video helpful, make sure to give it a thumbs up below to like the video. And remember to subscribe to our channel to get updates on future videos. And if you have any questions about the 2GIG GC3e or about alarm monitoring, send us an email at support@alarmgrid.com. Hope you enjoyed the video. Thank you.
- Uploaded