Devices Used With a 2GIG XCVR2-345 Transceiver on a Go!Control GC2
Related Products

Related Categories
- Touchscreen Alarm Panels
- Small Business Security Systems
- Monitored Home Security Systems
- DIY Wireless Security Systems
- Apartment Security Systems
Description
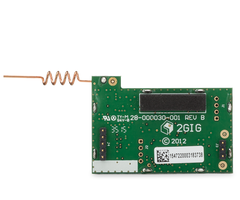
In this video, Jorge from Alarm Grid talks about the devices that are used with a 2GIG XCVR2-345 for a 2GIG Go!Control GC2 Alarm System. The 2GIG XCVR2-345 is a wireless transceiver that allows the 2GIG GC2 to support bi-directional communication devices. The module attaches to the main panel board.
The 2GIG GC2 already has a 345 MHz wireless receiver inside. This allows the panel to receive signals from 345 MHz uni-directional devices. This includes most security and life-safety sensors. The system is capable of supporting 2GIG 345 MHz Sensors and most Honeywell 5800 Sensors. However, if you want to use bi-directional 345 MHz devices with the system, then you will need to add the 2GIG XCVR2-345 Wireless Transceiver Module.
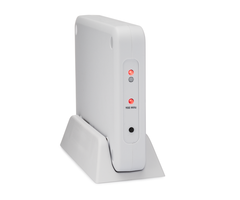
There are a few examples of devices that require the 2GIG XCVR2-345 Transceiver. One is the 2GIG Go!Bridge IP Communicator. This is a device that allows the 2GIG GC2 System to communicate with an IP router for IP monitoring service. The way this module works is that it will connect with the router using a hardwired ethernet connection. The 2GIG GC2 will then communicate wirelessly with the Go!Bridge IP Communicator.
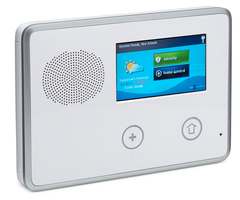
Another device that requires the 2GIG XCVR2-345 is the 2GIG TS1 Touchscreen Keypad. This is a wireless touchscreen keypad for the 2GIG GC2. The keypad can be used to arm and disarm the system and to control any programmed Z-Wave devices. It also shows the current system status. The keypad needs to be able to send arming and disarming commands to the panel. It must also be able to receive updates from the panel regarding any change in arming status or change in Z-Wave device status.
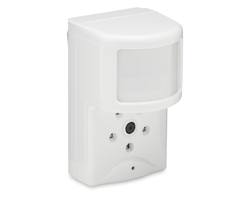
You will also need the 2GIG XCVR2-345 if you plan to use an image sensor with the GC2 System. An image sensor is a device that will capture a photo when it detects movement. The image will be send to the panel so that it can be uploaded to the Alarm.com servers. You will then be able to view the image from Alarm.com. You can even receive notifications from Alarm.com whenever an image is uploaded.
http://alrm.gd/get-monitored
https://www.alarmgrid.com/faq/what-devices-are-used-with-a-2gig-xcvr2-345-transceiver-on-a-go-
Transcript
Hey, DIYers. I'm George from Alarm Grid. Today we're going to be going over what devices are used with the XCVR2-345 Transceiver on your Go Control 2GIG panel. We know that as a GC2. All right. Our GC3 is the later version of the 2GIG panel. As you see, it has a bigger touchscreen on the buttons on the right-hand side, and the GC2 has a smaller touchscreen, two buttons underneath, and little speaker holes on the top left corner. Now the XCVR2-345 is what the GC2 uses to send out any commands. Now typically the GC2 only comes with the 345 megahertz receiver. So that means it's only listening, it's only able to receive signals, from the sensors. So that means any bi-directional devices that you guys have-- keypads, Go!Bridges, image sensors which use 900 megahertz frequency-- you would not be able to use on a GC2 if you have not installed the XCVR2-345 Transceiver. Now we do actually have an install video, the XCVR2-345 install to the GC2, on our YouTube channel. So if you guys need help on installing it, please look up that video. Today I'm just going to go over some of the devices that use this transceiver, starting with the first one, which is going to be our Go!Bridge. It's going to be our Go!Bridge IP Communicator for this GC2. Now typically, just so you guys know, the Go!Bridge is probably the only communicator that can be activated through internet only on alarm.com. Alarm.com normally requires every single one of their panels to have a cellular communication path enabled. The Go!Bridge and the GC2 are the only panel that will allow you to do internet only. However, you will still be charged for cellular price plans only. So just because you have a Go!Bridge communicator on your GC2 doesn't mean you will be able to sign up for an internet plan with your alarm company since alarm.com only has cellular-based plans, you will still be charged for cellular. So if you're being charged for cellular, might as well just get the Go!Bridge and the cellular communicator while you're at it. Now GC2, it's still a common system that a lot of people still have. Some of you out there may need a firmware update if you're going to be getting the new LTE communicators. So there's a lot of things that come into play when you're doing this, so it's always best to contact your alarm professional, and either us or they'll be able to help you figure out what you need. Now the Go!Bridge Communicator, it's an IP communicator, internet communicator, that you plug directly into your router with an internet cable. From there, you actually learn it in wirelessly to your GC2. And you need the XCVR2-345 so that this panel here can communicate to the Go!Bridge Communicator that works with alarm.com. So not only it needs to be able to receive the signals from that Go!Bridge Communicator, but it actually needs to be able to send out the status. So if you ever arm the system from the panel to Away or if you ever disarm the system from the panel, that signal needs to be sent to the communicator so that then it can update alarm.com if you guys have the service, and you guys can actually make sure that the live status on your panel is showing correctly on your app. So it needs that XCVR2-345 in order to communicate back and forth to the Go!Bridge communicator. I'm going to show you guys real quick. I'm going to open the panel up. It's going to give me a cover tamper. I'm going to show you guys exactly where it's going to be installed just so you guys can see. I'm just going to pull my panel directly off the back plate. And if I look at the back here, if you look at the top right corner-- I'm holding it upside down-- it's right across the battery pack. It's this little silver piece with the black foam there. That's normally where you would see your 345 receiver, but that's what you're going to replace with the XCVR2-345 Transceiver. All right. Let me go in and put it back now. Good. All right. So that is the first device that we're going to talk about that needs the XCVR2-345 to communicate. The second device is going to be the IMAGE1 Sensor. The IMAGE1 Sensor transmits at a 900 megahertz frequency, which for those of you who don't know, the XCVR2-345 not only works at 345, but it also does 900 megahertz, which is exactly what the Image Sensor communicates at. So in order for this panel to work with an Image Sensor, you need that transceiver module. Now the reason why you also need that is because you don't want the Image Sensor capturing images while the system is in a disarmed state and there's people at home. You typically want the Image Sensor whenever the system is in Armed Away or an Armed Stay mode, maybe. Typically it's going to be in Armed Away mode. That's usually when motions are enabled, and that's when nobody should be in the house, and that's when you want the images to capture anyone walking by that may set off the motion. Now the third device is going to be the TS1 keypad. The TS1 keypad is the touch screen keypad for the GC2. That also transmits at 900 megahertz, so you need that transceiver so that whenever you arm from this keypad or whenever you arm from the other keypad the commands are being sent and they're actually syncing. If you don't have that receiver and you're arming Away on this keypad, that other TS1 keypad is not going to know whether the system's Armed Away, Armed Stay, Disarmed. It's not going to know what sensors it has. It's not going to have any communication at all to this panel. So that's why you need to make sure that if you're going to be using that TS1 keypad for the GC2 that you guys actually have that XCVR2-345 Transceiver. So those are the three main devices that are used with this XCVR2-345. Again, it's to allow your panel to work with bidirectional communicators and devices. Again, the things that we touched based on today was the Go!Bridge IP Communicator, the IMAGE1 Sensor, and the TS1 keypad. If you guys have any other questions about devices, feel free to go ahead and emails us at support@alarmgrid.com. If you found the video helpful, make sure you hit Like underneath, subscribe to the YouTube channel, and enable the notifications so when we upload new content you guys get notified. I'm George, and I'll see you guys next time.
- Uploaded