Honeywell 5800PIR-RES: Program to L5210
Related Products


Related Categories
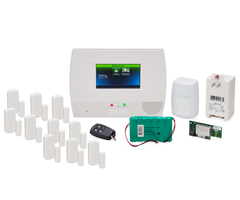
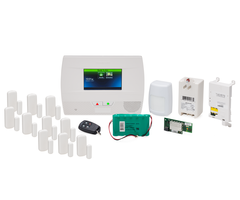
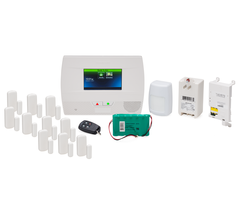
Description
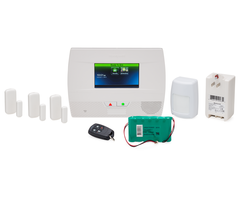
The Honeywell 5800PIR is a residential graded, pet immune motion sensor. It is calibrated to pets weighing less than 80 pounds. The motion sensor is a great addition to home security with indoor pets, to help prevent false alarms set off by furry wanderers.
In this video we will program the Honeywell 5800PIR to the L5210 control panel. It is assumed that the sensor is already installed. If you have not yet installed your sensor, you can view our other video that will walk you through the process of installation.
To program the motion sensor to the control panel you need to access the Tools option from the menu and provide your installer code when prompted. The video will discuss how this is done.
As the video will warn, you need to use the installer code to access the tools options, not the master code. If you have forgotten the installer code you can see our other video to learn how to bypass or recover it.
From the programming menu, press Program followed by Zones. The video will discuss how to choose the proper zone based on your circumstances. If you already have a motion sensor zone listed you can use that one, otherwise you will choose New.
When you edit from the Zone menu it will ask for the serial number. As you will see in the video it is always best to auto enroll your sensors when possible (glass break detectors are more difficult, for example). This will ensure the serial number is correct and the sensor is enrolled properly.
Because of the battery saving lock out of the motion detector, auto enrolling is very difficult. It is advised to manually enter the serial number and press done to lock it in to the system.
You will need to define the different zone attributes. Our detailed walk through video will discuss each aspect of this procedure and ensure you have the correct set up for motion detection. Be sure to follow along with the video to enable the proper zone settings.
As you follow along you will learn what the different zone settings are for and how they should be set. You should note that before you hit save, there is one further option by pressing the down arrow button. After all the zone settings are defined according to your specifications, press the save button to lock in the sensor details.
You should always test the new sensor after it is enrolled. However, this can be a tricky process because of the safety features of the sensor. The video will discuss the two safety features in detail. Follow along to learn all about the features and how to test the sensor properly.
You can view our other videos to learn how to install the sensor or other features of the L5210 control panel.
Transcript
Hi, DIYers. This is Frank at AlarmGrid. And today we are in the AlarmGrid lab working on the Honeywell 5800 PIR-RES. That stands for residential alarm system.
What this is is a wireless, pet immune motion detector. As far as pet immunity goes, it's spec'd at 80 pounds, up to 80 pounds. Now when it comes to pet immunity, usually you want to weigh on the side of caution with that. We prefer pets to be smaller than 80 pounds. And even in that case, you want to have the motion detector somewhere not with furniture or stairwell where the pets could potentially jump up and down and potentially get the profile of the human or trip this unit. So although it is pet immune up to 80 pounds, you want to be cognizant of keeping it out of range of a stairwell or any furniture that your animal may jump up and down off of.
So what we're going to do today is program the 5800 PIR-RES. This is a wireless motion usually designed to sit in the corner of your wall. We have an install video for this as well. You can check that out on our channel.
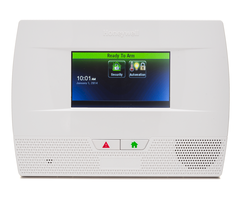
So for today we're just going to program it. So what we'll do is the first step into programming with the Lynx L5210 panel today. This is the new Honeywell self-contained panel. Its predecessor, the L5200, was the first of the firmware upgradeable systems that Honeywell offered. Now we have the L5210. Essentially, the same system, except smaller screen, basically same programming though. But we'll show you on this system just so that you have an idea of what it looks like.
So in order to get into programming what we'll do is we'll hit the Home button, Security, More, and then Tools. We'll enter 4112 for the default installer code. Now if you change your installer code, you obviously want to use that code. This is not to be confused with the master code, which is one, two, three, four by default, and usually that's changed to something else for you to arm and disarm.
Once you're in programming using the installer code, we can hit program. And then we'll go right into zones. When you're in zones, by default, there's some zones that already here. If you haven't programmed sensors yet, you can go into the motion sensor zone just because it's already named for you. Or if you do have zones existing on the system, you can just go into a new, unused zone and select edit.
For today's purposes, we'll use the motion sensor zone, and click Edit. The loop number here will be automatically assigned when we enroll the unit, because we usually like to auto enroll these. We'll hit the serial number and then it'll say Activate Sensor, OK.
This unit actually ships with the battery outside of the unit. So there's a Panasonic lithium CR123. It's a 3 volt, cylindrical battery that's designed to power the 5800 PIR-RES.
So what we want to do first is take a flat head screwdriver and you can just basically lightly press the tamper here. And we'll actually clear this here. We'll clear anything that pops in here until we get the battery in. If it is another sensor that's picking you up, you don't want to auto-enroll that accidentally.
So we'll clear that. We have the 5800 PIR-RES opened. And you'll see that there's an empty battery compartment. We have a plus and minus here. You'll see, obviously, on the plus side of the battery, we'll put that straight in. Once it's in you'll see the LED flash. That means that it's enrolling into the system.
What we can do now is for the motion detector, we can manually enter it, which, in most cases, is the easiest way. Unless you're able to fault it a few times and get it into the system. Door and window contacts are a little bit easier because they fault quicker.
The motion sensor has a transmission lock out on it that's designed for a battery saving feature. So after it faults twice, it's actually going to go to sleep, which will make it difficult to fault and auto-enroll. So what we'll do is we'll manually enter the serial number here. It's listed with the number as A as in alpha and then the seven-digit number.
Now again I'm sitting in front of a motion here that's already installed. And I'm picking that up. So now we're going to clear that out and manually enter this. We have 0, 8, 0, 8, 0, 9, 0, 4, 2. We'll hit done. Now we can close up this unit.
I find that hinging in from the top and snapping the bottom shut is the easiest thing to do. You always want to have the motion sensor oriented this way with the look down sensor facing towards the bottom. If you don't do that and it's upside down, it can cause issues. When you do a walk test, you'll probably notice that it won't reliably fault based on motion. It's designed to be right side up with the tapered edge towards the top and the look down area towards the bottom.
So now we can put the sensor down for a moment. We'll always want to have the motion detector on loop one. And we can name the zone. If you want to put it in the living room, we can type in Living. If you type in LIV, it'll automatically put in Living. And then we have the device type as Motion Sensor.
We have the Response Type automatically set to Interior Follower. So what that means is Interior Follower is a setting-- any of the interior response types are set for motions. And what that means is that they're automatically disabled during Arm Stay Mode. The difference between Arm Away and Arm Stay is when you're staying at home at night and going to bed, you can arm the system to Stay Mode. And that will basically allow you to walk throughout your home and not trip the motions but have a protected perimeter with your doors and windows and even select some motions to be part of that list, if you'd like. And we can discuss Night Stay Mode later.
For now in terms of the two types of interior response types for the motion, we have Interior Follower and we have Interior with Delay. Interior Follower-- basically what it does is it follows your entry delay. So if you have an entry door, say your front door is on Entry Delay 1 and set to the 30 second entry delay, when you walk in that front door, the system tells that motion that it has 30 seconds now to disarm.
If there's an intruder that gets in or anyone that gets into the home, and that front door is not opened or any entry-exit delay door is not open, and that motion is tripped, it will trip the alarm immediately. However, if you open that front door and there's a delay period, then that motion will allow the motion to exist until that delay period expires.
Interior with Delay-- the difference there is it doesn't matter what happens with the front door, doesn't matter anything else when that motion first detects motion, there is a delay period, no matter what. Whereas with Interior Follower, it can be an instant alarm if it doesn't sense the entry-exit door opening first. That's the difference. That's why usually we recommend Interior Follower, because it's a bit more secure.
The Interior with delay would be a motion for an area where you don't have a door contact. Maybe you don't have a contact in your back door, and you just have a motion there. And you potentially may enter through that door to enter the home and disarm. Then you'd want to set that motion Interior with Delay. Otherwise, you want to have it on Interior Follower. So for today, we'll set it on Interior Follower.
As always, we have the Alarm Report set to Yes. That means that it's actually going to send signal history reporting to your central station if you do indeed have monitoring set up. We have the chime. By default, the chime is disabled usually because the motion is not something you want to have a chime every time. If you had a motion in a secure area where every time it trips you do want a chime, then you can enable it just by toggling through here, hitting Standard, or choosing whatever chime tone you like, and then saving. For today's purposes, we'll just cut through here and leave it disabled for now.
The Supervision-- this is something that is important in all RF devices. The supervision is something that, essentially, allows the system to keep in communication with this motion detector. What it allows it to do is if that motion detector ever failed and stopped communicating wirelessly back to the system, it would automatically throw a Trouble Error on the keypad. And you would then know that there's an issue with the wireless transmissions on this wireless motion detector. So you always want to have that enabled. If you don't have it enabled and the sensor stops communicating, you'll never know. So you always want to have it supervised. So we can leave that there.
If you hit the page down, there's actually a selection on the L5200 series panels, including the L5210 and the L7000. What this allows you to do is it gives you an Arm Night selection. If you set this to Yes, per motion sensor you can enable Arm Night mode. And what that means is going back to the conversation on Armed Stay and Armed Away, you actually have the ability to choose specific motion sensors and allow them to be enabled when you Arm Stay at night. So you can have a specific mode when you go to arm, we can show you that in a moment, where if you set this to Yes it will allow you to have that motion sensor be active without the others being active.
So, for example, you have a basement motion detector. At night, you arm the system. You don't plan on ever going down in your basement. And you want to protect it from any intrusion at night, but you want to be able to walk through your house and get a cup of water and night in the kitchen and not trip any other motions throughout the main area of the home.
So for today, we'll set this to Yes. We'll go ahead and hit Save. We'll back out of programming. And until you set one motion sensor to Night Stay Mode, you won't see an Armed Night Stay selection. And where you see that is you go into Arm Stay from the Security section and you actually see a little Arm Night toggle. Now you won't see that unless you say yes on one of those zones. Once you do, it'll automatically populate. And then you can select if you want to choose Night Stay or not.
If you arm it without toggling this, it'll arm without any motions active. If you toggle this and it's green then you can enter your code at that point. And go ahead and hit your master code. And, in this case because I'm tripping a motion, it didn't let me go. But I'll do Armed Night Stay, enter my master code, and it would then arm the system. I'm tripping other motions here, which is why it's not allowing me to arm.
But this is a good selection for motion detectors put in secured closets, maybe your master bedroom closet where you have any valuable belongings, basements, laundry rooms, whatever it may be. Any entry points that you don't plan on entering those areas when you arm at night. So that's a new feature on these new Lynx touch panels that adds some more flexibility when it comes to the motion sensors.
So after the unit's programmed what you want to do is test. So I'm already seeing that every once in a while this is tripping. I'm getting the red LED flash to show that it's tripping. It's showing my zone 5 Living motion on the screen here. You can see again, it's doing it again.
The first few minutes when this powers up, you're going to get the red LED flashes based on motion detection. After those first three minutes, you will not see that LED. So if this no longer shows the LED, it doesn't mean it's not working. It is still working.
And there's two settings that can be very tricky when testing this-- one is the Transmission Lockout. The Transmission Lockout feature is a feature that allows this sensor, on this single battery, to last up to five years. And what it does is after the second time that this senses motion when the system is disarmed-- only when the system is disarmed-- it goes to sleep for three minutes.
Now again in the first three minutes when this is still flashing, it's not going to do that. But after that period, that Transmission Lockout feature will be enabled. And after the second trip, it will go to sleep for three minutes and nothing will wake it up, not even arming the system.
Now don't be worried about that because even if you did put it to sleep just before arming, it will wake up at three minutes and then automatically be active. And if it's ever tripped again, obviously it'll trip an alarm. So you have to worry about it going to sleep and staying asleep when it's armed. But when testing, it can be tricky. So you want to stay away from the motion detector if possible. Put it in a drawer, maybe step out of the room. If the keypad is within direct line of sight to the motion when you're arming it, you probably want to block it, or just arm it, and give it a few minutes to really make sure that it's armed and active and out of that battery saving time out.
The other feature is Auto-Stay. Now the L5210 Auto-Stay arming automatically enabled, and we recommend keeping it that way. The reason why is Auto-Stay is a feature that allows the panel to intelligently know when you do or do not get out of the home in time.
So, for example, say you're testing you arm the system away so that the motion detector is enabled-- because if you Arm Stay and you don't set it to the Arm Night Stay mode, then it will not be active. So in order to test this you always need to Arm Away.
Now if you Arm Away and you notice that after the countdown it goes automatically to Stay. It's not something you're doing wrong, it's a feature in the system. And what it means is that the system is looking for an entry-exit door to open and close. So if you already have a door or window that's programmed, you can Arm Away, step over to that door or window, you can open and close the door to allow the system to know, OK, that the user has left the home.
And now we can Arm Away and not have any false alarms with the motion detector tripping. If for whatever reason-- maybe you didn't get out of the house in time. You got a phone call on your way out and you just didn't get out of the house. We don't want to have-- the panel wants to reduce false alarms. So that's why that feature is enabled. With all that said, you can disable Auto-Stay arming, if you'd like. But I just want you to keep that technology in mind as you're testing.
So once you're done with all the programming, you can go into a walk test and just by going into Tools, entering your installer code or master code, going into Test, and Walk Test. And then you can actually walk throughout all your sensors, including your new 5800 PIR-RES and test it and make sure that it's faulting on the panel.
You can enable the chime on it just for testing, as well. But the Walk Test is a good feature. It doesn't require chime being enabled so you can know, you can get an audible beep of the keypad after it's tripped.
So if you have any other questions on the 5800 PIR-RES, you can e-mail us at support@alarmgrid.com and also please subscribe to our channel.
- Uploaded