Honeywell 5809: Program to 2GIG GC3
Related Products

Related Categories
Description
Easily configure the Honeywell 5080 wireless heat detector to work alongside the 2GIG CG3 wireless security system by going to the “Installer Tool Box” and following the steps laid out in our video.
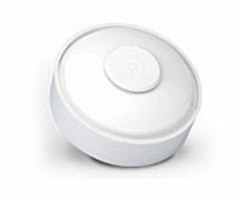
The Honeywell 5080 detects heat at the fixed temperature of 135° F. It’s not a smoke detector and does not detect smoke, only heat. It provides fire protection to a 50’ x 50’ area.
The wireless heat detector works best in kitchens where smoke isn’t necessarily a cause for alarm. Since it doesn’t detect smoke, the number of false alarms caused by cooking are greatly reduced. Real emergencies caused by fire are still identified since it detects heat over 135° F.
There are two main alarm settings for the Honeywell 5089. You can change these at any time from the 2GIG GC3 touchscreen.
First is “24-Hour Fire” which is a single-trip alarm. The device triggers an alarm soon as 135° F heat is detected.
The second setting is “Fire with Verification.” The device must trip twice before triggering the alarm in this setting. This is best for busy kitchens where false alarms are common.
Our video walkthrough shows you how to select either of these settings. It also shows you exactly how to enroll the heat detector to the security system. Both available options are explored: auto enrollment and manual enrollment.
The process of setting a voice descriptor for your heat detector is easy by following the steps laid out in the video. This will ensure that the touchscreen clearly enunciates the name and location of the device when needed.
After enrolling your heat detector to your security system, you can rest assured the two are always connected by keeping the “Sensors Supervised” setting on.
“Sensors Supervised” guarantees you’ll be alerted in the event that the signal stops transmitting between the two devices. The supervision ensures the alarm always stays online to best protect your home.
Testing that the devices are connected is simple. Our video shows you how to use the “RF Test” key to confirm the heat detector is properly paired with the security system.
The Honeywell 5089 must be mounted at least 4 inches from the ceiling for wall mounting. Or it must be mounted at least 4 inches from any wall for ceiling mounting. It should not be mounted near any appliances that generate heat such as ovens, stoves, or heat vents.
Remember that this heat detector is a one-time use device. Once it detects temperatures of 135° F or greater, it must be replaced. It’s important to use the “RF Test” key for testing rather than real heat for this reason.
That’s the value of pairing the Honeywell 5089 wireless heat detector with the 2GIG GC3 wireless security system – it identifies fire emergencies by detecting heat while limiting false alarms caused solely by smoke.
Transcript
Hi, DIYers. This is Frank at Alarm Grid. We're back in the Alarm Grid lab working on the 2GIG GC3 wireless self-contained alarm system.
Today, we'll be programming the Honeywell 5809 wireless heat detector. This is not a life safety device, but is a wireless heat detector designed to detect high heat at a fixed temp of 135, mainly designed for either commercial properties or areas of the home that may have smoke. So you know, the most popular place for this would be a kitchen so that you can avoid any smoke false alarms, but still protect and get the fire department out there during a fire in the kitchen area.
So we'll show you how to program this into GC3. The first thing you'll want to do is slide this counter clockwise, open up the unit, and put in your battery, which I've already done just for the video here. So we have the plus symbol going to the plus sign here.
You'll see it has an RF test button here and then a tamper switch. So we can use this RF Test feature to actually enroll this particular unit into the keypad. We will go right into system-- into the Installer Tool Box by adding the 2GIG symbol on the top-right. And then will enter our default installer code, which is 1 5 6 1.
If you've already changed that code, then you can just use that new installer code here. We'll do System Config, and then Wireless Zones. We'll go ahead and delete our previous zone here. And we'll start with zone one.
So we can set up. We can hit Edit Zone on the right. We use the dropdown here to swipe down all the way to 24-hour fire. This is type nine.
There are two ways to program a smoke or heat sector, either regular fire, which is basically a single trip creates an alarm. That's type nine. Or you can go all the way down here to type 16, which is fire with verification. The difference there if this is in a kitchen-- and oftentimes, you do have false alarms-- generally, with smoke detectors that's where the fire with verification will come in.
If this trip's, generally, it is the real thing. If you did want to set it to fire with verification so it has to trip twice to send out, you could do that if you have had false alarms in the past. Otherwise, we want to set this on type nine-- I'm going set this on type nine, which is 24-hour fire. So we'll keep that there and move to Equipment Code.
We can scroll down here to where it says HW for Honeywell. And you'll see 0 5 5 7 for the 5809, which is this device here. So we can then move to the next section.
We have serial number. So here's where we can auto enroll this or manually enroll. So there is a serial number listed right here on the inside of the tamper, of tamper cover, the smoke head. You can also auto enroll using this RF Test icon here. So we'll go ahead and show you how to auto enroll.
We'll hit Learn and then press in all this. And you'll see 0448259. And that also says that there. So we'll except that. Be cognisant when auto enrolling that if you have a motion detector in the area to avoid that from sending the serial number from that motion when it trips, rather than the device you're trying to enroll. So that's why you always want to double check.
So we can move down to the next field here. We have Equipment Age as new, the Sensor Loop. So for the 5809, we always want to use a loop one. You'll notice that it learned in as a loop two. That's because we use that Test button. So just always set this to loop one for the 5809.
And then we can move down to Voice Descriptor. We can put this in as the kitchen smoke-- always want to use-- or actually kitchen heat. You always want to use the words that are listed in the white tab here that way they will voice enunciate from the keypad.
So we can now hit Done. We'll go to Censor Reports. We always want fire devices to report to central station. So we'll keep that enabled, Sensors Supervised.
We always want to keep an eye on this to make sure it's transmitting our signal back and forth to the system. So we want to supervise that communication and make sure that it does stay online. If it ever does not ping back, you'll get in RF supervision trouble, where you can get a text and email through alarm.com or a phone call from the central station so that you can remedy whatever issue is causing that supervision error.
Here, chimes I usually just disable on fire devices. The reason why is when the trips, it will trigger an alarm. So there's no need for a chime. So we will go back to Return to System Config, back out. We can use this as a triple check to make sure we have the proper serial number.
I already know that I auto enrolled and double checked. So that's fine. We'll hit Save.
System disarmed. Ready to arm.
And now at this point, what you could do is you could open this up, make sure you get the tamper. And you can even use this as a test, which we'll do right now, which we can press this RF test key again. And we'll see if we get the fire.
I'll use our master code, which is still on default, 1 1 1 1. And it says alarm report, ready, cancel the dispatch or cancel the transmission. I left that and let it go. I don't have this hooked up to a central station currently.
If you do have central station monitoring, be sure to put your system on test before testing any smoke or heat detectors. We can clear the alarm history here after the test. And then we can put this tamper cover right back on.
You want to line up these white plastic tabs here with these openings on the center. So we can just slide that in, turn clockwise, and lock it in. So that's how you program the Honeywell 5809 Wireless Heat Detector with the 2GIG GC3. If you have any other questions on programming this device or any others with your GC3, you can email us at support@alarmgrid.com. And don't forget to subscribe to our channel.
- Uploaded