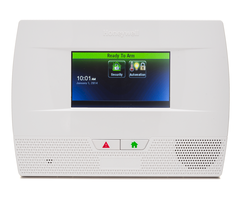
Honeywell L5210: Setup High Security Mode Using 5834-4
Related Products

Related Categories
Description
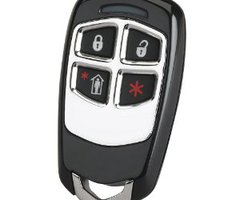
Honeywell 5834 is a 4-button key fob generally used to remote arm and disarm your home security system. In this video we will show you detailed instructions on how to program the key fob to the Honeywell L5210 control panel.
The key fob has 4 buttons that can be programmed to 8 different functions, utilizing single and double key presses. Each button, or combination of two button simultaneous presses can be programmed in to the system. Follow the video to learn how.
As the video will discuss in detail, out of the box the key fob is ready to be installed. Each key press will require a 3-second press and hold. To test the battery out of the box, press any button for 3 seconds and you will see the LED light illuminate.
The flashing Led will vary between red and green. When it flashes red it means the key fob is in high security mode. Green flashing means low security mode. Honeywell has started shipping all key fobs defaulted with high security mode.
If you have an older version, or other factor that makes the LED light flash green, you need to put the key fob in high security mode. This second part of out two part video will assume you have your key fob in high security mode.
To set up your Honeywell L5210 control panel to communicate with the high security key fob you need to enable it to scan for the encrypted signal. This video will show you how to do just that.
On the Honeywell L5210 control panel access the Tools menu using your installer code. The video will show you how to get to the Tools menu from the home screen. From the Tools menu you need to press “Test” followed by the “Go-No-Go” option. This will put the control panel in testing mode.
The next step outlined in the video is to pair the key fob to the control panel. You pair the device by pressing and holding the three buttons on the key fob for 5 seconds. These are the top two buttons (Arm away and disarm) as well as the bottom left button (home stay).
The video will further discuss the options for the key fob once you have tested that it communicates with the control panel. You can change the audible arm away and disarm alerts if you need to. The video will discuss these options in detail.
You can view our other video in this two part series to learn how to set the key fob to high security mode so that the fob and the control panel can communicate in high security mode.
You can also view our other videos to learn more about the Honeywell 5834 key fob or the Honeywell L5210 control panel, it’s functions and devices.
Transcript
Step two is we're going to go into Programming. So we'll go to Security, More, Tools, and then we'll enter the installer code, followed by Test. And then we'll go into the Go/No Go test mode.
Once you're in that mode, you'll get a yellow bar across the top of the screen that says Go/No Go Test Home to Quit. What that means is in order to get out of this mode when we're done, we'll press the home icon beneath the touch screen, and that will get us out of this test mode.
While we're in the test mode, in order to pair the key fob to the panel, what we'll need to do is press and hold the three icons-- the arm away, the disarm, and the person inside the home. Now, when you're in this mode, you'll hear a single beep every minute or so. That means you're still in test mode. That's fine.
When we pair this unit and it goes in, it's actually going to triple-beep. So we'll go ahead and do that. We're going to press and hold the open and close padlock and the arm stay button at the same time. I find putting it on a table is easiest.
[BEEPING]
And you hear the triple-beep. That means that now this unit is paired. What we can do now is hit the home icon. Enter your master code, which in this case we have on default, 1234. And we're back to ready to arm mode with a green bar across the top.
So after the key fob is paired, what we're going to do is test. So we're going to press and hold the arm away button, which is a closed padlock. We're going to--
[BEEPING]
Get a loud audible beep. That loud audible beat is designed so that when you're outside the home, you're notified that it did indeed arm. You'll also get a red flash on the key fob.
Now, when you disarm, it's going to be even louder. The design of that is that when you're entering back into the home to disarm, it will beep loud for three full seconds. So we're going to press and hold the open padlock--
[BEEPING]
And get a loud audible beep. Now, in order to disable that, if you're someone that may be using the key fob inside or maybe just don't like that loud audible noise and you're OK with just having the LED flash after you've tested for reliability, what you can do is go back into programming. We'll do Security, More, and then Tools, followed by the installer code, which we have as 4012, Program.
And then we'll go hit the down arrow, followed by Sounder. And here we have Arm Confirm. So we'll go into Arm Confirm. By default, it's set to RF Key Fob, which is this. And what that means is it's going to give that loud audible noise each time.
So for our purposes here today, we're going to set it to None because in some cases, you find that the key fob is better off, not as loud. Maybe you're arming the system as you're leaving for work and you don't want to wake up your family, who's still sleeping, whatever it may. We'll set the Arm Confirm setting to none. We'll hit Save, and then we'll back out to the home screen.
And now we'll try again. So we'll do an arm away. And you'll notice this time, it's a little bit more pleasant. You do get the setting with the arm away and the exit beeps to know that you did, in fact, arm the system, but it doesn't give you that loud, crazy beep.
So we can then do a disarm-- same thing, single beep and it disarms. So that is the 5834-4 RF key fob. This is a very handy unit when it comes arming and disarming, especially with users that may not be as familiar with security systems as you may be as the installer or master user. You can hand this to them and they can use this to arm and disarm. It's a good way to track users coming in and out, arming and disarming on Total Connect if you decide to set up that software.
After testing the 5834-4 key fob, you want to put on your key chain. And you can give it to any user that you plan to, or keep it for yourself. If you have any further questions on programming or using the 5834 key fob, you can email us at support@alarmgrid.com, and please subscribe to our channel.
- Uploaded