Programming a Zone to a 2GIG GC3e
Related Products


Related Categories
- Wireless Touchscreen Alarm Panels
- Small Business Security Systems
- Monitored Home Security Systems
- DIY Wireless Security Systems
- Apartment Security Systems
Description
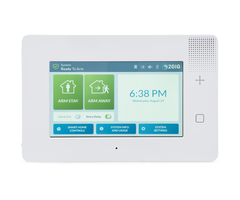
In this video, Michael from Alarm Grid shows you how to program a zone to a 2GIG GC3e Security System. This is a very important step for setting up the system. Every sensor will take up at least one zone on the system. You need to make sure that you configure all system zones correctly, or else the system will not respond in the appropriate manner when a sensor is faulted. This is determined by the Sensor Type for the zone, which may also be referred to as the Response Type. Different sensors will use different Sensor Types, so understanding them is important when programming zones.
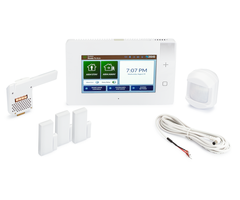
Other than Sensor Types, there are many other configurations that go into programming a zone. For example, as most zones on a 2GIG GC3e are wireless, you will need to program the Serial Number for the sensor to the zone. The 2GIG GC3e allows you to auto-enroll wireless sensors. This is recommended so that you do not make a mistake when entering the Serial Number. Auto-enrolling also helps ensure that the sensor communicates with the system properly. Most 345 MHz sensors will work with the 2GIG GC3e. You can also use the encrypted 2GIG eSeries Sensors with the system.
Another aspect of programming a zone is setting things like the Voice Descriptor, which is what the panel will speak out when the sensor is faulted. You can also set whether the panel will chime, speak out the Voice Descriptor, or do both voice and chime. There are also other miscellaneous settings, such as whether or not the panel should report out if the associated sensor triggers a system alarm, as well as whether or not the system should monitor the sensor for RF supervision. All of these settings will need to be adjusted accordingly when setting up the zone.
https://www.alarmgrid.com/faq/how-do-i-program-a-zone-to-a-2gig-gc3e
http://alrm.gd/get-monitored
Transcript
Hi, DIY-ers. This is Michael from Alarm Grid, and today, I'm going to show you how to program a wireless zone into your 2GIG GC3e security system. And we have our 2GIG GC3e right here. This system supports 345 megahertz wireless sensors, such as those from the Honeywell 5800 series and the 2GIG 345 megahertz series. And what this panel supports, the GC3e, supports over its predecessor, the GC3, just the regular GC3-- it can support the 2GIG eSeries encrypted sensors, which use wireless encryption for added protection. The only panels that can support the 2GIG eSeries sensors are the GC3e here and the 2GIG GC2e. So those are some nice sensors to use if you have one of these systems. But I'm just going to get into it. All the sensors are programmed in the same way, by the way, whether you're using encrypted or non-encrypted sensors. If you're using a Honeywell 5800 series sensors, just a reminder, you can only use the one-way communication sensors. You can't use the bidirectional sensors. Those only work with the LYNX Touch. But we have a sensor here. I believe it's a Honeywell 5800 Mini. Might be a VERSA-2GIG. But either way, they're programmed in the same way. So we're going to do an auto-enrollment with the system so that way, it auto-enrolls the serial number. So that way, you don't have to manually enter it. But that aside, let's just get right into it. We have the GC3e here. We're at the main screen. We're going to start by choosing the 2GIG logo in the upper right corner. And then we're going to be prompted for a code. We're going to enter in our installer code, which we have at our default, 1561. And then we're going to choose System Configuration. And we're going to choose Wireless Zones, and we're going to wait five seconds, because the GC3e likes to do that when you go into wireless zones. And after waiting, we have gotten to Wireless Zones. You can see, we don't have any sensors enrolled with our system right now. We don't have any zones set up. So nothing's bold over here. Say you had a sensor set in zone four. Then zone four would be bolded. And if you scroll down, you can see all 100 zones here. So you can program to whichever one you'd like. You can also use the Go To Zone button at the bottom, but I find it's easier just to scroll through it. And we're just going to use number one, just because we're programming the first sensor for the system. And we don't really need to do anything with our sensor right now. We're just going to be working on the right side of screen. It's actually going to take us to a different menu once I choose that option. Or we're going to go down from the top. So we're going to start with sensor type. And now, this is pretty much saying the response type. It's officially referred to as the sensor type, but it's like a response type on a Lyric or a LYNX Touch system. So this setting determines how the system will respond when the sensor's faulted. Or in this case, when the door is opened. When the magnet separates from the sensor. So it's very important that you get the proper response type in there, or else the system's not going to work the way you want it to. We have an FAQ that explains all the response types in more detail, so I'm not going to go over them here. But I'm just going to choose Entry Exit 1, which, in this case, if we had our system armed, stay, or armed away, and we faulted the sensor, then we would be able to disarm the system within an entry delay period. Or else if we didn't disarm within the entry delay period, then an alarm would occur. So we're just going to keep it at Entry Exit 1. And then for equipment code, you can click the button here. And you can scroll through a list of different sensor models that are used with the system. You'll see a lot of 2GIG ones in here. You'll see a few Honeywell ones, too. In our case, we have a 5800 Mini. And I don't believe this one's in here. So we can just choose an equivalent. They haven't an option for existing door and window contact. That's usually what I do, and that works pretty well. You could also just choose a 5816, I guess, or something. Really, just any door and window contact would give you the same result, so just make sure you're choosing that one. If you're using a motion, choose-- if you can find the sensor in there, that's great. Choose it. But otherwise, just choose an equivalent. So then we're going into serial number. Now this is for programming the unique serial number for the wireless sensor. Each wireless sensor has its own serial number, and that's how the system differentiates between different sensors. So in our case, we're going to auto-enroll it, which, that's pretty much always recommended. So you see this Learn button down here in the bottom right corner, we're going to click on that. And now it's listening. So we have our sensor, and we're just going to fault it. Let's see. You can see that all right? There we go. Left door open. And apparently, we haven't enrolled with the IQ 2, but that's OK. This is a non-encrypted sensor. So it has the capability to being rolled with multiple systems. So even though it's set up with our good friend the QOLSYS IQ Panel 2, that's OK in our example here. So we have the serial number displayed on the screen. You can confirm that it's correct. But usually, if it appears on the screen, then that means it's the one you want to use, because you just faulted it. So we're going to choose accept. And now, the serial number's enrolled, so we can go on to the next one. And we have Smart Areas assignment. Now, this is for smart area partitioning. And so that's a way to separate the system. So you arm different parts of the system at different times while other parts remain disarmed. In our case, we're not using partitions. So if you're not using partitions, you can just keep it at S1. Otherwise, just choose the partition you want to use. You have four available. So we're going to go to Equipment Age now. And this setting actually does absolutely nothing. So we'll just keep ours at new, because we don't really care about that. Then you have Sensor Loop. So a sensor can be programmed to multiple zones if it uses multiple loop numbers. An example is the 5800 combo, which, if you want, to get all the functionality out of, you'd have to program it to multiple system zones, with each zone using a different loop number. In our case, we're going to keep bars at loop 2, because that's the one that activated when we did the auto-enrollment. So that that's fine for us. But refer to the manual for your sensor if you're not sure which loop to use. It will tell you, based on the function you want. So then we have Transmission Delay. In most cases, you want to just have this disabled. What this does is actually, if the sense-- if the zone causes an alarm on the system, then if you have a transmission delay enabled, it will wait a little bit before sending out an alarm to Alarm.com. Assuming you have the system monitored and set up with that service. And really, if an alarm occurs on your system, you want to receive help as quickly as possible. So usually, you would just keep this disabled. That's what we're going to do here. Then we have a voice descriptor. This is what the panel will speak out when the zone is faulted, when the sensor faulted. You can click Edit Voice Descriptor here to set it up. We'll do door. And we'll call it hallway. Yeah, there. So you enter in the letter, and then you can choose-- it's pretty intuitive. Once you get it the way you want-- we have door-hallway, I guess, rather than hallway-door. Whatever. We're just going to choose Done. You can also press that Delete button there if you want to delete stuff or the Clear button. But we're happy with door-hallway, so we'll go with that. Sensor Reports. So again, normally you'd want this to be enabled. But if you don't want the zone to be able to cause an alarm-- maybe you just want to have it monitored, but you don't want to trigger a false alarm by chance on the sensor. You're worried about that. You can disable it. But in our case, we want to have our hallway-door protected. So we're going to keep it enabled. And now sensor is supervised. Again, you want to normally keep this disabled-- you want to keep it enabled for a sensor supervised. So Sensor Supervised-- that's pretty much RF transmission check-in. So occasionally, the panel will be checking in periodically with the sensor. And if it doesn't receive a notification that it's around, then a trouble condition will appear on your system. You would disable this for something like a key fob that you bring away from the system, or maybe you have someone wearing a medical alert button. And you have to wear it at all times and they might go out and about, they might go on a walk or something. And then they might be far away from the system, and you don't want to receive that trouble notification. So in that case, you could just use Disabled. But most of the time, you'd want to have it enabled, so that way you know that your sensor is communicating properly and checking in with your system. Then so lastly, we have sensor time. You can choose different options here. This is also how you would disable the voice descriptor if you didn't really want to use one. You'll see various options have voice setup. Other ones don't. We'll choose ding-dong with voice, I guess. And that will give us a chime plus the voice descriptor. And so once we've done everything, then we can choose Return to System Configuration in the upper right. And you'll see that Wireless Zones is highlighted, indicating that there are changes there. If we press the Return arrow, and then it'll allow us to confirm the changes, and we can choose Save, and it will apply the changes to the panel, and we've successfully enrolled our zone. And we're going to hear a notification on the IQ 2, but you'll also see when I fault this that we have our door-hallway open here on the system. And we've successfully enrolled the sensor. When we close it-- see, it's closed now. We don't have the message anymore. And do it again. See, it's properly enrolled with the system. We configured the wireless zone. So that's how you would add a wireless zone to a 2GIG GC3e security system. If you found this video helpful, make sure to give it a thumbs up below to like the video. And remember to subscribe to our channel to get updates on future videos. And if you have any questions about the 2GIG GC3e or about alarm monitoring in general, please send us an email at support@alarmgrid.com. Hope you enjoyed the video. Thanks.
- Uploaded