Installing a Cellular Communicator Into a 2GIG GC2e
Related Products
Related Categories
- Small Business Security Systems
- Monitored Home Security Systems
- DIY Wireless Security Systems
- Apartment Security Systems
Description
In this video, Michael from Alarm Grid shows you how to install a cellular communicator for a 2GIG GC2e Security System. The 2GIG GC2e does not have a cellular communicator included by default. You must obtain a communicator and install it inside the system This is a requirement for getting the system monitored, as the 2GIG GC2e does not have another communication path available. The GC2e System will use its added communicator to send signals to the Alarm.com servers. From there, Alarm.com then forwards important information, such as alarm events, to a central monitoring station and/or the end user directly via text message and/or email.
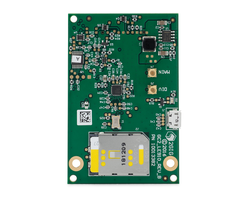
After you have installed the communicator inside the GC2e Panel, you must then activate it for monitoring service. You will need to provide your monitoring company with the unique IMEI Number associated with the added communicator. This is required for activating the communicator, so make sure to have it on-hand and ready for your activation. The IMEI Number can be found on a sticker on the communicator itself, or you may be able to find it on the product packaging. You will also need a monitoring plan that includes cellular connectivity. An example of a good monitoring plan to use is the Alarm Grid Gold Plan.
If your monitoring plan includes access to Alarm.com, then you will also be able control your GC2e System remotely from that platform. This is made easy using the Alarm.com website and the Alarm.com Mobile App for Android and iOS devices. You can use Alarm.com to arm and disarm your system, check its current status, control programmed Z-Wave devices and much more. Remember that Alarm.com access is only possible once a compatible Alarm.com Cellular Communicator has been installed and activated for monitoring service. Make sure to confirm with your monitoring company that Alarm.com access is included with your monitoring plan.
https://www.alarmgrid.com/videos/how-do-i-install-the-cell-module-in-a-2gig-gc2e
http://alrm.gd/get-monitored
Transcript
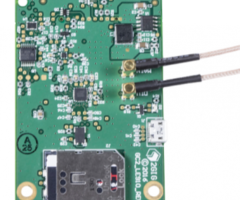
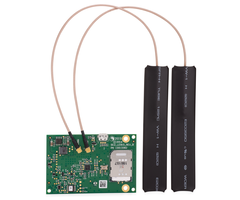
Hi DIYers. This is Michael from Alarm Grid, and today, I'm going to be showing you how to install a cellular communicator inside of a 2GIG GC2e security system. The 2GIG GC2e, we have ours here, it does not have a communicator built in. Doesn't have Wi-Fi capabilities. You need to add a cellular communicator for this panel to communicate out and that's the only way it's going to do so. It's going to communicate with alarm.com and then alarm.com forwards alerts to the end user directly via text and/or email and/or to a central station. This is going to depend on the type of monitoring plan you have. But you do need cellular connectivity per alarm.com requirements, and also that's really the only way that the system can send out signals. So there are a couple of communicator options. They all use LTE which is one of the latest cellular technologies. You may have heard of 5G being rolled out. LTE is going to serve as a valuable backup to 5G, so LTE is going to be around for a very long time. So once you put an LTE communicator in the system and you take care of it, it's going to be serving you well for a very long time and to protect your home or business. But putting this communicator in when you do have it connected with alarm.com, you're assuming it's included in your monitoring plan, you'll also be able to control your system remotely using an app on your phone or using a web browser, whatever you prefer. You can use both. And there are a couple of options like I was saying. There's an AT&T version and a Verizon version. We're going to be installing the AT&T one today, which is actually the LTA-A-GC2. The Verizon model's installed in the exact same way. So if you're using that, it's the same process pretty much looks the same and everything, so just follow along and do what you gotta do. But I do want to point out on this communicator-- any communicator of Verizon or AT&T are both going to have this-- there's going to be an IMEI number on the communicator. And you're going to want to get that-- you're going to either write it down or take a picture of the IMEI number because you will need it when you go to activate the communicator at the end of this, after you've installed it. So just make sure you have that handy, otherwise you will have trouble accessing later. It's also found on the product box. So if you did install it and you needed to find it last second, then that could be an option. But just a good idea to write it down. But anyway, so we have our system here. So what I'm going be doing today is I'm going to be opening up the system, and then I'm going to be powering it down so that way we can safely install the communicator. I'm going to show you where the communicator goes. I'm going to show you where the screws go. I'm going to show you where the antennas go, and we're going to close it back up. Turn it back on and then I'll close it out. So we have our 2GIG GC2e system here and we're going to start by taking our fingernails and we're going to kind of pop the top cover off. You can also use a thin object if your fingernails aren't suited for the job. But you do just want to take off the cover here. Now you can see that our screws have already been released. I do want to just show you what would happen if they weren't released. These are already popped out but if I were to take it in and kind of screwed in a little bit, it's called locking the module. Let me see if I get it here. There. You see, it's locked, it's not popped out. If I tried to open it now, then I would run into problems. And that's how you first encounter the system a lot of the time. So if you do see that yours are locked, then you do want to take your flat-head screwdriver and you just want to go counterclockwise until it pops out like that. So that's how you can get into it. And you want to do that for both of them. Ours were already opened. I was just showing you just in case yours weren't. But once you get them both released, then you can do the two tabs. We'll start up here. Just kind of pop it in there, get that first one released, and then the second one released. Did you see, we have a tamper on the system. That's normal. Well, press OK even though we really don't have to worry about it. We are powering down the system. But now we can kind of fold it down and you see that there's a third hand option right here. This white straping can go in this circle part right here. And then we have our hands free, so that's nice. Now I'm going to start by powering down the system. So first, we're going to just disconnect the backup battery here, just unplug it, and then we're going to do AC power which is this white cord right here. And now, if you are using the wire terminals instead for AC power, you might find it easier to unplug transferring from the wall outlet or you can cut power at the breaker, that's fine. Just make sure your system is completely powered down. You see our screen is blank now. That means it's powered down. So we have our communicator here. I'm going to start by plugging it in. You see that there's a port for it right here. And then we have our prongs that can go into it. So we're just going to take it and connect it on that part right there to make sure it aligns, and looks like we're good. So we have that taken care of. And now what we're going to do is we're going to do the two small screws that are right there and right there, and we have our screws and washers. Right here they're small screws so just be a little bit careful with them. I'm going to switch over to a Phillips head screwdriver, ours is reversible, so we'll do that. And now let's do the first screw here and we'll do the one little bit far for me. OK. Now we have both screws in place and our communicator is set. So now it's time to take a look at our antenna here. We have two antennas and you see on the communicator, there's one labeled Main and then there's one labeled DIV for diversity. So the antennas actually go in two different places. I'm going to do the main one first. The main one goes inside the panel and you can just stick it into this little slot right there. You'll see I'm going to first connect it and you see when I get it into the hole and then I just pop it, it's going to take a nice click. You're going to hear it. [CLICK] There we go. So we got the click and then we can just take the antenna and just slide it into the port here. And I'll worry about getting it out of the way in a little bit later because we will need to close the panel. But I'll worry about that in a bit. So we have our main antenna that's going into the panel hanging out there. And we're going to do our diversity antenna, the div, which is the next one. And we're just going to take our antenna. It connects the same way. I just want to get it aligned here. And when we do this, click. [CLICK] There. And that was kind of a quieter click, but we still got it. And we'll take it and we'll just slide it through the back area. And it can just hang out over there. So now we're going to turn our panel back on. I'll do the backup battery first. We just connect to that. Here we go. And now we need to reapply AC power which will power the system back on. And if you took out your transformer earlier from the wall outlet, you can just plug it back in. Or if cut power to the breaker, return power to the breaker. We did the barrel connection from a Honeywell LT cable. So we'll just go and we'll connect it back in. Good. All right. And now we can go ahead and close the panel. So we'er just going to swing it upwards, make sure the antenna's in place. I'm going to kind of just get it out of the way here so it's not in the way of anything, and then we take our system. I want to get them right down, and there we go. Got it back on. Now I'm going to do the locking screws just to kind of show you them again. They're optional, really. You don't have to lock them down. But if you want to make your system extra secure, then that is an option. So let's do the first one. We're just going to tighten it down a little bit, and they were good. And then we're going to do our second one. System disarmed. Ready to arm. And you see our system did come back on. And there we go. So we've got our two locking screws, and then we can just take our front cover and we're going to snap it into place. And there we go. So now our communicator is installed inside of our 2GIG GC2e system. So that is how you install a cellular communicator inside of a 2GIG GC2e, but you have one more step. You do have to activate the communicator for monitoring service. So like I said, you will need your IMEI number. If you sign up with service with Alarm Grid, such as an Alarm Grid Gold Plan or Platinum Plan, then we'll be contacting you at your scheduled activation slot. Just make sure you do this before we contact you, and be on site ready to go, and we'll take care of the rest. So just wait for that phone call at your scheduled time. So and remember to have your IMEI number in hand. You will need that as part of the process, but we'll walk you through everything else. So that's how you install a cellular communicator inside of a 2GIG GC2e. If you have any questions about the 2GIG GC2e or alarm monitoring services, send an email to support@alarmgrid.com. If you find this video helpful, make sure to give it a thumbs up below, and remember to subscribe to our channel for updates on future videos. We hope you enjoyed the video. Thank you.
- Uploaded