Honeywell 5811: Program to an L5100
Related Products
Related Categories
Description
This video is about Program 5811 to L5100 Wireless Security System
Transcript
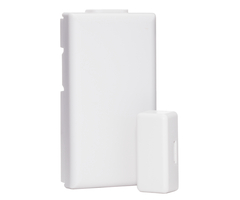
Hi DIY-ers, Sterling from Alarm Grid here and today we're going to show you how to program a Honeywell Wireless 5811 Door and Window Sensor. The 5811 is one of our most popular door and window sensors. The 5816 is the more traditional sensor that comes with the L5100 PK and L3000 PK Security System Kits. So that's the more popular and older style of contact. It's bigger and boxier than the 5811. You can see that the 5811 has a very thin profile which makes it very nice, blends in well with your decor. So this is the newest sensor that the Honeywell 5800 series has released and it's fast becoming the most popular option for people when they want a new door or window sensor to work with their Honeywell wireless security system.
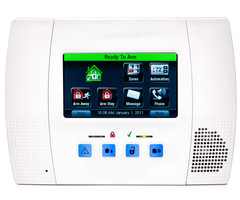
So now we're going to show you how to learn your 5811 into a Lynx Touch L5100 System. So the first thing we want to do is click from the home screen the more option at the bottom so that we see our tools option. We go into our tools menu. We enter our installer code which we have set to the default 4112. And then we go into our program option. And just like with all zone programming we go to our zone screen.
Now that we're in here, we're going to scroll down to our first available zone. We're going to always ignore zone one because that's the hard wire zone that cannot accept a wireless sensor. We're not using any hard wire so we skip over that. You can see that we do have some zones already programmed in so we're going to scroll down until we get to our first available zone. It happens to be zone ten, new. Toggle it. Click edit. And here we are on our zone programming screen.
The first thing that you want to do when you're learning in your zone is enter the serial number option. So we click in the serial number. Every Honeywell wireless sensor has a sticker on it with A for alpha and then a seven digit number. This happens to be a sensor that we took down from a previous installation and there is no bar code sticker. So if you're left with a sensor that for some reason doesn't have a sticker, there's an easy auto-enroll mode to learn the sensor to the system in case you don't have the sticker.
So what you do, you can see on the 5811 on one side there's these two little hash marks. It's not on this side, it's only on one side. That corresponds where the internal read switch and that's the side that the magnet needs to be in conjunction with for the sensor to work. So the way that this auto-enroll mode works is you put the sensor next to the magnet, you pull it away and it will beep. It actually just did that before so let me back out and go back in to show you fresh. So we have our magnet and our sensor. We have our battery already installed. We're going to put our magnet next to the two hash marks, pull it away, it'll beep once. You put it back, pull it away again. It'll auto-enroll the serial number and the loop number 5811 Sensor should always be loop number one. Do it a third time. It saves the values and takes you back to this screen.
So we now have our sensor enrolled and we just have a few more options to tell the system how to respond when this zone goes off. So the first thing we want to do is name it. This is on our back door, on our right back door. We happen to have two back doors in this home. So we're going to choose back and the way to choose back is you. System, Baby, type the first letter B. System, Back. Scroll down to back. So this is an alphabetical list of all the words in the Honeywell library. You choose back. You click done. And we're going to then use our zone description two, to give it the option for right to designate from the back left door. Toggle in. Choose an R for right, system, rear. It gives you your first R word, system: Recreation, refridge. You can scroll through all the available words, sensor, refrigeration. Or for a shortcut, you choose the next letter, sensor, right. It skips right to the first RI word which happens to be right which is the one we want. We click done. We have back right. And the last word that we want is door and the way we choose that is by naming the device type. So this is where you're telling the panel what is this sensor. Is it a carbon monoxide? Is it a smoke? Is it a window? Is it a door? It's a door. You choose it. And it will actually say back right door when this zone is tripped.
In addition to naming it as a door, this device type also will limit our zone response types to the options that you should be checking. So it's a little handy way to help you instead of giving you the whole list of response types and having to choose, it'll weed out the ones that it knows you're not going to use for a door. And it gives you the options you will want to use. So you're option for a door or window 90 percent of the time is going to be entry exit one or perimeter. Entry exit one will give you a delay so you've set that for all doors and windows that you use when the system is armed. So the doors that you need to give a delay so that when you're coming home, you open the door, the alarm won't go off right away. You have x amount of time to get to the panel and disarm the system. Since this is a back door and not a door that we use when the system is armed, we actually want to set it to perimeter. With a perimeter option chosen, as soon as this zone is violated, as soon as this door opens the alarm will go off. So we want to set it to perimeter. And our last three options, we have alarm report. Our system is monitored by our central station so we want to set it to yes so that if this zone is tripped it'll send the information over to the central. If you had a simple monitor zone, maybe this was on your cabinet and you didn't necessarily want the central station to send out the police but you wanted to know if it faulted, you could set that to no. The alarm will still occur but it won't go to the central. So that's what alarm report does.
Chime will tell you locally that the panel opened or closed. So it'll beep and respond giving you the name of the zone. So this is handy for doors and windows that you want to keep tabs on if they're opening and closing when the system is off. We're going to leave that set to yes. And then lastly we want supervise. That means that the panel will check to make sure this sensor is there and you always want to have that set for yes for all your doors and windows sensors. So we're going to save it and you can see zone ten back right door is now learned in. We're going to back out to the home screen and we're going to demonstrate that when the door opens, system, back right door.
The panel faults. It shows you back right door and it even enunciates with voice letting you know that the back right door has been opened. Put it back. System is ready to arm and zone is happy. So that's a 5811 Honeywell Wireless Thin Door and Window Sensor. One last thing that I'll note because we get this question a lot: what is the system, back right door. What is the magnet to use for this sensor? Unfortunately, Honeywell does not sell this nice, convenient, small magnet on its own. However, we have the 943 WG-M which is a similar, smaller magnet. It looks a little bit different but it's a good option for using with the 5811. A lot of times when you want two magnets it's a way to vent the zone.
So for venting, normally it's on a window. You want to be able to arm the system when the window is open. What you would do is you would have two magnets, one sensor. You mount the sensor on your window and you put two magnets six inches apart, system; back right door. When the window is closed, you have it in line with the magnet, system; back right door.
When the window opens, you have another magnet up that will also keep the zone happy. So it's a very simple way to protect your system even when the window is open. So again, if you want to look for an alternate magnet, 943WG-M is a good option for your 5811. So now that you know how to program and use your 5811 Wireless Sensor, please let us know if you have any questions on that. Leave us a question in the comment section below and we'll make sure to answer it. Please subscribe to our YouTube channel so that you can keep tabs on all new videos that we release.
- Uploaded
- Duration: