Qolsys IQ Shock S: Enroll with IQ Panel 2
Related Products
Related Categories
Description
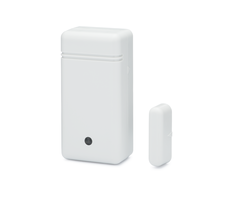
In this video, Michael from Alarm Grid shows you how to enroll the Qolsys IQ Shock-S with the Qolsys IQ Panel 2 Security System. The Qolsys IQ Shock-S is a wireless shock sensor that operates at 319.5 MHz. It works with the original Qolsys IQ Panel 2, as well as the 319.5 MHz Qolsys IQ Panel 2 Plus. The sensor responds to the physical shock waves that occur when a door or window is broken down. You can also use it as a door and window contact sensor by turning ON sensor DIP Switch #3 and installing it alongside its included magnet.
The Qolsys IQ Shock-S enrolls with the Qolsys IQ Panel 2 by putting the system into its Auto-Learn Sensor Mode and then activating the tamper switch for the sensor. Once the system acknowledges the sensor, just confirm that you would like to enroll it, and then configure the zone settings. Before installing, you should open up the sensor and adjust its inside potentiometer to the desired level of sensitivity, and also configure the three (3) inside DIP switches to the proper positions based upon how you intend on using the sensor. It is a good idea to test the sensor after enrolling and installing it.
https://www.alarmgrid.com/faq/how-do-i-learn-the-qolsys-iq-shock-s-into-my-qolsys-iq-panel-2-p
http://alrm.gd/get-monitored
Transcript
[MUSIC PLAYING] Hi, DIYers. This is Michael from Alarm Grid. And today, I'm going to be showing you how to enroll the Qolsys IQ Shock-S with your Qolsys IQ Panel 2 security system. Or you could be using the 319.5 megahertz Qolsys. IQ Panel 2 Plus. This is part of the Qolsys S-line sensors that use the S-line rolling code encryption. And it actually doubles as a door and window contact sensor, in addition to a shock sensor, if you enable deep switch number 3. Which I'm going to show you that right now, actually. So the first thing we're going to do, we're going to open up the sensor. Because I want to show you what's inside, because there might be some settings that you want to change in here. So to open up the sensor, you want to take the magnet, put that off to the side. Don't have it be stuck to your screwdriver there. So there's a little slot right here. And we can just take our flat-head screwdriver, and we're going to just insert it. And you see it pops right open, and we can open it up just like that. There's some pretty cool stuff inside the sensor. First of all, we have a CR123A lithium battery here that's powering the sensor. We have a potentiometer. Fun word there. But what you can do is you can take a smaller screwdriver-- this one's a little bit too big. You can turn it counterclockwise to reduce the sensitivity minimum, or you can turn it clockwise to increase the sensitivity towards maximum. So potentiometer right there. So you can go and get a smaller screwdriver and turn that as needed, but we're going to leave ours alone right there. But we also have three deep switches down here at the bottom. The first one is for a test signal. So that way, if you that one on, it's not going to send any signals to the panel, so the sensor won't work. So you want to leave that one off, assuming you're using the sensor and having it reporting to your system, which is pretty much the purpose of the sensor. Deep switch number 2 is for an LED and sounder. That's going to drain the battery a little bit faster. But some users do like the feature to have the sensor provide its own warning that it's being activated. So you can turn that on if you want. We're going to leave ours off, just because we want to save the battery life on here as much as possible. And so we have deep switch number 3. Now, this is the one where the real action is. This is what enables the read switch for the sensor, so that way, it's going to double as a door and window contact sensor. And by that, I mean you look on the side, you see that there is an indentation. It's a little triangle right here, I'll also show you when I have the sensor closed. And when we have the magnet next to the sensor, that's when the door window is closed. You have the magnet on the moving portion of the door window, you open up the door window, the magnet moves away, and that faults the sensor. This sensor is going to give the same response, assuming we have a switch number 3 on, it's going to give the same response whether it detects a shock wave from someone breaking down the door window, or if it detects that the door window has been opened, the way that we're going to program it. So we're going to keep the switch 3 on. We're going to leave it alone, you see it is on right now. I'm going to close the sensor. So I can show you the side indentation what I was talking about. We just want to line it up. Here we're going get the top part first. You just want to make sure it gets closed all the way. There we go. It's nice and closed all around. And you can see that there's an indentation right there, a little triangle right there, that's the side where the magnet goes. Like I said, you have the magnet, and the door window is closed. Door window is open, and it goes off. Let's get to enrolling this. And it's the same whether we're using a standard Qolsys IQ Panel 2 or 319.5 megahertz Qolsys IQ Panel 2 So let's get into programming it. We're going to start the main screen in the system. We're going to click the small gray bar at the top. We're going to choose settings. And we're going to choose advanced settings. And then we're going to enter in our installer code, which ours is at the default of 1111. And we're going to choose installation. We're going to choose devices. And we're going to choose security sensors. And then we're going to go to auto learn sensor. The way we're going to enroll, we're going to open up the-- that's actually the sensor right there. I will show you that it is the correct code. But I'm going to enroll it by activating the tamper switch, the way that you're traditionally supposed to enroll it. But that actually is the sensor right there, and it detected the fault, because the deep switch is turned on for deep switch number 3, and the lead switch is enabled, and it will enable the sensor. We're going to cancel for now. And what I'm going to do is I'm going to open up the sensor again. Remember, we have this small tab right here. I'm going to insert it, pop it open, and that's going to do a tamper. And you see that sensor CEBAA8, that is the code that you see right there on the barcode right there. So that is the correct sensor, that is the one we want. So we're going to choose OK. So I'm going to close the sensor just before I forget to do so. I'm just going to line the top up, here get that proper. And it's not on there right, because I have it facing the wrong way. We're going to do this properly now. Here we go. It is closed. Top part is still not on there quite right. And there we go. Nice satisfying click. It is closed. So let's get into doing the zone setting. We have the sensor DLID. That one is correct, we just confirmed it. We're going to an roll this as a shock sensor, so we're going to switch this to shock. Now, it's not going to show faults on the panels. So what I'm going to do is I'm actually going to arm the system and put it into alarm. I'm going to show you both ways that you can activate the sensor I'm going to make sure that the magnet is properly aligned so we don't have any faults right away. Just doing that real quick. Let's look at what we got here. We can set it as an IQ shock or a different type of shock. This is an IQ shock, so we're going to keep that as an IQ shock. Now, a sensor group. There's two to choose from. So we have 13 and we have 17. If we choose 13 and the sensor is faulted, since we have the deep switch 3 enabled, whether it's detecting the door window being opened or detects the shockwave of the door window being smashed. If the system's armed away or armed stay, it's going to trigger an alarm, if I choose 13. Now, if I choose 17, it's going to be the same thing, except the sensor will be automatically bypassed if the system is in armed stay mode. It's only going to be able to trigger an alarm in armed away mode. We want ours to trigger an alarm in armed stay or armed away, so we're going to choose sensor group 13 shock. And sensor name, we can choose a name or we can do your custom name. We're upstairs, so let's do upstairs shock detector. Chime type, this one you're not really going to worry too much for a shock sensor. This is mostly triggering an alarm. It's just going to trigger an alarm, because you can activate the door window sensor, but it's going to just give you the same response either way. So you're really not going to hear a chime too often, but you can choose one if you wish to. Which is sonar. We'll keep it as that. And so voice prompts. Again, you're not really going to hear the sensors name too often, but if you do want to have it enabled, you can. And then the s-line encryption, we do want to have that enabled. So we'll keep that as the source cell. Everything's correct there, we're reviewing all the settings, they look good to me. So we're going to choose Add New. Sensor added successfully And the sensor has been added. So let's test the sensor out and show you how it works. So let's press the home key at the bottom, and we're going to go home. Upstairs shock detector activated. You can hear that we have our upstairs shock detector enrolled with the system properly. Now, the system is going to give the same response whether it detects the shockwave of a door window being smashed or whether it's the door window opening, and the magnet separates from the sensor, and activates the read switch inside. So I'm going to put the system into armed stay mode. And we're going to, hopefully, get an alarm on the system. I'm going to try to fault it by doing a tapping against the sensor, and getting it to detect a shock wave. Headphone warning, by the way-- this will trigger an alarm, and it will be loud. So let's go ahead and do this. Armed stay here. And we're going to input our master code, which ours is still at the default, 1234. Usually change that code, but we kept it at that for simplicity purposes, for just the testing. But let's hopefully fault this guy. [ALARM BEEPING] [INAUDIBLE] is now disarmed. And you see, we got the sensor to fault. We clearly had the magnet still in line with the sensor, so detected the shockwave. And that's how we trigger an alarm. Now I'm going to do the same thing, but this time I'm going separate the magnet from the sensor, as if I were opening a door or window. And you're going to see that it gives me the same response on the system. So let's go ahead. Armed stay again. 1234. And remember, it's treating it as though it's an activated shock sensor. It's going to send the same signal to the panel whether I did the shock wave or whether I do this. So let's go ahead. Headphone warning. [ALARM BEEPING] [INAUDIBLE] disarmed. I'm going to lose my hearing by the time I'm 30. Anyway, OK. That is how you enroll the Qolsys IQ shock S with your Qolsys IQ Panel 2 Plus security system or your standard IQ Panel 2 security system. Pretty much like any S-line sensor. And you set the zone settings accordingly. Just remember to adjust the potentiometer inside and adjust the deep switches accordingly. So that's how you enroll your Qolsys IQ shock S. Qolsys Shock detector activated. If you found this video helpful, make sure to give it a thumbs-up below. So like the video, and remember to subscribe to our channel for updates on future videos. You have any questions or you want to learn more about alarm monitoring services? [INAUDIBLE] shock dector activated. Send an email to support@alarmgrid.com. We hope you enjoyed the video. Thank you.
- Uploaded