2GIG GC3: Installing the 3GA-A-GC3 Cellular Radio
Related Products

Related Categories
Description
The GC3 wireless security system is one of the latest models offered by 2GIG. It provides comprehensive security for your home or business.
The security system requires a cellular radio to function properly. It does come with one right out of the box.
However, the stock radio doesn’t work for everyone. If you live in an area with special wireless needs, then you might need to invest in an aftermarket cellular radio.
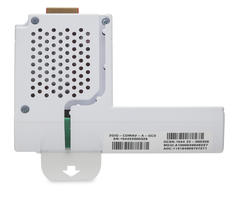
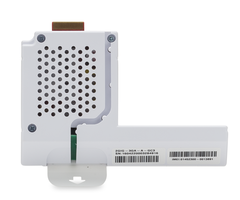
The 2GIG 3GA-A-GC3 cellular radio is the best option for those that live in an area with strong AT&T coverage. It connects to the AT&T network.
Our video shows you exactly how to install the 3GA-A-GC3. It starts by explaining the reasons to do this – if you’re in an area with strong AT&T network coverage.
The video then goes on to explain how to properly power down your 2GIG GC3 so as not to ruin the device during the installation process.
Once disconnected, the video shows you how to open the device’s back panel, remove the old cellular radio, and install the new 2GIG 3GA-A-GC3 model.
Though the 3GA-A-GC3 does come with a written instruction manual, our video instructions are much easier to follow.
Our video explains the necessity of writing down the IMEI number of your cellular radio. Once the new cellular radio is installed, you can contact your alarm provider with the IMEI number. It enables them to remotely active your new cellular radio.
The 3GA-A-GC3 cellular radio is also unique in that it allows you to connect your smartphone or computer to the GC3. Of course, a connection to central station is also available.
Once the new cellular radio is installed, our video shows you how to navigate to “System Settings” and then “Cellular Radio Swap.” This, along with sending your IMEI number to your alarm provider, will ensure the 2GIG GC3 functions smoothly.
Finally, our video tutorial explains how to test that the swap worked correctly. It’s pivotal to make sure the new radio works, so that you’re not left without service in the event of an emergency.
The 2GIG 3GA-A-GC3 cellular radio is only one of the additional cellular radio options. You can also replace the stock radio with two other aftermarket models, the 2GIG CDMAV-A-GC3 or the 2GIG 3GR-A-GC3.
The 2GIG CDMAV-A-GC3 is a Verizon cellular radio. If you live in an area with dominant Verizon coverage, this is likely your best choice.
The 2GIG 3GR-A-GC3 is a Rogers cellular radio. If you live in an area with dominant Rogers coverage, this is likely your best choice.
We have in-depth videos showing exactly how to install these two cellular radios into your 2GIG GC3 security system.
That’s the value of installing the 2GIG 3GA-A-GC3 cellular radio into your 2GIG GC3 wireless security system – it enables you to access the AT&T network if it’s strongest in your area.
Transcript
Hi, DIYers. This is Frank at Alarm Grid. We're back in the Alarm Grid lab working on the 2GIG GC3 alarm system today. This is the newest 2GIG Go!Control panel offered by 2GIG. We have the GC2 down here below. You'll see that GC3 has a much larger touchscreen and is going to support the new encrypted sensors.
As of now, in May 2016, they have not been released yet, but they will be released at some point later in the year. Today, we'll be working with the 2GIG 3GA-A-GC3. This is a cellular module.
You'll see it has this kind of right angle shape so that it can fit on the left side of the panel. This is an alarm.com radio. So the 2GIG Go! Control three or GC3 supports communications to alarm.com, which is an interactive service that hosts cellular communications. And it will trickle down to an app on your smartphone, tablet, or computer.
You'll have a web login, where you can go in, set up alerts through push notifications, text alerts, emails. And it'll also transmit signals to a central station, as well. So we'll show you how to install this today. And then we'll show you how to send over the IMEI number to your alarm dot.com dealer.
So it's actually listed right here on the unit. So before you install it, the first thing we recommend you do is document that IMEI in full and write it down onto a piece of paper, maybe even send yourself an email with it. And then we can install it.
So there is a feature in the guide on this that tells you can install the unit, while the system is powered on. Now what I've done in some testing here, at least, on our panel in the lab, is I've found that the system does require, at least, for the first time, is for you to power down and install it. So what we're going to do today is show you how to basically power the system down, which is fairly straightforward.
Just like any self-contained alarm system, we'll have to disconnect the transformer from the wall, so where the transformer is plugged into the wall outlet below here, feeding the 120 VAC, that's then transformed down to the low voltage DC and giving this panel its power. Then there's also a backup battery inside the keypad. And opening this panel up is pretty easy to remove the battery. So I'll show you that in just a second.
So we'll put down our radio for the moment. And what I'd like to do is first I will remove AC power by disconnecting the transformer from the wall, which I'll do below here. You'll see that it says power lost on the screen. We can click OK.
And then we'll go ahead and remove the panel from the wall. So the best application for this is to actually lift from the bottom. We can keep our fingers on the top and just lift from the bottom and take the panel of the wall. So you'll see that we're actually using an LT-CABLE.
The LT-CABLE has a nice right angle barrel connector. So in this case, if you were using the LT, you could just disconnect it from the back in the panel, instead of removing at the transformer. In the event that you use custom cable, then you're using a two wire cable going into your power connections here. That's where we want to move out the transformer so we're not disconnecting live wires and potentially shorting at the system.
So we'll actually plug this back in, because we've already disconnected this at the transformer below. And what we'll do next is unplug our battery. So just beneath the battery, here, there's a little black clip. We can bring this wire out, slide it up. And you'll see our white clip for the battery connection on the board.
We'll unclip that. And you see the we have it now unclipped. Panel is completely powered off. And we can now put our battery back in. Actually, we'll leave everything out there right now.
So now that we have everything disconnected, you could do this on a table if you wanted to. I'll actually do it-- just for today's purposes-- I'll just hold it right here in my hand.
So we have on this left side of-- this is the orientation of the system here. So on the left side of the panel, there is a door here. And there is actually a small tab that you can grab and lift and open. And you'll see that you can see right into the keypad here.
What we'll do is install the radio. So we'll take our door, put that down. And we have the panel flip flipped right now. Well, actually we have a square button, which is the Home key. We want that on the bottom, plus on the top. That means we have the proper orientation up and down.
And then this unit will slide in with the antenna facing up right into the panel here, like this. And click that right into place. And you'll see that there's a little tab here to pull that out later. We can then take our door.
It says up on here. So we'll face that up and down this way. And then we'll snap that shut. We can then turn this back around. If you did disconnect the LT-CABLE at the panel, you could then plug that back in.
Actually, yeah, you could plug that back in now. And then we'll go ahead and plug-in the battery clip. Now closing up the back plate can be a little tricky with this little ferret here. So we'll actually slide this over, and push it in nice and snug so that it doesn't get in the way, when we go to close up.
When you put this back on the wall, there's two small hooks that latch on the top. And then you want to get your LT or your custom cable out of the way. Snap the bottom down.
And then in this case, we disconnect the transformer. So I'll plug that back in. And we'll give that a moment. You can see the flash here on the Home and Panic keys.
Disarmed, ready to arm.
This will power back up.
Disarmed, ready to arm.
And as that's powering up, once this does power up, you can take your documented IMEI number that was listed on the 3G AT&T radio, and you can document that and send it in the form of an email, or just call your alarm company that you enrolled in alarm.com service with and make sure that you get that to them so that they can remotely activate your radio. This 3G radio will use the AT&T network.
There is also a CMDA Verizon radio that we'll be showing you in another video. So if you do have better AT&T or Verizon coverage in your area, just use whichever radio that is. That's how you install the GC3GA-A-GC3. So if you have any other questions regarding the AT&T radio for alarm.com on your 2GIG panel, you can email us at support@alarmgrid.com. And don't forget subscribe to our channel.
- Uploaded