2GIG GC3: Swapping a Cellular Radio
Related Products

Related Categories
Description
The 2GIG GC3 wireless security system requires a cellular radio for operation.
The cellular radio enables the device to stay connected to central station. It ensures that your security system is constantly monitored.
Yet the stock cellular radio in the 2GIG GC3 security system isn’t for everyone. There’s a chance that it will be underpowered in your specific area.
This usually happens if one provider doesn’t have coverage where you live. For instance, you might not get good AT&T reception, but Verizon reception is top quality. The cellular radio swap outlined in our video shows you how to swap in a Verizon radio in place of the stock model.
As explained in our video, swapping the two radios is extremely simple. The 2GIG GC3 instruction manual also details the process, but it’s far easier to follow the visual example outlined in our comprehensive video tutorial.
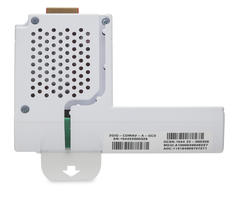
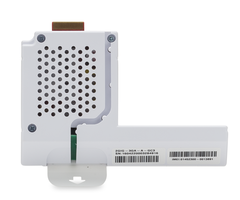
The tutorial details how to safely remove the old radio and install the new one. Though the stock cellular radio can be replaced with a variety of models, the video shows you how to replace it with the 2GIG CDMAV-A-GC3 cellular communicator.
The 2GIG CDMAV-A-GC3 is a powerful Verizon cellular radio that allows your 2GIG GC3 security system to communicate with central station in areas without adequate AT&T coverage.
Other popular cellular radio replacement options for the 2GIG GC3 include the 2GIG 3GA-A-GC3 cellular communicator and the 2GIG 3GR-A-GC3 cellular communicator.
The 2GIG 3GA-A-GC3 uses the AT&T network to send signals to central station. The 2GIG 3GR-A-GC3 uses the Rogers network to send signals to central station.
Our informative video shows you exactly how to navigate from “System Settings” to “Cellular Radio Swap.” Doing this puts the security system in the right mode to safely remove the cell radio module and install the new one.
Once the swap has taken place, you can test it to make sure the new cellular radio works. Our video details exactly how to perform this test and what the different results mean.
This video shows you how to swap for the 2GIG CDMAV-A-GC3. Though the process is almost exactly the same, we have separate videos showing how to swap for the 2GIG 3GA-A-GC3 and 2GIG 3GR-A-GC3.
All three of these cellular radios can be used via the 2GIG GC3 with the Alarm.com service. As explained in our other videos, the service gives you the ability to set up a mobile app.
Use the mobile app to control your security system as well as set up text and email alerts based on your preferences. Our comprehensive video shows you exactly how to set up this app and use it effectively to increase the security in your home.
That’s the value of swapping out the stock cellular radio in your 2GIG GC3 wireless security system for another model – it allows you to use the right cellular communicator for the best network coverage in your area.
Transcript
Hi, DIYers. This is Frank at Alarm Grid. We're back in the Alarm Grid video lab working on the 2GIG GC3 panel. We're going to show you how to swap out a cellular radio on your system.
You may notice in either of the cellular radio guides, specifically we're going to be working on the alarm.com radio's today, you'll notice that there's the do have the ability to do what's called a cellular swap. What that means is that when the system is powered on, you can basically remove one cellular communicator and put it in another.
The guide is a little bit confusing. There is mention that you can install your first radio when the system is powered on. What we've noticed, at least on our system here in the lab, is that the feature to begin and essentially cut power to the cellular radio and allow for that hot-swap. It's not there unless there's a cellular radio already installed.
So we already have a video on installing the 2GIG-3GA-A-GC3 radio. We also will have a video for the 2GIG-CDMAV-A-GC3. This video here will actually be showing you how to remove the 3GA or the AT&T radio and putting in the CDMA Verizon radio. So you'll notice that when we go in here into Programming to do the cellular swap, that Begin button will show. And you can do that swap here in live time.
Again, the first time you install these, you'll notice in our other videos you will have to power down the system. So I'm not sure if that's something that will be changed in firmware so that those guides are, in fact, correct with their statement on hot-installing. It may just be a hot-swap for now, not a primary initial install.
So again, we'll show you how to do the swap here with the radio already installed. And then we'll install our new Verizon radio here. So if you are in, say, you got this system. You ended up with an AT&T radio. And maybe the AT&T coverage has not been so great in your area. Maybe your Verizon is a lot better. That's where this swap could be a good solution for you.
So we'll hit-- we'll go into System Settings on the bottom right. And this time, we can enter either the master code, which by default is 1111, or we can enter the installer code, which is 1561.
Once you're in this field here, we can then swipe down and you'll see Cellular Radio Swap. You'll notice that because we have the radio in there already, it will say select begin to start cellular radio module. We can do Begin or Radio Test. For right now, we'll do Begin.
So in this mode when it says remove the cellular radio, it has cut power to the cellular side of this panel. So what we'll do is we'll grab the little tab here on the bottom side of the door. And there's a little tab here that sticks out with an arrow on the side of the radio. We can just grab that and give it a firm pull.
And you'll notice that now the screen says insert cell radio module and select Done. So I'll take our old AT&T unit, put that down. And we'll take our new Verizon CDMAV-A-GC3.
Before we put this in, you'll always want to document the ADC number. So just make sure that you have the ADC. You might as well just take a photo of this with your smartphone or you can just document the numbers on here. You'll need that ADC number in order to change over to this radio on alarm.com. You'll need to give that to your dealer.
So we'll take this. We want the antenna sticking up and the gold connector here facing inside the panel. So we'll just push that right in. It just firmly sits in there nice and snug.
We'll grab our door again. And that little tab here, we'll have on the bottom right. You want to put the three hinges into the back plate first sitting in there nice and tight and then snap it shut. Now, once we have this completed, we can click Done. It will say Working. And it will take a few moments for that to give power back to the cellular compartment here.
And as that's doing its thing there, again, this was swapping out the 3GA-A-GC3 for the CDMAV-A-GC3 You can do the same thing the other way if you had a Verizon, if you had the CDMA radio in there first and AT&T happened to be better in your area, then you could do the same thing, same cellular swap process here.
It may take a couple of minutes for this to get power back to the cellular module. So we'll give that just a few moments here to keep working and make that physical and firmware swap inside the system.
These cellular radios give you the ability to enroll in alarm.com service, which, again, we've discussed in other videos, but gives you the capability to set up the alarm.com app where you can remotely control your system and set up customizable text and email alerts as well as allow your alarm.com dealer, your alarm company, to remotely program and configure sensors for you, as well as other deeper level programming features. This process, you'll notice, could take several minutes. So we'll give the panel a couple more here. And there it is.
It says cell radio module swap complete. And you could do a radio test now. We could hit Radio Test. And you'll see signal strength is four out of six bars. And it'll actually show you the serial number on there. It will say registration status Registered. And it's idle.
So we already have this setup here on the system. I can back all the way out to the Home screen. And now we have our new CDMA Verizon radio installed in our 2GIG GC3. If you have any further questions on doing a radio swap on your 2GIG GC3, please email us at support@alarmgrid.com. And don't forget to subscribe to our channel.
- Uploaded