Honeywell L5200: DIY Installation of LYNX Touch Wireless Security System
Related Products

Related Categories
Description
Sterling installs a Honeywell L5200 wireless security system using an LT-Cable and a L5000DM. Unlike the Honeywell L5100 installation video, which shows the unit mounted to the wall, here, Sterling installs the L5200 on a counter top in order to show the simplicity with which the L5200 can be added to any home.
Transcript
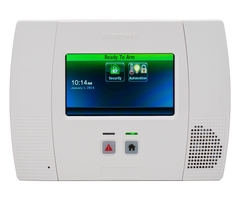
Hi, DIYers. Sterling, with Alarm Grid, here. Today, we're going to show you a desk mount installation of the LYNX Touch L5200 wireless security system. You may have seen our L5100 installation video, where we show you how to mount it on the wall and fish the wire nice and clean through the wall, so that you see no wiring. We also have an L7000 video, where we also wall mount it, but we use a little bit of wire track, plastic wire track, to fish the wire up straight from the outlet to the bottom of the panel, and hide it with the wire track. Those are both nice, clean installs if you want to put it on the wall.
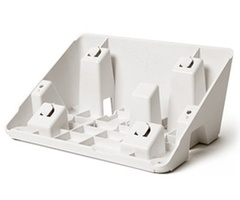
However, the L5200 as well as the L5100 and L7000 all have desk mount options. You would use the plastic desk mount. The part number is L5000-DM. It's the same part for the L5000, L5100, and L5200. The L7000, because it's a bigger panel, uses a bigger desk mount, but all it is, is a piece of plastic. You got four rubber feet. The panel sits on top, gives you a nice angle so you can manipulate the system while it's on the counter. It's a great option if you want to keep and it's centrally located in the kitchen or great for apartments, condos, smaller places where you may not want to put holes in your wall.
So, we're going to show you how this is done. First thing we do is, before we put it on the desk mount, we want to prepare our LYNX Touch L5200 system for power. So, you'll notice along the top edge, just like every LYNX Touch, there are two tabs. We simply press down on the tab, and the front pulls away from the back. You do the same to the second tab, and the front will swing down from the back plate. When you're going to wall mount, you use these screws here, but it's even easier with the desk mount.
Before we close it up and put it on the desk mount, we want to prepare it for power. So, the first thing we'll do, you get a rechargeable battery pack with every L5200, so that if you lose power to the system, whether it's just a power outage or it gets unplugged, it'll still work. This rechargeable battery pack will kick on. Once power comes back, the system will recharge this battery so it's ready to go for the next power outage.
This battery sits right into this compartment. You have a little notch on the left to feed the wire, and then you have some wire track holders, wire clips, so that you can keep your battery wiring nice and neat. This battery plugs into the front of the board here, with this two-prong clip. We're not going to plug it in quite yet, because you always want to apply AC power before DC power. But now, our battery is good. So that the battery doesn't fall out, the system comes with this little plastic holder. This will keep the battery in place.
So, underneath the battery compartment is a little clip. You clip it in, and at the top is a screw hole. Put the screw through the hole, and it matches up with this hole on the back of the plate. You can screw it into place so that the battery is not going to go anywhere, nice and tight, good to go.
Now, that's our battery connection. The next thing we got to worry about is our power from our wall outlet. Okay. So, this is the transformer that comes with every LYNX Touch. It's a 9-volt transformer, 2.5 amps, unlike a Honeywell wired security system. This transformer is polarity conscious. The terminal on the right is a plus terminal for positive wire. The one on the left is a negative for your negative power.
You'll notice that it does not come connected to a wire. So, many people that buy this unit will call us wondering how to connect it. You can splice in your own wire. You would use two-conductor, 18 or 22-gauge stranded alarm or speaker wire. You can pick that kind of wire up at your local hardware store. Cut off the length you need to go from your outlet to your panel. Splice into the screw terminals here, and then also, there is a strip of screw terminals on the control panel board that you can wire those wires to provide power.
The other option and the easier option is to use the LT dash cable. The LT dash cable is a cable that Honeywell offers. It's pre-made. At one end, you have two space connectors, which land to the screws here. You slide them under the screws. Then, even easier, you have a DC plug on the other end that you route through the back of the plastic cover, and you simply plug into the DC plug right there. Nice and easy, no stripping, splicing, or screwing down of any wiring.
So, that's what we're going to show you today. Just for reference, our L7000 install video shows you how to splice a regular stranded two-conductor wire to the transformer and the panel, if you want to see how to do that. The L5100 video shows you the LT cable to do a wall mount. So, this will be our LT cable for the desk mount. So, let's give it a go.
First thing we want to do is connect our terminals on our transformer to our spade connectors on our LT cable. Again, plus is our positive. So, we're going to use our red wire under our plus terminal, screw it down nice and tight, so that a firm tug on the wire doesn't come loose. Then, we go to our negative, land it under the screw. It just slides right under. Screw this one down. Again, firm tug. Not going anywhere. Now, we know our transformer is ready to go.
Before we plug it in, we're going to now do the desk mount portion. So, on the back of the panel, you have your four holes, which would normally be your screw holes for mounting on the wall. You have matching four tabs on the desk mount. Flip it over. Insert it into the holes. Slide it up into place. And now, your desk mount is on the back of your panel. The desk mount does come with two screws, very small screws, which you can use to insure the desk mount will not come attached from the back of the panel. So, you screw them in.
Now, you don't have to worry about the desk mount coming loose. We don't want to close it up yet because we're going to have to do our battery connection once we do our AC power connection. But now that we have the desk mount on there, we're going to open up the back. We're going to route our wiring right through here. On the back of the desk mount, there are notches on both sides. These notches allow you to feed the wire through. So, this will sit flat and not get pinched by the wire. So, all you really have to do is fish the wire through the hole, and then either side you can put your wiring. You plug right into this DC connector, simple as that.
Again, we're not going to close it quite yet, but you can fish your wiring through here, through the track. When it sits down flat, it's nice and clean. Okay. So, we're good to go there. The next step, we have an outlet nearby. We're going to take our AC power, plug it in. You can see the panel start to boot. While it's booting, going to open it up. You have your battery clip, simply plugs into this two-prong connection on the front. Keep the wiring from getting snagged. Close the panel up. Again, feed the wire through the side so it's nice and clean. We can tuck our wiring back in our kitchen here, out of the way. We now have our main L5200 boot sequence.
You can see it says, "Red system standby," at the top. After a minute or so, it will switch to, "Green ready to arm." A shortcut is to press and hold the home key. When you do that, it switches, "Green ready to arm." That is our full installation of our L5200 desk mount. Again, very nice, easy, clean way to install the L5200 Honeywell security system. If you have any questions on desk mounting your LYNX Touch panel, please let us know, support@alarmgrid.com. Make sure to subscribe to our channel.
- Uploaded
- Duration: