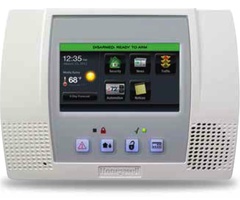
Honeywell L5100 Installation Video
Related Products

Related Categories
Description
Sterling's shows you how simple it is to install the Honeywell LYNXTOUCH L5100.
Transcript
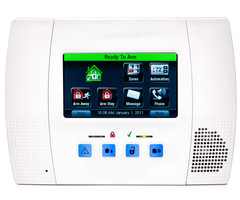
Hi DIY's, I am Sterling with Alarm Grid, and today we're going to show you how to do a "Do it yourself installation" of an L5100 LYNX Touch control panel. We've decided to use this as our mounting location, and the reason for that is because it's centrally located within the house.
The L5100 has a wireless receiver built inside the panel, which is used to communicate with the wireless sensors therefore a central location ensures that you are going to have good range to all of your sensors. It also, conveniently, is nearby the garage door where you would normally come in, so that when you have your entry delay, you can quickly get to the panel and disarm it.
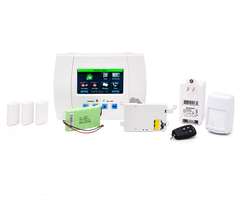
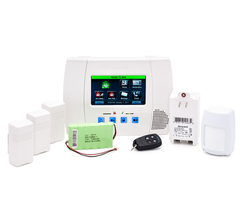
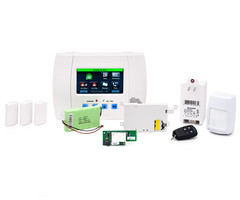
The things that we're going to use are our L5100 LYNX Touch control panel, a medium-sized flathead screwdriver, a pen or a pencil to mark our holes, and we also have a level to make sure it's nice and neat, and in line with this thermostat.
The first thing we want to do is open the L5100 LYNX Touch control panel. On the top of the panel you have two tabs. Insert the medium-sized flathead screwdriver into one tab at a time, until the case pops from the back. You can see that it's open a little, and then you do the next one and the front hinges down from the back plate.
Now because we want to mount just the back plate we're going to remove the back plate from the front. Simply put it at a 90 degree angle and snap the back plate from the front. Now that we have the back plate, we're going to put it on the wall, and we're going to mark our holes. The holes that we're going to be marking are the four mounting holes on the back.
We are also going to mount and show the hole where the LT cable is going to be for power cable. Take your pen and your level, put the case on the wall, get it level with the thermostat and we can now mark our holes. We are now ready to drill our holes.
So we now have three wall anchors in, and we're going to show you how to do the last one, so that you can mount the L5100 back plate to the wall. We have our power drill. We're using a 5/32nd drill bit, to match our wall anchor that came in the little baggie with the L5100 control panel. We've marked our hole, and now we're going to simply going to drill in, and insert our wall anchor.
We're now ready to mount the L5100 after we screw in the four screws that come with the kit. We now have our wall anchors in. Take our four screws and Philips-head screwdriver, screw in until you just have a small amount of the screw head, showing which will make the back plate sit nicely on the wall.
Now that we have our four screws, we are going to drill a hole for our power cable. Honeywell assumes that when you attach your transformer to your L5100 that you're going to be professional installer and that you're going to use a pre-cut length of wire to conductor wire, to make your connections.
There is a terminal strip on the back of the front plate of the L5100, which you would LAN your power, and on the transformer itself, you have two terminal screws, positive and negative for your power wire.
For us DIY's the LT-CABLE is a much easier way to attach this. The LT-CABLE has a premade DC connector on one end, and two spade connectors on the other, therefore the spade connectors connect to your transformer. The DC plug plugs right into a port on the L5100. We recommend a LT-CABLE with every installation of a L5100. Of course, no one wants a wire hanging below their L5100, because that doesn't look good. So what we're going to do is show you how to fish the cable through your wall, so that it's hidden.
You'll notice on the back plate there is a small tab in the corner. Simply remove the tab and we now have room to fit the DC connector. We've already marked our hole, and we have a nice ½ inch drill bit, big enough so that we can get our LT-CABLE, DC connector through the wall.
So now that we've made our hole for the LT-CABLE, we need to make a matching hole to fish the cable that's going to connect to the transformer. We have our two terminals on the back of the transformer. We're going to use this plug here for power for the L5100.
Plug it in. Note where the holes should be, and we're going to drill this hole. We're going to use the same half ½ inch, which may be too big, but you can always patch up after. Of course, make sure all power is cutoff before doing any drilling around an outlet. We're now ready to fish our LT-CABLE.
So we are now ready to fish our wire up, what we did was use the snake, we fished through the hole we had drilled before, previously. You can tell that we had to make this hole slightly larger to grab the fish and get it through, because our outlet wasn't quite directly below the L5100.
But now that we've got it we're going to attach our DC connector to the snake with some masking tape. You want to make sure that you cover everything completely, so that you don't snag anything inside the wall. And we can now pull this up, so that the DC connector can plug into the back of the L5100.
So we have our snake, we are attached at the bottom. Simply pull it up. Careful at the top here, we can pull the DC connector through.
With our wire pulled through fished through the back of the L5100 back plate, tighten the back plate to the wall. This is a good chance to level out any inaccuracies with our screws, and we have a nice secure back plate.
So now that we have our back plate secure, our LT-CABLE fished through the hole in the back, simply take the front case. You have your two hinges at the bottom, snap it on. You can let it hinge and hang down nicely like this.
Next step is to install our rechargeable backup battery. This way if we ever lose power to the house, we've lost our AC power you get up to 24- hours of backup battery off of this little guy. It mounts in this section right here. There is a notch for the wire, and there are three wire clips to keep it nice and neat.
Once it is in there, to prevent it from falling out, we have a battery retainer clip that came in the kit, and there is a small, little screwdriver that came in the baggie with the screws and the wall anchors. The retainer clip has a notch on the bottom, goes underneath, and there's a hole for the screw at the top.
Battery is nice and tight, and you can go ahead, and plug this connector into the top port on the front case. It's a smaller one. You won't be able to mess this up, because the other one won't fit. The LT-CABLE goes into this DC port right here, nice and easy. To prevent your LT-CABLE from ever getting unplugged and falling back into your hole which would be a nightmare, you'd have to do that really easy fish again.
We're going to use this wire tie and make a nice loose connection, so it doesn't get bunched up, but tight enough that this DC-connector head will not be able to fall through the hole, like so. We'll trim this, and then we'll be able to close this back up, and we can close our panel. We are now fully-mounted, our L5100.
Okay, now that we have our L5100 mounted up on our wall, we have our LT-CABLE plugged in, the last thing we need to do is connect our power supply to the spade connectors. Couple of things I want to point out here.
Most Honeywell transformers, if you've ever had a hardwired Vista series panel, or even the older LYNX panels, polarity did not matter when you were making your connections here. It is very important on the LYNX Touch that you observe polarity.
There's a red spade lead here. Your terminal is marked with a plus. You have your black one with the negative. Just make sure that you match that. Slide the spade connector under the screw, like so, tighten it with a screwdriver, and make sure this connection is tight, do the same for the red and you're good to go.
One last thing I want to point out. We have a wall plate cover that has two screws at the top. A lot of people will have a wall plate cover that has one screw in the middle that keeps the cover tight to the outlet. If you have that, this screw at the top of the power supply, with the little red washer is convenient.
What you would do is pull this screw out in the middle. Remove the wall plate. I'm sorry, leave the wall plate there. Plug the transformer in, and then you would use this screw, to replace the one that was in the middle, and you've actually secured your power supply to the outlet, so that no one will inadvertently unplug your security system when they're looking for an available outlet.
Because we don't have that, we're s going to simply take the washer off the screw. Remove it. Fish our wire into the hole. Plug our power supply in.
And you can see the panel's booting up. You have this nice LINUX prompt here. After it goes through its process, it's going to come up with the screen in ready.
You'll have a red system standby along the top. Coming up now the red system standby, that will go to green after a minute or so, and you are ready to use your L5100.
We have now completed our installation, and if you have any issues with yours, please let us know. We'd be happy to help out. And in our next video we're going to discuss the available communication paths, for alarm monitoring services.
- Uploaded
- Duration: