Pairing a 2GIG SP1 with the 2GIG GC3e
Related Products

Related Categories
- Wireless Touchscreen Keypads
- Small Business Security Systems
- Monitored Home Security Systems
- DIY Wireless Security Systems
- Apartment Security Systems
Description
In this video, Jarrett from Alarm Grid shows you how to pair a 2GIG SP1 Touchscreen Keypad with a 2GIG GC3e Security System. The 2GIG SP1 allows you to perform security and automation functions from a second on-site location besides the primary GC3e Alarm Panel. Many users will install a 2GIG SP1 by a garage door or a back door so that they can conveniently arm, disarm, and bypass sensors as they come and go. Another popular location for a 2GIG SP1 Keypad is in a master bedroom so that users can perform smart scenes from a convenient location. The SP1 is also useful for triggering emergency panic alarms in distress situations.
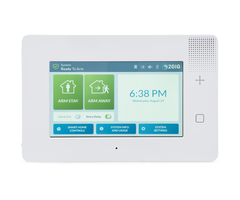
One notable thing about the 2GIG SP1 is that it will mimic the GC3e main screen almost perfectly once it has been paired. You can use the 2GIG SP1 Keypad to control multiple smart area partitions, as long as you have a valid code for the partition you want to control. You will assign the 2GIG SP1 to a partition as part of its programming process. However, this only determines which partition will display a trouble condition that directly affects the SP1, such as an AC loss condition where its transformer becomes unplugged.
The 2GIG SP1 is truly a very complete alarm system keypad. It offers more functionality than the 2GIG SP2, which can only be used to perform security functions, like arming and disarming. The SP1 can do everything that the SP2 can, and it also adds smart home automation capabilities. Additionally, only the SP1 shows the date and time and a five-day weather forecast. One other limitation of the 2GIG SP2 is that it can only control the partition that it has been assigned. The 2GIG SP1 can control any partition as long as you have a valid code.
https://www.alarmgrid.com/faq/how-do-i-pair-the-2gig-sp1-with-the-2gig-gc3e
http://alrm.gd/get-monitored
Transcript
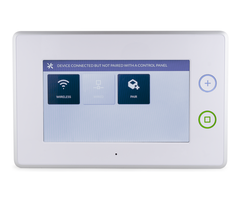
Hey, DIYers. Jarret here from Alarm Grid. Today, we're going to be going over how you would pair the 2GIG SP1 keypad to the GC3e. Normally, there's a couple of reasons as to why you would go ahead and set up a keypad in general with a wireless alarm system. Really I mean-- if you want to go ahead and be able to configure the system from a-- or be able to arm and disarm the system actually from a different point in the home or business, then you would set up a keypad that gives you a secondary point to be able to do that. Let's say for instance, you have the GC3e like up in the master bedroom or if you have like an office, right? You have this main system sitting inside that room or those rooms but you want to be able to arm and disarm the system from, let's say, the front door, or the back door, in an office setting, you want to go ahead and disarm it from the front door, so you would setup a keypad. So that it gives you a secondary point or secondary place to be able to arm and disarm the system and do what you need to. Now, when you're setting up different key pads and everything, you do want to keep in mind though that normally, keypads are not able to let you do programming on the system. If you want to do programming or anything, normally you have to do it directly right there at the local panel because everything is being saved up on here. These keypads don't really give you that option. So you want to keep that in mind whenever you're setting this up and everything, but otherwise, it is actually very, very simple to go ahead and do the programming if you did it locally. Anyway so-- now the GC3e is able to support up to four keypads. You're going to see a little bit later in the video. There's options for about eight of them, but you're actually only able to set up for these keypads with the system so you definitely want to keep that in mind when you're setting this up. And you can actually have the partitions and everything interact with the keypad too. And we'll go over that in a little bit. Now when you're pairing the keypad to the system, you want to make sure that they both are on the same Wi-Fi network, OK? If you try to pair this and they're not set up on the same Wi-Fi network, they are not going to be able to connect. So you want to make sure that if you're setting these up within a certain area or anything, you have that same Wi-Fi network available. If you have a bad signal strength for the Wi-Fi network in a certain area that you're trying to set this up in, maybe look into setting up a repeater or something to push that Wi-Fi network out so that you can go ahead and do that and set up this keypad. So now one other thing that I want to add here about the pairing of the key pads and everything, you don't have to worry about the firmware version. The GC3e actually comes with the latest firmware version for the system but you don't have to really worry about the firmware version when setting up the keypads to these systems, and also lastly, the pairing process for this system. You can go ahead and set it up with the Wi-Fi, and as I said, you know you want to make sure that both the keypad and the panel are both in the setup on the same Wi-Fi. However, if you're not or if you aren't able to get a good signal in that area and you're not able to get a repeater, the other thing is, you can set up an access point for the system so that the keypad can go ahead and connect to that. Now when you set up the access point, you're not going to get a long range normally so you want to bear in mind whenever you're setting that up, normally, it's good like 30 or so feet, maybe 40 feet, if you're able to push that boundary and get a little bit further out there, that's great, but you want to keep that in mind about setting it up with the access point. Now for this video, we're not going to be covering how you set it up with the access point, though if you do want to, go ahead and check that out. We do have a link in the description below that you can go ahead and follow, or for the FAQ for this video, you can actually go check that link out from there as well. So if you want to go ahead and set up your keypad to the GC3e, it's very simple. First, you want to go ahead and make sure that your keypad is actually set up to the Wi-Fi. So, we already have a keypad powered up right now, but if you want to go ahead and do that or when you do power it up, it's going to pull up this main menu here, you have wireless, you have wired, and then paired. Now for if you want to get the Wi-Fi, just tap on wireless, and it's going to go ahead and bring up this next window here with a different Wi-Fi networks available. I'm just going to look for the one that you're using, and just tap on it. It's going to bring up this window for entering the password, so at this point, just go ahead and enter your password real quick. And then actually at the bottom right there's a next-- there's a blue next button. So when do you type in your password, you're going to tap on next. It's going to bring up this next window, so it's just going through this process, we are now connecting, it's going to bring this up right here, it gives you an IP address that is connecting to subnet mask, gateway, DNS, everything. It tells you that it is connected. So once you've confirmed this connected, just hit the back here on the right or on the left side. Now it's going to bring you back to this main screen. So at this point, we're going to be directing our attention over to the GC3e, so that we can get this paired to the SP1. So on the main system itself at the top right, you're going to be tapping on the 2GIG logo. This will take you straight to the option, enter your installer code so you can access the programming. So the default installer code is 1 5 6 1, and then we're going to go into system configuration, going to go into keypads over to the right, and now, this is where we're going to go ahead and pair the keypad. So on the left side, you're going to see different keypad addresses or zones and you can assign the keypads to. As you can see there are eight, but we're only able to pair four keypads to the system. So it doesn't matter which keypad address you choose, we're just going to be starting on keypad one, and then you're going on the right side, you're going to see the information for the different settings. So if you want to go into keypad one, at the bottom, you tap on-- edit keypad, it's going to give you the options, go ahead and configure that. So, first one is keypad use. You want to make sure it's enabled. So we're going to go ahead and just tap on that, and we're going to go to equipment code. So the left side of the screen is going to be your different options that you're going to go ahead and configure. So you can connect the keypad on the right side, it's going to show you what you're setting up and what your options are. So as I well showed, you have keypad use over here, you can either disable or enable it but to go ahead and pair your keypad, you want to go and choose enable. For equipment code, you actually want to keep this the same. Can't really change it. But this is the correct equipment code for that keypad and then next you have device ID. So this is where we are going to place the GC3e into pair mode or into the pairing mode so that we can-- or into the listening mode, so that we can go ahead and pair the SP1 keypad. So we're going to tap on pair. Now it's listening. So now, what you have to do is, on the SP1 keypad, we're going to go ahead and pair this now. So you have the option for pair, just going to tap on pair and it's going to start going through this pairing process, and now it says SP1 connected right on the panel, and then over here, it's going to give you a pairing key and serial number. You actually don't have to worry about this at all, just generates that when you go ahead and pair it. So once you've confirmed that this is connected on the SP1, just hit the back arrow. So it takes you back to the main screen. And as you can see, the pair option is actually grayed out. That's because we did pair this to the system. If it is not grayed out, then there may have been something that happened. You might want to go ahead and try repairing it or reconnecting it to the Wi-Fi and make sure that there's a good Wi-Fi connection, and then repairing it. So back over to the GC3e, we have the device ID, we have everything paired right here, if you want to go ahead and just pair a new keypad, then you tap on pair new but we're going to move over to smart areas assignments. So smart areas assignments, this is basically like your partitions. If you have different partitions set up on the system, in this case, you have four that you can go ahead and set up then you would assign that to this keypad. Now you're not assigning this keypad to a specific partition, so you can go ahead and control that partition. Actually you're signing the partition to the keypad so that any trouble conditions that generate on that partition show up on this keypad. So if we choose, let's say, partition 2 for the keypad, right? Any trouble conditions, anything that is happening on partition 2 are going to show up on the SP1 keypad. But if you have sensors on partition 1, those sensors are going through different events and everything or activity. They're not going to show on the keypad. So if you want to see certain events from a certain partition on that keypad, you want to make sure you're choosing the right partition in the smart areas assignment area. So for right now, we're going to keep it on S1 because we don't really have any partition setup at this moment. Now you move on to equipment age. So equipment age, it actually doesn't affect that at all, you could choose new or existing, we're going to keep it to new and then you have emergency keys, this is if you want to go ahead and set panics on the keypad. So for instance, on the GC3e, you have like a medical panic, police panic, you have like a silent panic, if you wanted to set that up, if you want those to be shown on the keypad, so you can actually activate those as well. Then you would choose enabled. If you don't, then you go ahead and choose disabled. For this one, it's going to keep it enabled. And then the last one, we have voiced descriptor. Now voice descriptor, it's a way that the GC3e can talk to the SP1 keypad. If you set a descriptor, you basically just tap on add a voice description, and you can type in any name that you want to. But the GC3e is essentially going to periodically check for the SP1 keypad and when it does and you have this voice descriptor set up, it's going to enunciate that descriptor for the keypad. So they can go ahead and trying to communicate with that SP1. This is optional and you don't exactly have to set it up if you don't want to. For right now, we're just going to leave it blank. But once you have everything configured here and you've confirmed everything is good to go, then at this point, you're just going to tap on, return to system configuration, over at the top right. And then you hit the back arrow. Now it's going to bring up this window. So it's going to show you the different options or different settings that you changed. You have the keypad added, keypad use enabled, the SP1 touch screen, everything that we just configured. If you've confirmed everything is good to go, then just press save. Now it's going to bring this back to the main menu, and then this keypad, with the SP1 keypad, is either going to go through a loading process, so that it brings up everything from the GC3e system, and sometimes it can go through that loading process or it will immediately bring everything up right there. So once it's paired, you'll see the main screen of the keypad pop up on here or it's going to display like basically the main screen, and you can see, very similar. I mean really-- the only way you can tell between the two systems are the two buttons and the look of the panel itself as well. But essentially, it is going to go ahead and mimic that main screen. Now as I said, when you pair that keypad, if it's going through like-- There are occasions where it can go through it synchronization process, it just brings up a window and says it's synchronizing, just give it a little bit few minutes or so it can go ahead and sync everything and pair up with the system correctly. And then once that's done, it's going to bring this up. So once-- go ahead and pull this up, you just wanted to do some testing to make sure everything's working. So let's just put the system into-- Armed Stay. So if it's tap on Armed Stay. Arming Stay. You can see it's controlling the system at this point. So if you want to go ahead and do that, all you are going to do is just tap, Armed Stay, if you disarm it, then it's going to bring up the keypad to disarmament. So am going to put in the master code. Wrong code. System disarmed. Ready to arm. I used a different master code for a different system, don't do that next time. But 1 2 3 4 is not the best code for this, I just used 1 1 1 1 to go ahead and disarm it. If you want to go into Arm Away Mode, then you just tap on that and go into an away mode on the system as well. If you want to go ahead and check out your smart home controls, you have your lights, thermostats, everything for your Z-Wave devices, if you want to check out your smart areas, this is where you will go ahead and take a look into your partitions and everything, you have a system info usage, you want-- you need to check certain information off from the system, so for your dealer or anything that you go into there, you want to go into system settings, then you can just tap on that and bring this up. It's going to give you some very basic options here, you have users sounds, bypass everything. If you need to go ahead and configure a couple of things there, then you can, but keep in mind you normally are not able to do that deeper level programming as you would with your main keypad. And that is how you pair the SP1 keypad to the 2GIG GC3e system. If you have any further questions about the 2GIG GC3e or alarm systems in general, please reach us at support@alarmgrid.com, or go to our website, alarmgrid.com. If you found this video helpful, please like and subscribe, if you'd like notifications of future videos, please click the bell icon. This is Jarret with Alarm Grid, You have a great day.
- Uploaded