2GIG GC2: Upgrading to LTE
Related Products
Related Categories
- Verizon LTE Cellular Communicators
- Small Business Security Systems
- Monitored Home Security Systems
- DIY Wireless Security Systems
- AT&T LTE Cellular Communicators
- Apartment Security Systems
Description
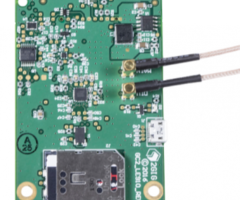
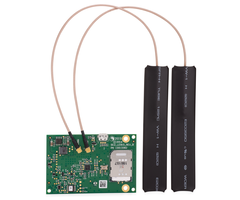
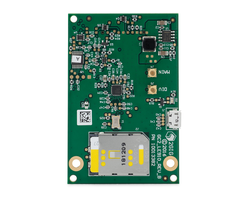
In this video, Michael from Alarm Grid shows you how to upgrade a 2GIG Go!Control GC2 to LTE. With the 3G Sunset and CDMA Sunset, any GC2 System running an old 3G or CDMA Cellular Communicator can no longer be monitored, unless the system is upgraded to LTE. The upgrading process involves opening up the 2GIG GC2 System, powering it completely down, removing the old 3G or CDMA Communicator, adding the new LTE communicator in its place, powering the system back on, closing the panel, and activating the new LTE communicator for alarm monitoring service. You should make sure to write down the IMEI Number on the new LTE communicator, as your monitoring company will need that information during activation.
When choosing an LTE communicator for your 2GIG GC2 System, there is the 2GIG LTEA-A-GC2 AT&T LTE Communicator and the 2GIG LTEV1-A-GC2 Verizon LTE Communicator. Whether you decide to go with AT&T or Verizon should have nothing to do with your personal phone. This decision will have no impact on your monitoring expenses or the type of service that you receive. You should decide based solely on which cellular network provides better service in your area. You may want to check coverage maps if you are unsure. A good cellular connection should almost never become lost or cause disruptions.
After installing the communicator, you will activate it for monitoring service. If your monitoring plan includes access to Alarm.com, then you will also be able to use that service to control your 2GIG GC2 System remotely. This can be done from the Alarm.com Mobile App on your Android or iOS device, or by using the Alarm.com Website on any compatible web browser. Alarm.com allows you to arm and disarm your system, check current system status, control programmed Z-Wave devices, and so much more!
https://www.alarmgrid.com/faq/how-do-i-upgrade-my-2gig-gc2-to-an-lte-communicator
http://alrm.gd/get-monitored
Transcript
Hi, DIYers. This is Michael from Alarm Grid and today I'm going to be showing you how to upgrade your 2GIG GoControl GC2 system to LTE. Now you've likely heard about the 3G sunset, or also called the CDMA sunset. 3G and CDMA towers are being shut down, in favor of newer technology like LTE, and if your system is running an old communicator, then it will soon stop working once the tower is shut down. So what you're going to want to do is you're going to want to replace that communicator with an LTE communicator. So that way your system can continue to be monitored, and your home or business can stay protected. So, with the 2GIG GC2, there are a few communicator options available. We're working with the 2GIG-LTEA-A-GC2 today. This is an AT&T LTE communicator. If you're using a Verizon LTE communicator, it's the same process. And also this process is the same if you're just adding a communicator for the first time. The only difference is you won't be taking out a communicator like we are here. And once you have the communicator installed, then you can activate it for monitoring service, and you'll be good to go. One thing I do want to point out here are the IMEI number is on the communicator. So you're going to want to take that and write that down, or take a picture of it, so that way you have it ready for when you go and activate the system for monitoring. You will need the IMEI number. So make sure to take that down. It's also on the product's packaging, so, if you find it there, that works as well. Make sure you have it, as it will save you a lot of trouble later on. So, what we're going to do today, we're going to open up our GC2, we're going to power it down, we're going to take out our old communicator, our old communicator that's no longer being used, and we're going to install our new LTE communicator. So this is the process you would do if you're upgrading a GC2 to LTE. So, let's get started. First thing we're going to do, we're going to take our system, and it's going to take it off the back plate here, just lift up. And now we have our system open, and what we're going to do is we're going to take this third hand-- and actually. I'm going to unplug the barrel connector, right away, so it's out of the way here. And we're going take our third hand, and we're going to just hang it there on this circle part. This white strap on the circle, it's called the third hand, and now our hands are free. And, you did see already, I did take out the power. That's to shut power down from the system. I will also take out the backup battery. So now our system is completely powered down. Just to stress that point, you really do want to power down your system. If you're using the terminal block, then you might instead unplug at the outlet, the transformer, or you can cut power at the breaker. Do whatever it takes, but power on your system completely. And you see our screen is blank, so that way we do have ours completely powered down. So-- and also don't forget the backup battery. Make sure you get that part, too. So, what I'm going to do is I'm going to take off this side slot here, just to show you that there is an antenna hiding inside. And-- so this is our communicator right here, and we're actually going to have another antenna running through in the same spot, but just for demonstration purposes, I did want to take that out. So I'm going to take out the antenna first, just to get it out of the way. And see, it runs through this little hole right here. So we're going to just put that aside. And now we're going to be taking out our communicator, our old communicator, which-- we have two screws, and they use a Phillips head. So, we have our Phillips head screwdriver here. So let's get the first screw. And I'm just gonna grab it with my hands this time, and be careful not to drop it, and there we go. So, we have our screws removed, and we can just take the communicator out from its port. And I do want to show you a communicator has this port that it plugs into right there. Our new communicator is going to have the same thing. So we're going to set that aside here. And now, our new communicator does have two antennas, but we'll get to that. We're going to first plug-in the port here. You see it plugs in, the prongs there to make sure it's aligned. And then-- ours is not aligned right now, and there we go. Got it. You'll have a nice little click as it gets into place. So now that's in place, now we can take our screws and we'll put them into the same spots as before. You can use the same screws you were using before, it doesn't matter, or you can use your new communicator screws, if you prefer. So we're just going to take that and screw it down. Make sure the washer is there, too. Don't forget about the washer. And then we're going to take our other screw with its washer, which is still there, and we're going to just take it and we're going to put it in, and then we're going to tie it down. So [INAUDIBLE] cut right there, and there we go. Good. All right. So now we have our two screens in place, and we're going to do our two antennas this time. We'll start with the main antenna. See there's a div antenna, and there's a main antenna. Div is for diversity, diversity antenna, and the main antenna. The main antenna is going to be the one that goes in the side port right here. So what I like to do is I like to take it and just run the connector through the hole first, so that way it's going to make it nice and secure in a bit. And this is going to go into the main, right here, and you just wanna take it align it, and then it snaps right into place like that. There. I just want to get this guy to where it's not giving me issues. We'll worry about that in a second. Now, we're going to take our second antenna, and we're going to plug it into the diversity one, and we're going to run it through the back plate, over there. So, we're gonna take it and just click it into place like before, like so. There. And then we can just run it through the back. It's out of the way. And now I do want to cover up this part right here. I was trying to get it to stay down earlier, but it wasn't giving me much cooperation. But I'm going to hop over to the other side here, and we're going to take it. We're gonna take our thing. Make sure the covers align properly. And, we got ours, and there we go. It snaps into place and it's secured. So, that's the cover for the main antenna, so we have everything we need. It's all connected, it's all good. We do want to power on our system before we go and close our system. So we're going to connect the backup battery first, plug it into its port, and then we're going to reapply AC power, in our case we use the transformer-- we use the barrel connector. If you did do a transformer, then do that at the wall outlet, return power at your breaker, do whatever it takes. And we're going to just close our system. Just gonna get it on the top first, and then the bottom. So-- and then it will take a few moments for the GC2 to power back up, so just be patient for that. But now is when you would activate the communicator for monitoring service. So, if you signed up for service with Alarm Grid, then we'll be contacting you at your scheduled activation point. Make sure you have your IMEI number ready, so that way we can complete the activation, because you will need that IMEI number. Remember, you will need a monitoring plan that includes cellular communication, such as an Alarm Grid gold plan, or our platinum plans, if you're using cameras. And now you can see our GC2 did come back on. So, now we would be ready to go and activate it for monitoring. So, that is how you upgrade a 2GIG GC2 GoControl to LTE. If you have any questions about the GC2, or about alarm monitoring services, send an email to support@alarmgrid.com. If you found this video helpful, make sure to give it a thumbs up below to like the video. And remember to subscribe to our channel for updates on future videos. We hope you enjoyed the video. Thank you.
- Uploaded