2GIG GC2: Updating Using the Easy Updater Tool
Related Products


Related Categories
- Wireless Touchscreen Alarm Panels
- Small Business Security Systems
- Monitored Home Security Systems
- DIY Wireless Security Systems
- Apartment Security Systems
Description
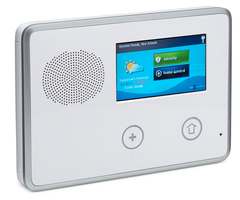
In this video, Jorge from Alarm Grid shows you how to update the firmware on a 2GIG Go!Control GC2 System by using the 2GIG Easy Updater Tool. The 2GIG GC2 is one of the oldest wireless touchscreen alarm panels, and it helped pioneer the way for other wireless all-in-one alarm systems.
Ideally, the easiest was to upgrade the firmware on a 2GIG GC2 is to install a compatible LTE cellular communicator, activate the system for alarm monitoring, and then push down a firmware update from Alarm.com. Unfortunately, it is almost never that easy. With the GC2 being an older system by this point, many users come across old or used GC2 Systems that are not on a high enough firmware to support an LTE communicator for activation and monitoring. This means that the system cannot be set up with Alarm.com, and no firmware update can be sent down over-the-air (OTA).
If you cannot get a GC2 set up with Alarm.com for an OTA update, then you must instead update the system locally. This can be done using the 2GIG Easy Updater Tool or the 2GIG Updater Cable. Of these two options, using the Easy Updater Tool is much more practical. The process consists of connecting the Updater Tool to the panel and then applying the update at the panel.
When you connect the Updater Tool to the GC2 Panel and apply the update, whatever firmware version is on the updater tool will be applied to the system. With that in mind, it is likely that you will need to update the Updater Tool so that it carries the latest GC2 Firmware Version. In order to update the Updater Tool, you must connect it to a Windows Computer or another type of computer running virtual Windows software. You can then apply the latest firmware version by downloading it and saving it to the Updater Tool.
https://www.alarmgrid.com/faq/how-do-i-use-the-2gig-easy-updater-tool-to-update-a-gc2-panel
http://alrm.gd/get-monitored
Transcript
Hey DIYers, George here from Alarm Grid. Today I'm going to be showing you guys how to update your GC2 security system using the 2GIG Easy Updater tool. So if you guys have an older GC2 security system, and you're now coming around to that time where your older 3G, 4G, or CDMA cellular communicator is coming to a sunset, you're going to have to be upgrading to an LTE communicator sooner or later. The LTE communicators comes in Verizon or AT&T, and they require your panel to be on the latest firmware version. And in order to update your panel firmware, you can do it one of two ways. You can do it using an updater cable, or you can do the update using the updater tool. This updater tool is a simple plug and play device. It looks like this. And this updater tool will basically plug into your system. I'm going to show you guys how to use this today. And you want to plug it in while it's powered down. You power the system back up, you then hit the start button, and it should update the firmware on your GC2. And then all you got to do is plug in your new LTE communicator. Now before you go ahead and buy one of these updater tools, you should first check to see if you even need it. So the first thing you want to do to check the firmware on your GC2 is, from the home screen, we're going to hit security, you're going to go to menu. You're going to hit toolbox, and after you hit tool box, you're going to either use your your master code or your installer code. I'm going to use my master code just for today. Mine is defaulted at one, one, one, one. I'm going to hit the right arrow key. You should get to this screen, by the way. You should get to the toolbox. We're on page one of three. We're going to go to page two. We're going to hit version. And mine is actually on firmware version, it's the fourth option down, it scrolls past the screen, so we have to wait for it to come back around. Its firmware version 1.19.3. Now this is actually pretty good. However, there is just one new firmware version that's higher than that, 1.19.3.1. And today, because I have my updated tool on the latest software, I'll be able to show you guys the update on this system. If yours is firmware version 1.17, 1.10, anything like that, if it's below 1.19.3.1, you will want to get an updater tool so that you can use an LTE communicator. The Verizon and AT&T communicators do require your panel to be on a different firmware, so make sure when you guys are buying these communicator's that you look at the description so you know what it's compatible with. Mine timed out, so it's back to the main screen. The first thing we're going to need to do is power the system down. I need to actually open the system up, I need to remove the adapter. I'll show you guys in a second, but if you guys have a barrel connector in the back of the system, you just unplug that. If you guys have it hard wired to the positive and ground on the system, you guys will probably want to unplug the transformer at the outlet. Also, if you guys are trying to take the system off, and it's not coming off, and you don't know what to do, check the top center. There is usually a set screw that holds it in place. You guys do need to remove that screw, so you will need a Phillips or flathead to remove that little screw up here. It's called the set screw. You take that out, and then the system just comes right off. After you remove the set screw, you're just going to take the system off the back-plate. It will give you a console tamper, just acknowledge it, hit OK, it's fine. Again, it's letting you know somebody is tampering with the system. I'm going to go ahead and let it flip down. You're going to see a little strap. Do not take this off, you need this strap. This will actually help you. It's going to make your life a lot easier. Use this little strap right here, hook it in right here, boom! You can use both hands now. After I put the strap that's in the back, again, make sure you don't remove it, it actually helps you. You can hook it into this little part right here. My back-plate isn't correctly situated, so it's coming off a little bit. Yours you want to make sure you have screwed on in all these little holes so that it holds it in place. But basically, this is the little barrel connector that I'm telling you about. If you have your hardwired into the terminals, then you want to make sure you unplug it at the actual outlet. Don't unplug it from here, because you might have live wires and you might fry the system. Be very careful with that. I'm going to go ahead and unplug power. Be careful not to let it fall behind the wall. I'm just going to snake this back here so it doesn't go anywhere. And then the little backup battery, this lime green battery here, you need to unplug it from right here. Now that that's unplugged, I'm just going to show you guys real quick. System is powered down there. None of these buttons work. It's completely dead, no power at all. Watch out for that. Be careful. Now that you have this unplugged, you're going to go ahead and get your updater tool. Now this updater tool is very important when you guys are plugging it in. As soon as you plug it in, and then you power the system on, the updater tool will power on, and it will show you the firmware that it currently has. If your firmware updater tool isn't on firmware version 1.19.3.1, make sure you guys update the tool. We have a video on that as well as-- we have a video and an FAQ on that. Make sure you guys follow the steps in that video if you're updater tool is not on firmware version 1.19.3.1. And I'll show you guys this in a second, how it shows you the update. Be careful while you guys are taking the contents out of the package, there is going to be a little paper manual, and there's going to be a baggie with these little pin connectors. You need to keep these pin connectors. Do not lose it. It's a very easy piece to lose. These are the connectors that you need to use for your TS1 keypad, your touchscreen 2GIG keypads. If you guys have them, and you guys do a firmware update on your GC2 system, you will also need to do the update on your TS1 keypad. Keep that in mind. Don't lose that piece, don't lose the manual. I'm going to set this down for now. I have my 2GIG Easy Updater tool. I'm going to show you guys exactly where to plug this in on your GC2 system. Now that we've got a close up of the system. Right now, if you guys have an older cellular module, it's going to be this little piece right here being held in by these two screws. You are going to need to remove those two screws. Remove the old cellular module, plug the new one in. That is, of course, after you do the firmware update. I'm pointing this piece out because the piece that this updated tool plugs into are these little pins right here. There are four pins. And if you look at this piece right here, the skinny piece is going to go facing that way. The part with the thicker plastic is going to go facing the communicator. it only fits one way guys, so if it's not fitting in the way you're trying, do not force it. It should only fit in one way. It snaps right in. Now it's not going to power on just yet because the system doesn't have power. We have to plug the system in, and then we can do this. What I'm going to do right now, first, I'm going to plug the battery back in. After I plug the battery back in, I'm going to plug the power supply back in and feed this through. As soon as I plug this back in, my screen will start to power on and the updater tool will start going through the firmware update that it actually has in it. I'm going to go ahead and somewhat close this up so you guys can see the system powering back on. It takes a little bit for the screen to power back on. But what I did want to show you guys was the updater tool. It's showing you guys that this one is on firmware version, let me see, 1.19.3.1. If yours is not displaying that, make sure does. If it doesn't, you will need to follow the video that we have to update the updater tool. We're just waiting now. Again, once you've verified the updater tool has the correct firmware update, we're just waiting for the system to power back on. The tool will actually let us know when it's ready to start. I'm just going to check the screen real fast on the 2GIG system. We're just going to wait a little more. After you have the system plugged in for power, you have the tool, and you've verified that the firmware update on it says 1.19.3.1, you can now go ahead and hit the start button, which is this little middle button right here. It will start going through some numbers, some letters here. Basically, it's just letting you know it's going to be erasing the firmware update, flash upgrading whatever is on the system. And then once we start-- once this number here gets to 100, the tool will actually say done. It'll beep to confirm, and then the system should reboot. Let's just give it a couple of seconds, let it do its update. The firmware update does take a couple of minutes. So you do want to be patient, but as you see once this gets to 100, the updated tool should beep for two long seconds. It's actually resetting the panel right now. Once it's completed, it'll make a beep for two seconds, and it should display "done." At that point, once you see "done," you can go ahead and unplug the updater tool, and situate your panel back onto the back-plate. My screen just came on, and you hear the long beep. The tool says done. And it should start beeping every 10 seconds or so. At this point, now I am OK to go ahead and unplug the updater tool. Just pull it straight out. You can go ahead and put this back in the box, hold on to it, use it to upgrade your TS1 keypads. And from here, just go ahead and situate your panel back onto the back-plate. Make sure no wires are being pinched so you don't get a console tamper. And just to verify that it actually updated to the latest update, you're going to go ahead and hit security, go to menu, go to toolbox, enter in the code, your master code or the installer code. I'm going to use my master code. One, one one, one. Hit the right arrow key to go to the second page, hit version. Now the firmware is 1.19.3.1. You are now good to power the system down. Remove the old module, put the new one in, and then get that registered with whatever alarm company you guys decide to use. Real quick, once you're done doing everything, very important, don't forget to put that set screw back in there so nobody can just take your system off the wall. Put that set screw back in. Once you're done doing all the updates and updating the LTE module as well. This was just a quick video on updating your GC2 system using the Easy Updater tool. And if you guys have any questions, please feel free to send us an email to support@alarmgrid.com. If you found the video helpful, make sure you hit like underneath, subscribe to the channel, and hit the little bell icon, so whenever we upload new content, you guys get notified. I'm George and I'll see you guys next time.
- Uploaded