Basics of Alarm Keypad Operation
Related Products


Related Categories
Description
In this video, Jorge explains the basics of alarm system keypad operation. Knowing how to use your alarm keypad and its various commands is crucial for getting the most out of your panel. You can use a keypad for basic tasks such as arming and disarming. It may also be used for advanced programming.
An alarm keypad provides an on-site access point for controlling a security system. For a hardwired system, you will need to add at least one keypad to the system. But for a wireless system, a keypad is largely optional. This is because the panel itself will typically serve as an on-site controller. However, you can certainly still add a second keypad for an additional on-site access point. This is great if you have a larger building where you might want to access your system from multiple locations. An easy example is if your house has both a front door and a back door and you want to be able to Arm and Disarm from both spots.
In order to communicate with an alarm system, a keypad will need to offer bi-directional communication. In other words, it must be capable of sending signals and receiving signals. This is unlike standard security sensors, which typically only need to send signals to the panel. The reason that a keypad must receive signals is because it must update the displayed status whenever the system is Armed or Disarmed. That way the user can check the keypad to see the current status for the system. This is why a wired keypad receives connections for both data and power when it connects with a panel. Wireless keypads send transmissions wirelessly, but they still usually rely on a plug-in transformer for power.
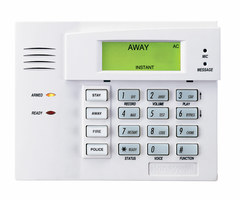
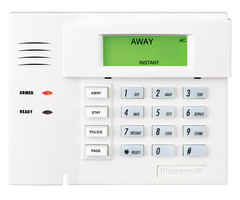
Keypads can also be push-button or touchscreen. Push-button keypads are commonly split up into two types. These are Alphanumeric Keypads and Fixed English Keypads. Of these two, only Alphanumeric Keypads can be used for deep-level programming. This is because a Fixed English Keypad will not display all the relevant text, However, you can still use a Fixed English Keypad for performing basic tasks like Arming and Disarming. Meanwhile, touchscreen keypads feature touchscreen controls and an AUI display. This is similar to what one would usually find on a wireless all-in-one (AiO) panel.
http://alrm.gd/get-monitored
Transcript
Hey, DIYers. I'm Jorge from Alarm Grid. Today, we're going to be going over the basics of alarm keypad operations on a VISTA system, actually. So I'm working with a 6160RF, which is just an alphanumeric keypad with a built-in wireless transceiver. So it'll basically give me the maximum amount of zones on my wired system as it can hold. And then right next to it, I have a 6150, which is a fixed English keypad. And I'm going to show you guys a little bit of differences between both of them once I actually get to them. First, I want to explain a little bit of what keypads actually are. They work as both input and output devices. Output devices, usually referred to as sirens. Input devices, usually referred to as sensors or zones. The keypads act as both, yes? Now, you can have more than one keypad on your security system. So if you have a really, really big residence or location that you guys have the alarm system located on, more often than not, you'll see that there's keypads spread out maybe in different ends of the house. The reason for that is so that you don't have to walk all the way across the house to arm the system and then walk back to leave through whatever door you're leaving. So you'll find most people add multiple keypads to their alarm systems. Other people also get their system monitored. And they can actually control their alarm system through the application that is compatible with their system. So, for instance, Honeywell would use Total Connect 2.0. And then the other app that is most commonly used as well is Alarm.com. So all of these are apps that also allow you to control the system from your phone directly or from a website. But if you don't have the app, you can always use the keypads just to give you another access points to arm and disarm the system. So this not only goes for wired systems, it also works for wireless systems as well. So if you have a wireless system and you want to add an extra keypad for that as well, you can also do that. On the all-in-one wireless systems, you actually find that most people do get a second keypad. And the reason being is that since it's all-in-one they'd rather keep their main system safe. So if a burglar comes in, they don't smash it right away. Then they're out a couple of hundred bucks. What they'll actually do is they'll put the alarm system somewhere not right by the front door where most people usually put their keypad. Because you exit through the front door or you come in through the front door and you can enter in your code there to disarm or arm the system. So what most people would do is they'll put their all-in-one system, they'll put it maybe in their bedroom, maybe on their kitchen countertop, somewhere that's not right by the entry point. And then they'll put the secondary keypad, which is just-- it's a separate keypad to control your alarm system by. They'll put that by the front door. So that if that is damaged, the system still works because they haven't damaged the actual brains. And that's another point I want to get to. The keypad and the actual panel, or the system, are two completely different things. The keypad is just what allows you to control the alarm system. The actual panel, or the alarm system, is the brains. So, for instance, here I have the two keypads. And the brains of the system is right here. So if somebody comes in and they hear my keypad sounding off and they destroy the keypad, they have not destroyed my alarm system because this usually is located in my storage closet or basement area. So just because they destroy this doesn't mean this is going to be damaged. This is still sending out the alarm signal. It is still notifying the central station, if you're being monitored. So, yeah. And the same thing goes for the wireless all-in-one systems. The actual panel is the brains. It's all-in-one because it's a self-contained. Everything is built into one unit. And so the main system, it would be, if they destroy that, then, yes, they're going to destroy your alarm system. But if they just destroy one of your keypads, then your system still works. You can always just add an extra keypad for it, or replace it, or et cetera. All right? So now let's just go ahead and go into the basic operations. So the first thing you'll see is I have both of them show a ready light. They both are addressed to the same system. So they both technically are on the same screen right now. So I want to make sure that you guys realize the difference right now. So if the system is in a ready to arm, as we see by the little green LED on both of them, you'll start off by seeing on the LCD display, there's two completely different readings. On the 6160, which is an alphanumeric keypad, it actually says, Main Home Ready to Arm. And on the 6150, it's blank. You just have an AC in the top right. All right. Now that's very important if you guys are trying to diagnose or figure out, if you guys can do deep-level programming or anything like that. Whenever we ask you, or whenever a company asks you, what kind of keypads do you have, just always check the display first. If it actually spells out Main Home Ready to Arm, or Disarmed Ready to Arm-- it could change as well, so that top line can always be different-- as long as it spells out Ready to Arm at the end, then you guys have an alphanumeric. If it's just showing this screen right here, where it's just a blank screen and in the top right it says AC, you guys have a 6150. Now I have a zone learned into my system. And you'll see-- well, the ready light just went off-- but you'll see if I simulate a door opening, which is just moving the magnet away from the contact, you'll see this ready light should come off. So let me just make sure I have the magnet in contact with the reed switch. So it's in ready to arm right now. Once I move the magnet away, it causes a fault, which means the door's been opened. And you'll see here it actually says, Fault 15. Now usually, if I have my descriptors in there, it'll also say, right underneath, Fault 15, front door, or back door, or side door, or window, whatever zone name you do decide to program it as. So this will actually say the zone name. I just didn't have mine programmed in with one. But you'll see how it does spell out Fault 15. And that's letting you know that a door's faulted. It's opened. All right? This one just says 15, yeah. Let me show you guys real quick. All right, so we saw what a fault looks like. Now I'm going to show you guys what a tamper or what a trouble looks like. So if I open my sensor up, it should cause a tamper in the system. Let me just open up both ends here. You see it's showing Check 15. That's telling me that there's a trouble with my sensor. This just says 15, and Check on the bottom. All right, let me just silence that. So you see the little difference between here for a tamper, or for a trouble, or anything like that. Check 15. 15 and then Check on the bottom there. It doesn't actually spell it out right next to it. Let me go in and put this back on to clear this. And whenever you clear, or whenever you fix a trouble, you need to make sure that you disarm the system two times. Mine is defaulted. So I'm just going to use my default master code, 1234 1-- for off. So to disarm it, you enter in the master code and the command. So my master code is 1234 and 1. And you have to enter that in twice. 1234 1. Yes, they both have the same readings on the numbers. So they both arm and disarm the exact same way. Now that mine is in a ready to arm mode-- because I have the magnet touching the sensor, the reed switch, so it's in a ready to arm state-- I'm just going to go ahead and arm it. And I'm going to show you guys how to do that. So you enter in your code. Obviously, like I said, yours could be different. You enter in your code and then whatever command you want to do. So if I want to do an Arm Away, or even an Arm Stay, it's 2 or 3. So I'm going to go 1234. I'll do a Stay. Armed Stay. And we just have to wait for it to go into an Armed Stay now. And you see here, it's actually letting me know, Armed Stay, you may exit now. This one just says Stay. All right. And now to disarm it-- oh, by the way, if you saw here, the lights changed. So the ready light went off because it's not in a ready to arm state anymore. It's actually in an armed state. So you see that red armed light come on. All right. When I disarm it, the on light will go off. And the ready light should come back on as long as all my doors are closed So I go 1234 1. And again, it's the same thing-- Disarmed. Ready to Arm. --same thing if I arm from the second one as well, yeah. 1234 2. It gives me that delay to exit the house. If you arm with one keypad, you can still disarm with the other. You can disarm from another keypad. Remember, they're all connected to the same system so they're all receiving the same messages. So it doesn't matter what keypad you arm from, disarm from, doesn't matter at all. Now I want to show you guys something very important, which is why we always recommend getting the 6160. This, I'm going to show you guys deep-level programming. Sometimes you guys may come across a certain situation where you may need to go into a deep-level programming. For instance, if you guys need to go into your communicator diagnostics, if you need a changed city ID, or anything like that, that all requires deep-level programming, which only an alphanumeric keypad can do. If you guys tried doing it with a 6150, you guys, it's just like being in a dark-- it's just working in a dark room. You don't see what field you're in or anything. And I'm going to show you guys that right now. Same thing whenever you're programming sensors-- Star-56. I'll show you guys that right now. All right, so to do that, you enter in the installer code and then 800. Mine is-- my installer code's 4112. Very important to recognize the difference between your master code, sub-user codes, or installer code. Installer code is used to go into programming. So mine is defaulted at 4112. And then 800 is the command to go into programming. Right off the bat, you see here again, 6160 is alphanumeric. It's showing you my field installer code 20. And then this one just says 20. All right. Let's go ahead and go into Star-56. Set to confirm. So it's already showing what fields I'm in. If you do Star-56 on this, you're working in the dark right there. You have no idea where you're in. I'll hit 0. I can enter in my zone number. You see that just only shows zone 1. So let's just say I continue. So I hit the Star button. This shows me the summary of the zone. Zone, zone type, partition, and a couple of other fields there. Let's go ahead and hit the Star again. This is actually going to start having me go into these zones now. So it's going to have me, zone 1, or zone type 0 disabled. You see this? You have no idea what that 00 means. So you don't know what field you're in. You may delete all of your programmings, all of your sensors. You may even default the panel by accident. So it's very important, if you guys are going to do deep-level programming, always, always make sure you guys have a 6160. All right, I'm going to go ahead and back out. So I'll disable this zone for now. I'll leave it disabled. I'll enter 00 to quit. And then Star-99. Back to the home screen. So just a few important features about the 6160 and 6150 and just basic alarm keypad operations, arming and disarming. Always pay attention to the ready light. If the armed light is on, then that means your system's armed. If you guys have any questions about your keypads or what keypads are compatible with your system, feel free to email us at support@alarmgrid.com. If you guys found the video helpful, make sure you hit Like underneath. Subscribe to the YouTube channel and enable the notifications so whenever we upload new content, you guys do get notified. I'm Jorge. And I'll see you guys next time.
- Uploaded