Honeywell VISTA System: Factory Defaulting
Related Products


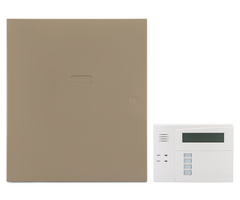


Description
In this video, Michael from Alarm Grid shows you how to reset a Honeywell VISTA P-Series Security System to its factory default settings. In order to do this, you must first enter into programming. This is done with the command [Installer Code] + [8] + [00]. Since the default Installer Code is [4112], the command you will likely use to get into programming is [4112800]. You will know that you are in programming because the keypad will read "Installer Code 20" if it is an Alphanumeric Keypad, or it will just read "20" if it is a Fixed English Keypad.
Once you are in programming, you are then able to perform the factory default for the system. To do this, simply enter the command [*97]. The keypad will beep three (3) times to confirm that the system has been factory defaulted. Doing this will reset all system zones to their factory default settings. It will also reset the Master Code to its default of 1234 and the Installer Code to its default of 4112. All other programmed user codes will be erased. At this time, you may also want to enter the command [*96] to default the panel's account number and computer station ID (CSID).
Then when you are finished, press [*99] to exit programming. You will then have to reprogram the system from scratch. Never use [*98] to exit programming, as it could cause you to become locked out and unable to reenter programming. Always use the command [*99] to exit programming on a Honeywell VISTA P-Series System. Remember that the [*97] command for factory defaulting only applies to VISTA P-Series Systems. It does not apply to VISTA TURBO Panels. Also keep in mind that there is no way to "undo" a factory default. Once you perform the task, there is no way to go back.
https://www.alarmgrid.com/faq/how-do-i-factory-default-a-honeywell-vista-p-series-system
http://alrm.gd/get-monitored
Transcript
Hi, DIYers. This is Michael from Alarm Grid. And today I'm going to be showing you how to reset your Honeywell VISTA P-Series security system to factory default settings. So just very quickly, you go into programming, and then star 97 is for the default. And then you also want to do a star 96 to default the panel account, and also the Computer Station ID, or the CSID, because that information isn't necessarily defaulted when you do the star 97. So you do star 97, star 96, and then star 99 to exit programming. Don't press star 98 in any of this. Star 98 will lock you out of programming, causing problems. So star 97, though, that's going to reset the master code to 1, 2, 3, 4. It's going to reset the installer code to 4, 1,1, 2. It's going to clear out any user codes you added. It's going to reset all of the panel programming information back to its default setting. So you're going to be starting with basically a fresh new system. Now, you can do this on a tuxedo, technically. I'm in Console Mode. But we generally recommend doing it on a push-button keypad, an alphanumeric keypad. Or you can do it on a fixed English, technically, but an alpha keypad is best for programming. So we recommend using this tuxedo. It can be used for programming, but it's kind of slow. It doesn't work as well. And plus, you might lose the keypad address. So there's actually some notes on that that I want to mention as well. And this is for a VISTA-20P or 15P, by the way. If you're on revision 10 or higher, by checking the PROM chip, then all the keypad addresses are going to be enabled by default. So you won't necessarily have to worry about getting your keypad set up again, your alphanumeric keypad. And tuxedos can be a whole different story. I'll get to that in a second. But for the 6160 and other pushbutton keypads, what's going to happen if you're on revision 10 or higher for 15P or 20P, or you're on revision 4.21 or higher for the 21iP, and all versions of the 21iP LTE, the keypad addresses are going to be enabled by default. But if you're on less than 10 for a 15P, 20P, less than 4.21 for a 21iP-- and you're not going to worry about this on the 21iP LTE. All the versions are high enough, but then only address 16 will be enabled. So make sure your keypad is on the default address, on address 16, because otherwise it won't be working after you do the default. So that's just something to keep in mind if you're on a lower firmware version. But if you're on a higher firmware version, then you don't have to worry about that as much. And as for the tuxedo, you want to have it on address 1 or 2. Because if it's on address 5 or 6 then those addresses won't be enabled by default and your tuxedo won't work following the defaults. So I know that's a lot to take in, but just as a reminder, for 15P, 20P it's version 10 or higher. If you're lower than that, then have your alpha keypad on address 16 for the 21iP 4.21 or higher. So just keep that in mind. So we're going to do this on our alphanumeric keypad. We're not going to do it on tuxedo. We don't recommend programming too much in the tuxedo. But we're going to do a factory default. So like I said, it's star 97, star 96. But we have to get into programming first. So we're going to enter in our installer code-- 4, 1, 1, 2. That's the default. And then we'll do 8, 0, 0. And you see we get installer code 20 on our alphanumeric keypad, whereas our fixed English keypad just shows 20. But because we're just doing very light programming today, we can do it on this one just fine, but we're doing it on this one. So we're going to do star and then we'll do 97. [BEEPS] And you see we get the three beeps, indicating that the system has been factory defaulted. There's no turning back now. So I will also do star and then we'll do 96. [BEEPS] And that cleared out the account information and the CSID. So star 97 and then star 96. And again, you really only do this as a last resort troubleshooting situation, or if you're wanting to start fresh with a new system, because we would have to program the system from scratch. And then to exit programming, star 99. Don't use star 98. That will give you lots of problems. You see it even cleared out our fun message that we had. We had AlarmGrid written here before. And now it says "Disarmed." So it's just completely plain. So we're going to have to reprogram this system from scratch. So I'll be busy this afternoon. But anyway, that is how you factory default your Honeywell VISTA P-Series system. This only works on a P-Series system. Don't do this on a turbo. You'll run into problems. Turbo being the best 128BPT or vista 250BPT. OK. So don't do it on the turbo systems. P-Series only. Star 97, star 96, star 99 to exit. But if you have any questions about your Honeywell VISTA security system or about alarm monitoring services, send an email to support@alarmgrid.com. If you found this video helpful, make sure to give it a thumbs-up below, to like the video. And remember to subscribe to our channel for updates on future videos. We hope you enjoyed the video. Thank you.
- Uploaded