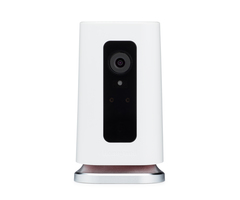
Can I Get an Alarm or a Specific Zone to Activate My Honeywell IP Camera?
Yes, you can get an alarm or a specific zone to activate your Honeywell IP Camera. To do this, you must create a notification in Total Connect 2.0. The notification will tell the camera(s) to activate when a predetermined event occurs. You can create the notification from the TC2 website.

Normally, a Honeywell IP Camera will start recording when it detects motion or hears a sound. But you can also get a Honeywell IP Camera to record when a predetermined system zone is faulted or when the system experiences an alarm event. This FAQ will assume that you already have access to Total Connect 2.0 and that you already have the necessary sensors and camera programmed. Complete the following steps to create a notification to activate a camera in Total Connect 2.0:
1. Access Total Connect 2.0. Login to your Total Connect 2.0 account from the Total Connect 2.0 website. Your alarm monitoring company should have sent you information on how to log into your Total Connect 2.0 account when you activated your monitoring service.
2. Start creating a notification. Choose the Notifications tab on the left side of the screen. Then choose List. Then choose the logo of the hamburger button (three bars) with the plus (+) sign at the top. This can be seen in the following image in the upper-right corner:

When asked for category, choose "Security". Do not select "Cameras". You will add the function for the camera(s) to activate later. The next selection will depend on what action you want to trigger the camera. If you want to have the camera start recording when a sensor is faulted, choose "Sensor Open/Close". If you want to have the camera start recording when the system goes into alarm, choose "Sensor Alarm". You can also choose an option to have the camera activated when Arming or Disarming or during certain system events. But for this FAQ, we will only be focusing on the "Sensor Open/Close" and "Sensor Alarm" options.
3. Continue creating the notification. First you should provide a name for the notification. Choose something that will help you remember it easily, like "Bedroom Camera". In our example, we named the notification "TEST".
Next you will choose when to trigger the notification. If you are setting it up for a faulted sensor, then "Sensor Open" is a good option. If you are setting it up for a system alarm, then "Sensor Alarm" is a good option. Press continue after making your selection.


If you are basing the notification around a sensor, then you must choose the zone that will trigger the notification. In our case, we have a door sensor assigned to Zone 3. It is called "Test Door". Select your sensor, and press continue.

Next, you can set a notification schedule. This way, the camera would only activate if the action occurs at a certain hour of the day or day or the week. For example, if you only wanted the camera to activate when the sensor fault or alarm occurs at night time, then you would set that here. If you want the alarm to occur at any time, just choose "Always". You can also create a new schedule if desired. For our example, we just chose "Always". Press continue after making your selection.

Next you can set who will receive the notification. This will determine which phone numbers will receive a text alert and which email addresses will receive email alerts. Notifications, and who receives them, is controlled by Groups within Total Connect 2.0. Make sure all users you want to receive this notification, are in the selected Group. In our example, we just chose "Default Group". This is the Group initially created by Total Connect 2.0, and the Admin user is included in this group by default. Press continue after making your selection.

4. Configure video capture settings. Finally, you will configure the camera(s) to respond when the notification occurs. First you must enable the option by clicking the button on the right. Blue means that it is enabled, as seen in the picture below:

If you want to adjust the capture schedule, you must first uncheck "Always" and then choose the schedule you want to follow. In our example, we just kept always.
Next you will choose which camera(s) activate. Again, if you want to choose any specific camera(s), you must first uncheck "All Video Cameras" before making your selection. In our example, we deselected "All Video Cameras" and chose "testingcamera" instead.

You can press the blue "save" button when finished to save your changes. Press "Yes" when asked if you are sure. You can then see the notification in the list. Note how the option for "Send To" is set to "Video Capture". Ours is seen in the following example:

At this point, you can logout of Total Connect 2.0. Your notification and camera settings should function as programmed.
Did you find this answer useful?
We offer alarm monitoring as low as $10 / month
Click Here to Learn MoreRelated Products


Related Videos
Related Categories
- Answered

