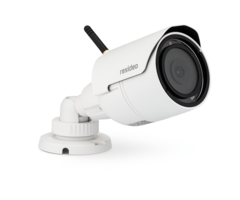
How Do I Add a Resideo IPCAM-WOC2 to Total Connect 2.0?
To add a Resideo IPCAM-WOC2 to a TC2 account, log into the account via the app and choose Cameras. In the upper right, select Add Camera then select IPCAM-WOC2. Name the camera then follow the prompts to complete the setup by joining the camera to WIFI, then adding it to your TC2 account.
The IPCAM-WOC2 from Resideo is the latest offering in the HD Camera lineup that is compatible with Total Connect 2.0. In order to add any camera to a TC2 account, the account must first be enabled for Video service with either 7-Day or 30-Day recording enabled. The IPCAM-WOC2 can support either option, but at Alarm Grid, we always enable the 30-Day option for any of our video subscribers. The Alarm Grid Platinum (Self or Full) plan, or a Stand-alone Video plan is required in order to support the use of cameras with TC2.
To add a Resideo IPCAM-WOC2 to Total Connect 2.0, follow these steps:
- Log into TC2. Using a phone or tablet with bluetooth capability, log into the Total Connect 2.0 account that you plan to add the camera to. Be sure the device you're using has sound enabled (ringer and speakers), that it is connected to WIFI, and that it is not currently connected to any other device, such as headphones, via bluetooth. At this time, the camera should be powered down.
- Plug in transformer. On the IPCAM-WOC2, be sure that the segment of the power cord from the transformer is not yet connected to the camera itself. Plug in the transformer, but don't yet connect the camera to the transformer.
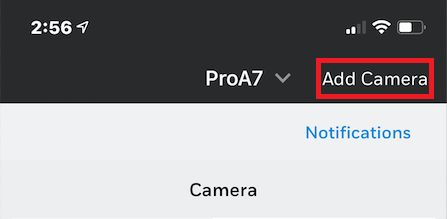
- Begin the association. If your TC2 account has more than one location, be sure the correct location has been selected via the dropdown menu at the top of the TC2 screen. Tap the Cameras icon at the bottom of the screen (iOS) or top of the screen (Android). Press Add Camera in the upper right (iOS, shown below) or ⊕ (Android).
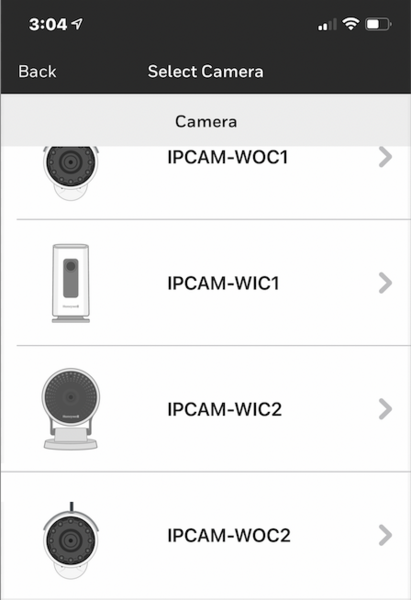
- Choose camera type. There will be a list of possible camera types. Select the IPCAM-WOC2 from the list. This will take you to a screen where you can choose a name for the camera. There are a number of pre-configured names to choose from, or you can choose to create a custom name. If you choose a pre-configured name, you'll be taken directly to the next step. If you choose to create a custom name, you will be taken to a screen where you can type in the name you want, then press 'Next'. From this point, an installation wizard takes over based on the camera type selected in the TC2 app. Follow the instructions as they are provided.
-
Power on the Camera. The app will instruct you to power on the IPCAM-WOC2. Do this by connecting the transformer end of the power wire to the camera section of the wire as shown below. Once the camera powers on, it will go through a Power on Self Test. It can take one (1) to two (2) minutes for this self test to complete, once it does the Status LED will begin blinking blue. At this point, in the app, press 'Next'. The app will search the network, and find the IPCAM-WOC2.


-
Pair the camera. Once the camera has been discovered on the network, you will be prompted by the app to 'Pair your Camera'. Press the button 'GENERATE QR CODE' at the bottom of the screen. Your iOS or Android device will generate a QR code on the screen, which you will hold up in front of the camera so that it can "see" the QR Code. As shown in the app, hold the device displaying the QR Code within 3 - 5 inches (7.6 - 12.7cm) of the front of the camera, parallel to the lens. The camera LED will blink when pairing is successful.


-
Configure network settings Next, you'll configure the camera for your WIFI network. Select the network from all available networks you see, then press 'Next'. The camera will attempt to connect, then ask you for the network password. When entering the password, remember that it is case sensitive. Once it has been entered, press 'Next'.


-
Complete camera setup. Once the camera has connected to the WIFI network, it will complete most of the remainder of setup on its own. There are a few more inputs for the end-user, depending on which panel the camera will be used with. You will receive a Preview image, showing the cameras WIFI signal strength with an option to complete Notification Setup now, or Skip and come to that later. We skipped this option during our setup.


-
Setup Display on Panel. You may see an option to "Display on Panel". This option is available when the camera is used with a Resideo or Honeywell Home ProSeries panel. Enabling this option will allow you to view the camera on the panel's touchscreen. Up to eight (8) video devices (HD Cameras or Skybell Video Doorbells) can be selected to be viewed at the panel, or through the PROWLTOUCH Remote Touchscreen Keypad. After making a selection, press 'Next'. The setting sill be saved, and once that is done, setup is complete. You can choose 'Done' or 'Add Another Camera".


Did you find this answer useful?
We offer alarm monitoring as low as $10 / month
Click Here to Learn MoreRelated Products
Related Categories
- Security Cameras
- Security Cameras
- Outdoor Cameras
- HD Security Cameras
- HD Security Cameras
- Low-Light Security Cameras
- 1080P Security Cameras
- Wireless Security Cameras
- Answered
- Answered By
- Julia Ross