How Do I Add a Z-Wave Light to a Simon XT?
You can add a Z-Wave light to a Simon XT by putting the system into its Z-Wave inclusion mode and activating the inclusion function on the light. You should clear the light from the Z-Wave network before doing this. The light should then be successfully included with the Z-Wave network.
Remember, the Simon XT will need a Z-Wave controller to support a Z-Wave light. The only compatible Z-Wave controllers for the Simon XT System are the Interlogix Alarm.com cellular communication modules. With one of these modules installed and activated, the system will be able to support Z-Wave devices.
Once the Z-Wave light has been added, it can be controlled from Alarm.com, using a key fob or with an Interlogix Two-Way Talking Touch Screen Keypad.
Complete the following steps to add a Z-Wave light to a Simon XT:
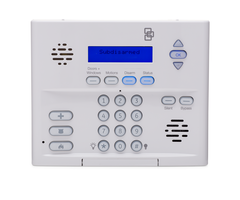
1. Access programming. Start from the home screen of the system. Press the down arrow repeatedly until "System Programming" is displayed. Then press the "OK" button. Then enter in the Installer Code for the system. This code is set to 4321 by default. Once the code has been entered, press the "OK" button. You will then enter into programming.
2. Exclude the light. Before adding a Z-Wave device to the network, it is always recommended to clear it from the network first. This is because many Z-Wave devices are included with a network before they even leave the factory for testing purposes.
To exclude the light, press the up arrow once to reach the "Interactive Services" option. Then press the "OK" button. Press the down arrow to reach "Z-Wave Setup", and press the "OK" button. Press the down arrow two more times to reach "Remove Z-Wave Device", and press the "OK" button. The Simon XT System will display "Press button on device to remove...". This indicates that the system is in its exclusion mode.
Then activate the inclusion function on the light. Most Z-Wave lights have an inclusion button on the back that can be pressed. Check the instructions that came with your particular model. Once the light is recognized, the system will acknowledge that it has been excluded from the network by displaying the message "Device # Removed." Please note that it may be necessary to bring the light close to the panel when doing this.
3. Include the light. Press the "Status" button on the Simon XT System to return to "Z-Wave Setup". Then press the "OK" button. Press the down arrow to reach "Add Z-Wave Device". Then press the "OK" button to put the panel into its inclusion mode. The screen will display the message "Press button on device to add...".
Next, take the light and activate its inclusion function to learn it in with the network. This is the same function that was activated in Step 2 when the light was excluded. Again, the light may need to be brought close to the panel in order for it to be recognized. Once the light has been added, the panel will display a device number for the device. It's a good idea to make a note of this device number.
4. Test the light. Keep pressing the "Status" button on the Simon XT until you are returned to the home screen. Any programming changes that were made will be automatically saved. Then test the light to make sure that it has been set up properly. Most users will test the light using Alarm.com.
Did you find this answer useful?
We offer alarm monitoring as low as $10 / month
Click Here to Learn MoreRelated Products
Related Categories
- Answered