
How Do I Enable Settings Photos on the IQ Panel 5 System?
To enable Settings Photos on the IQ Panel 5, swipe down and touch Settings, then Advanced Settings, and then enter your own Installer Code. Next, touch Installation, then Camera Settings, and then enable Settings Photos so the panel photographs anyone who is opening Advanced Settings here.
About Settings Photos
Settings Photos on the IQ Panel 5 (available in AT&T LTE and Verizon LTE) uses the panel's built-in camera to take and store a photo every time Advanced Settings is accessed. In other words, whenever someone enters a valid code to reach the installer-level programming, the panel quietly snaps their picture. It is an accountability feature, giving you a visual record of who opened the deeper settings on your security system, which is handy for a business or any shared setting where you want to know who made changes.
The setting is disabled by default, so out of the box no photo is taken when Advanced Settings is opened. Turning it on is useful when more than one person knows the Installer or Dealer Code and you want to track access, or simply for peace of mind that you can see who got into the programming. It works like the panel's other photo features, such as disarm photos, just triggered by settings access rather than a disarm.
Before You Begin
Settings Photos is in the Camera Settings, which you reach through Installation and which requires the Installer Code (1111 by default) or Dealer Code (2222 by default). The steps below use the Installer Code. The panel's camera must be enabled for any photo feature to work, so if the Panel Camera is turned off, the panel cannot capture settings photos.
Enable Settings Photos
-
Swipe down and touch Settings. Swipe down from the top of the screen to open the Settings Tray, then touch SETTINGS.
 Swipe down from the top of the screen to open the Settings Tray.
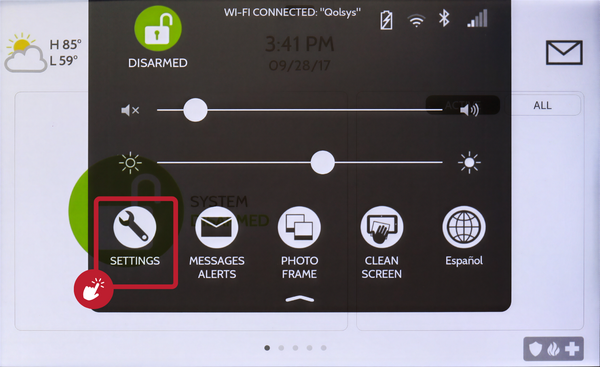 Touch Settings in the Settings Tray.
-
Touch Advanced Settings and enter your Installer Code. Touch ADVANCED SETTINGS, then enter your Installer Code (1111 by default). The Dealer Code (2222) works here too. The panel advances automatically after a valid code.
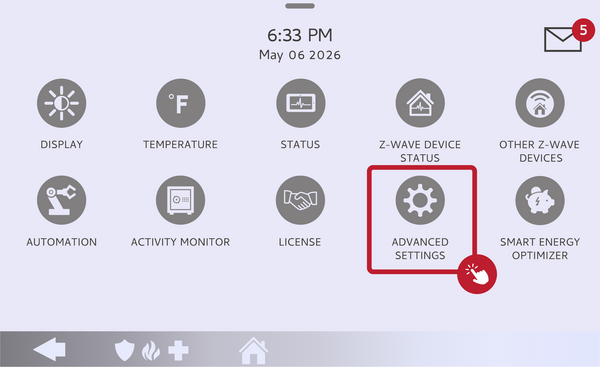 Touch Advanced Settings.
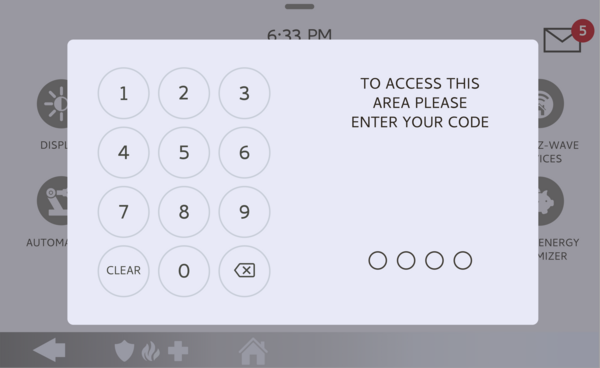 Enter your Installer Code (1111 by default).
-
Touch Installation, then Camera Settings. Touch INSTALLATION, then open CAMERA SETTINGS and find the Settings Photos option.
Open Camera Settings and find Settings Photos. -
Enable Settings Photos. Toggle Settings Photos on. From now on, the panel captures and stores a photo every time Advanced Settings is accessed. Toggle it off any time to stop taking settings photos.
Toggle Settings Photos on.
Tips
Settings Photos is most useful when several people have access to the panel's programming, since it gives you a face to match with each time the Advanced Settings menu is opened. The photos are stored on the panel alongside your other captured images, so you can review them later. Remember it relies on the panel camera, so it does nothing if the camera is disabled, and like other photo features it only captures a still image rather than video.
Enabling Settings Photos on the IQ Panel 5 gives you a photo record of everyone who accesses Advanced Settings. For help with Settings Photos or the panel camera on your IQ Panel 5, contact the Alarm Grid support team. We are here Monday through Friday from 9:00 AM to 8:00 PM Eastern Time. Email us at support@alarmgrid.com, call us at 888-818-7728, or visit our website and chat with a live support agent.
Did you find this answer useful?
We offer alarm monitoring as low as $10 / month
Click Here to Learn MoreRelated Products


- Answered