How Do I Install a Lyric Security System?
As of April 15, 2026, Lyric panels can no longer be activated or remotely programmed using AlarmNet360. For full details, please read this notice.
You can install a Lyric security system by using tools to mount the system back plate to the wall and then running a wire from the outlet to the system. A clean wall installation for the Lyric will require cutting holes into the drywall, fishing wires through the wall and connecting wires.

Please note that conducting a full wall-mounted installation of a Lyric Controller may be a difficult process for some end users to complete on their own. Many users choose to have the installation process completed by an electrician or a handy-person to ensure that it is done safely and correctly. Additionally, Honeywell also offers an excellent desk mount for the Lyric Controller that can serve as a viable alternative to mounting the system on a wall.
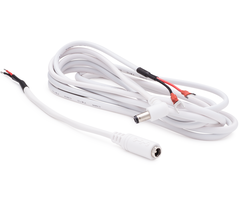
If you do decide to attempt the installation on your own, make sure that you have all of the necessary tools before attempting to complete the process. This includes the Honeywell LT-Cable for wiring, which is not sold with the Lyric Controller and will need to be purchased separately. We also strongly encourage you to consult the video found at the end of this FAQ for more information about installing a Lyric Controller. This video will go into much greater detail than the information presented here, and it will present a full step-by-step process of how to mount a Lyric Controller to a wall. The picture below shows the Honeywell LT-Cable:
Complete the following steps to install a Lyric Controller:
1. Turn off the power. For safety reasons, it is necessary to turn off the power to the outlet that you will be working with. Go to the building's circuit breaker and shut off the power to the appropriate outlet before you begin the installation.
2. Determine the mounting location and outline. Since you will be cutting holes into the wall, you will want to consider the mounting location for the Lyric very carefully. Remember, the Lyric will serve as the central hub for the security setup. It will be communicating with all of the security sensors, and it will serve as the primary point of access for controlling the security system.
With this in mind, the Lyric Controller should be placed in a centralized location that is quickly and easily accessible from the building's main entry point. It is also helpful to have the Lyric placed a few feet directly above a wall outlet so that fishing the wire through the wall will be as easy as possible. For a clean installation, the bottom plug-in on the wall outlet should be free and available for the Lyric Controller. Finally, you will want to determine a comfortable height for the panel to be placed. It should be comfortable to use, without any reaching or bending over being necessary. Another thing to consider is the Lyric Controller's built-in camera. By default, the Lyric will take a picture of anyone who disarms from the main panel. The built-in camera has no flash, so if you mount the Lyric in a dark location, the pictures it takes will also be quite dark.
Once you have determined a good location, you will need to hold the backplate up against the wall and use a writing device to outline the hole that you will cut into the drywall. When doing this, the side that connects with the Lyric (the opposite of the flat and smooth side) should be facing away from the wall. We recommend using the large hole and the small hole on the Lyric's backplate as guides for drawing the hole. Also, make note of the top and bottom of the Lyric so that you do not confuse the sides later. This can all be seen in the following picture:

When creating the outline for the hole you will cut, we recommend drawing a rectangle with one corner located at the bottom-left corner of the small hole and its diagonal corner at the upper-right corner of the large hole. Using these points as "guides" can be extremely helpful when drawing the outline for the hole. By creating a rectangular hole of size in this exact location, you will be able to easily fish the wire through the wall, and the Lyric Controller itself will still fully cover up the hole in the wall. Making the hole smaller will only make fishing the wire more difficult, and it will still be equally as tedious to cover up the hole with plaster, should you decide to ever remove the panel from the wall entirely. The picture below shows where we recommend outlining the hole, based on the position of the Lyric backplate against the wall:

3. Cut the holes. Using a drywall saw, carefully cut the hole into the drywall. We recommend cutting one side at a time, following the outline throughout the entire cutting process. Once you have finished cutting the hole, remove the loose piece of drywall from the wall so that the opening is accessible. There should now be a rectangular hole cut into the wall, a few feet directly above the wall outlet.
You will also want to cut a small hole directly beneath the wall outlet. This hole does not have to be very large; about one square inch will do. The hole should be small enough so that it will be covered up by the plug-in transformer later. You will use this hole to fish the cable up through the wall and out the larger rectangular hole later.
4. Fish the wire. Notice that the LT-Cable consists of two parts - a small cable and a long cable. For the wire fishing process, you will be working with the long cable. You can put aside the small cable until later. The long cable will have two ends - a male connector and a pair of screw terminal connectors. The part that will be inserted into the wall will be the male connector. This connector is shown in the following picture:

Again, this is the longer portion of the LT-Cable, not the smaller portion. Using flexible, but sturdy, fish tape, you will "fish" this male connector end of the LT-Cable from the small hole by the outlet, upwards towards the larger rectangular hole, using the fish tape as support. At this time, you should also unscrew and remove the outlet cover from the wall outlet.
If you have trouble fishing the wire from the small hole to the rectangular hole, you can instead try and fish the opposite end of the wire (the pair of screw terminal connectors) downwards from the upper rectangular hole to the small hole. However, doing it this way may present you with greater trouble when trying to pull the wire out from the wall. Regardless of how the process is completed, the end result should have the long portion of the LT-Cable in the wall, with the end with the two screw terminal connectors coming out through the small hole by the wall outlet, and the other end with the male connector out through the upper rectangular hole in the wall. You can then remove the fish tape once this step is complete.
5. Mount the backplate. Feed the male connector end of the LT-Cable (the part going through the upper rectangular hole) through the aforementioned small hole of the backplate of the Lyric. You do not want the LT-Cable going through the large hole on the Lyric backplate; it must go through the small hole on the backplate.
Just like when you drew the outline for the rectangular hole, you will hold the backplate of the lyric against the wall so that you can mark the locations for the four screws that will be used to hold the Lyric in place. The places you mark will ultimately serve as the final mounting location for the Lyric, so use a level when doing this. The locations for these screws can be seen in the following picture, as well as the stud mount for additional tamper protection if you are planning on screwing the backplate into a stud in the wall (optional):

A new Lyric Controller comes with a bag containing items that will be used for mounting the backplate. Inside the bag you will find five blue wall anchors and five screws. Four of these wall anchors and screws will be used at the screw locations you marked earlier. The fifth screw can be used at the stud mount, but this is optional. There will also be one additional smaller screw in the bag. This can be used for securing the backplate onto the Lyric Controller. The location for this screw is at the bottom of the Lyric Controller itself. You can put this small screw aside, in a safe place, for later. Finally, the bag will also contain two resistors that are used for hardwired zones. These resistors are not used in the installation process, but they should be kept safe, in case you decide to add a hardwired zone later.
Using a powered drill and a 3-16" - 1/4" drill bit, drill four holes into the wall at the screw locations you marked earlier. Also drill a fifth hole if you plan on using the stud mount. Be very careful when doing this. Make sure that the holes are straight so that the wall anchors and screws will fit in properly. Also make sure that you do not disturb the wire in any way.
Push the wall anchors into the holes. You can use your hand to place them loosely inside, then use a hammer to fit them in tightly. Once the wall anchors are in, screw the screws that came with the Lyric into the wall anchors. You will not want to tighten the screws all the way. Instead, leave some space between the end of the screw and the wall so that the backplate can be applied.
Once the four (or five if using the stud mount) screws are partially in place, apply the backplate over the screws. Make sure that everything is level and that the backplate is in the exact spot you want it. Then tighten the screws to secure the backplate firmly in place. Be careful not to over-tighten the screws, as doing so may warp the backplate and cause problems when securing the Lyric Controller later.
6. Prepare the Lyric Controller. On the back of the Lyric Controller, start by inserting the backup battery. This is done by inserting the connector into the 3-prong port on the back of the Lyric. This is seen in the GIF below:

The following picture shows the connector and the 3-prong port:

Next, place the plastic flap on the back of the Lyric Controller over the holder on the backplate. This will keep the Lyric Controller held up without having to hold it with your hands. Basically, the flap will keep the Lyric Controller dangling until you finish the installation. The picture below shows the plastic flap over the holder, although flat on a table, the principle is the same:

7. Connect the Lyric Controller. At this point, you will begin applying power to the Lyric Controller. It is now time to begin working with the small portion of the LT-Cable that you put aside earlier. This small cable has one end with a female connector port, and the other end has two wire connectors - one red and one black. Start with the end that has the red and black connectors. On the back of the Lyric Controller, locate the five-terminal box that features the labels (from left to right) "GND", "+9VDC", "HWZ1", "GND" and "HWZ2". Take the red connector, and insert it into the terminal that is labeled "+9VDC". Then use a small flathead screwdriver to secure it into place. Next, take the black connector, and insert into the "GND" terminal that is immediately to the left of the "+9VDC" terminal. This is not the "GND" terminal that is in between the "HWZ1" and "HWZ2" terminals. The proper connections can be seen in the following picture:

With the small portion of the LT-Cable attached to the Lyric Controller, connect the male connector of the long portion of the LT-Cable with the female connection port of the small portion of the LT-Cable. In order to store the resistors that came with the Lyric, for possible future use, you can connect each of them to the "HWZ1" and "GND" and "HWZ2" and "GND" terminals, so that they won't be lost.
Now that all of the connections have been made to the Lyric Controller, you can now apply the panel to the backplate. Secure it into place, and make sure that it is nice and snug. Finally, use the small screw that you put aside earlier to fully secure the Lyric Controller onto the backplate. The location for the small screw is on the bottom of the Lyric Controller, as shown in the picture below:

8. Power the Lyric. The Lyric comes included with a 9-volt DC transformer that plugs into the wall outlet. This transformer is called the Honeywell 300-04705. Take the device and bring it to the unconnected end of the long portion of the LT-Cable, this being the end with the pair of screw terminal connectors. On the transformer, notice that there are two terminals for these connectors. A sticker on the transformer will identify which terminal is positive (+) and which one is negative (-). Use a Phillips screwdriver to loosen the terminals. Then connect the red connector of the LT-Cable with the positive (+) terminal and the black connector with the negative (-) terminal. Tighten these connections using the Phillips screwdriver. These connections are shown in the following picture:
![]()
With the connections made, hold the wall outlet cover that you removed earlier against the wall outlet, but do not screw it in yet. While holding the wall outlet cover in place with one hand, use your other hand to plug-in the transformer to the lower outlet. Make sure that any excess wiring from the connected LT-Cable is pushed into the wall. Then, screw in both the wall outlet cover and the transformer into the wall outlet at the same time with the transformer being on top. By making the connection this way, the Lyric transformer will be less likely to be removed from the wall, causing a loss of DC power to the Lyric Controller. The lower portion of the transformer should also cover up the small hole that was made in the wall below the outlet. The picture below shows the screw terminal on the Lyric transformer:
![]()
Finally, with all the connections in place, you can restore power to the wall outlet. If everything was done correctly, the Lyric Controller should power on, and you will be able to begin using your system.
If you need any help during the installation process, we strongly encourage you to consult the following video, which goes through the entire installation step by step:
Did you find this answer useful?
We offer alarm monitoring as low as $10 / month
Click Here to Learn MoreRelated Products


Related Videos

Related Categories
- Home Security Systems
- Home Security Systems
- Wireless Alarm Systems
- Wireless Alarm Systems
- Business Security Systems
- Business Security Systems
- Apartment Security Systems
- DIY Wireless Security Systems
- Wireless Burglar Alarm Systems
- Wireless Burglar Alarm Systems
- Answered