How Do I Replace the Cellular Communicator in a 2GIG GC3e?
You can replace the cellular communicator in a 2GIG GC3e by choosing System Settings > Installer Code (default 1561) > Cell Radio Swap > Begin. Then access the port on the side of the panel, pull out the old cell module, and insert the new one. Choose Done, and follow the on-screen prompts.
 The 2GIG GC3e uses a cellular communicator to connect with Alarm.com. Compatible LTE cellular communicators for the 2GIG GC3e include the 2GIG LTEA-A-GC3 AT&T LTE Communicator, the 2GIG LTEV1-A-GC3 Verizon LTE Communicator, and the 2GIG LTEV-A-GC3 Verizon LTE Communicator (which is no longer sold by Alarm Grid). If you need to remove the system's existing communicator and replace it with a new one, then you can use the Cell Radio Swap menu option. This will allow you to safely swap-out the communicator, without needing to open up the panel and fully power it down. Please note that this option is only available if the 2GIG GC3e System already has a cellular communicator installed. If you are installing a cellular communicator for your system for the first time, you must power down the system all the way, insert the communicator, and power the system back on. Please refer to this guide if you are installing a cellular communicator inside the GC3e System for the very first time.
If you are swapping out an existing cellular communicator with a new one for a 2GIG GC3e System, complete the following steps:
1. Contact your monitoring company. You should contact your monitoring company before you perform the radio swap. If you are starting new service with Alarm Grid, then we will contact you at the activation time you chose when you signed-up for monitoring. If you are an existing Alarm Grid monitored customer, and you haven't chosen a time to complete the swap, then please visit our Communicator Replacement Portal to select a time. Make sure you are on-site with the system and its new communicator at the scheduled time. Your monitoring company will likely ask you to provide the IMEI Number off of the new communicator before you install it inside the 2GIG GC3e Panel.
2. Complete the communicator swap. Once your monitoring company says it's okay, you can go ahead and complete the swap. Start from the main screen of your 2GIG GC3e. Choose System Settings in the bottom-right corner. Enter in the system's Installer Code (default 1561). Choose Cell Radio Swap. On the following screen, click the red Begin button. The screen will say to remove the cell module now. This indicates that you can proceed safely with the communicator swap.
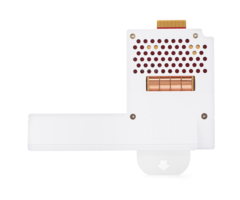
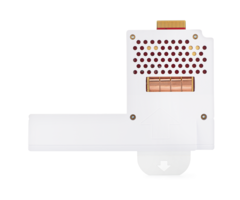
Before you can access the cellular communicator, you may need to first remove the cover locking screw. This can be accessed by removing the front plastic bezel from the GC3e by inserting your fingernail or a flathead screwdriver into the crevice and popping it off.

The cover screw can be found in the bottom-left section of the GC3e panel underneath the front cover. You will see two (2) screw slots. One slot is for locking the cover, and the other keeps it unlocked. If you find that the screw is in the slot for locking, then take it out, and put it in the slot for unlocking so that you do not lose it. You can see the cover locking screw in the unlocked slot in the picture below.

Once the cover screw is out of the locked slot, you can proceed with the swap. Locate the port on the left-hand side when you are facing the front of the panel. Remove the cover. Grab the white tab with the arrow, and physically pull out the old cell communicator. Then take the replacement communicator, and slide it into the same slot. Make sure it "locks" into place. Reapply the cover on the side of the GC3e Panel, again making sure that it clicks into place. Then turn your attention to the main screen of the GC3e. It should read "Insert the cell radio module and select done." Press the Done button to finish. If you want to move the cell cover screw back to the "locked" slot, then you can do so at this time and then replace the front plastic bezel.
3. Confirm successful communicator replacement. The 2GIG GC3e System will then say "Working." Be patient during this process. After a short while, the system should read "Cell radio module swap complete." You can then press "Radio Test", followed by the green "Start Radio Test" button in the bottom-right corner to begin the testing process. If successful, the system will provide a positive indication and you can press the "Done" button in the bottom-right corner. From there, simply follow any instructions from your alarm monitoring company to ensure a successful communicator replacement.
Did you find this answer useful?
We offer alarm monitoring as low as $10 / month
Click Here to Learn MoreRelated Products

Related Categories
- LTE Cellular Communicators
- Verizon LTE Cellular Communicators
- LTE Cellular Communicators
- AT&T LTE Cellular Communicators
- Answered