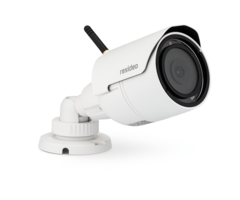
Resetting an IPCAM-WOC2 to Use On a Different Network?
To reset the IPCAM-WOC2 to be used with a new network, you must set it back to factory default. Do this by finding the reset switch in the wire loom behind the camera, then pressing and holding it until the LED on the camera begins to blink white. Do this while power is applied to the camera.
The IPCAM-WOC2 is the replacement camera for the now defunct IPCAM-WOC1. There are many similarities between them, such as the way in which they are reset. Usually, in order to delete a camera from an account, the user would log into Total Connect 2.0 and delete the camera from there. However, sometimes this isn't done. One example of this is when a user decides to sell a camera that they have used on their own account, but they fail to remove the camera from their account before sending it to the new owner.
The new owner will not be able to join the camera to their network, and won't be able to add it to their Total Connect 2.0 account. One way you can determine that this is the issue is that the camera's LED will not behave in the expected way while setup is being attempted. The new owner needs a way to join the camera to their network and to make the camera available for use with TC2. Another example of when this process becomes necessary is when a camera owner changes their network settings. They must reset the camera to prepare it for joining the new network. Factory resetting the camera will prepare for this process, and will also make it available to be added to Total Connect 2.0 once it is online.
To reset an IPCAM-WOC2 in order to change networks, and/or be added to a new Total Connect 2.0 account, do the following:
- Find the reset switch. The reset switch is in the bundle of wires and dongles attached to the back of the IPCAM-WOC2. It has a round plastic cover with a round black button. Hopefully, the camera was mounted in such a way that the Reset switch is accessible while the camera is mounted. If not, you will have to remove the camera from the mount in order to gain access to the reset switch. Remember, while resetting the camera, it must remain powered on.
-
Press the switch. Press and hold the reset switch while watching the camera's status LED. Once the status LED begins blinking white, release the button immediately. If you are changing the network for your own camera, as opposed to attempting to reset a camera that you purchased from someone else, you will also need to log into Total Connect 2.0, go to the cameras screen and press the gear icon for this camera, then choose to delete the camera.
Having a RBG (Red, Blue, Green) LED means that the status LED is capable of producing nearly any color:
- Complete setup. Once the default is completed, and the camera has been deleted from Total Connect 2.0 (if applicable) power the camera down and back up. The user can now add the camera to the proper WIFI network, then go through the process of adding the camera to (or back to) the Total Connect 2.0 account.


Status LED Color, State, and Meaning
| LED Color | LED State | LED Meaning |
|---|---|---|
| Status During Installation | ||
| Blue | Blinking | Power on. Ready to begin setup. |
| Blue | Steady | Connected to TC2. Ready to complete setup. |
| Blue | Blinking | Power on. Ready to begin setup. |
| Purple | Steady | QR Code scan complete. Restart the WIFI connection process. |
| Green | Blinking | Connecting to the WIFI network. |
| Red | Steady | Setup timed out. Power-cycle the camera and begin again. |
| Status During Operation | ||
| Green | Blinking | Connecting to the WIFI network. |
| Green | Steady | Connected to WIFI and operating. Note: The camera is always ready to record, but will only originate a live stream when called for by TC2. |
| Red | Blinking | Not connected to WIFI. |
Did you find this answer useful?
We offer alarm monitoring as low as $10 / month
Click Here to Learn MoreRelated Products
Related Categories
- Security Cameras
- Security Cameras
- Outdoor Cameras
- HD Security Cameras
- HD Security Cameras
- Low-Light Security Cameras
- 1080P Security Cameras
- Wireless Security Cameras
- Answered
- Answered By
- Julia Ross