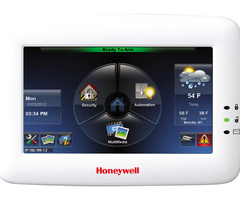
Customizing Your Tuxedo Touch
Related Products


Related Categories
Description
ALARM GRID
This video was made by Honeywell and proudly distributed by Alarm Grid Security monitoring and accessories http://www.alarmgrid.com. Alarm Grid is a home security company focused on the experience of the customer. We offer no contract alarm monitoring that allows you more choices without sacrificing the quality of your monitoring. We are here to help you protect your life's most important assets without the hassle of being caught in a contract with no way out.
Transcript
Narrator: With the Tuxedo Touch, you can program custom scenes to fit your lifestyle. Our first example is a scene programmed to turn on a porch light every day before you come home for the evening. From the home screen, press the automation icon. Press the scene setup icon. Now press the add scene icon. In this menu you can set a condition, a trigger, and an action for a given scene.
For any given scene, you need to enter at least one trigger and one action. A condition is optional and is set when additional criteria is needed to trigger the scene. We'll start by naming the scene. Press the text display area next to name. This brings up the text editor. Press the clear icon, type in the name of your scene. Press the trigger icon.
For this scene we want to control when the light turns on, based on days and time of day. A condition is not required for this scene. For this example we selected every day of the week. Pressing the hour section of the start time window allows you to set the hour. Pressing the minute section allows you to set the minute and pressing AM/PM section toggles AM/PM.
When done, press the save icon. This returns you to the edit scene window. Next we press the add action icon. Press the light icon, then select hall light from the pull-down menu. Make sure the on icon is selected. When done, press the save icon, now press save, to save the scene. Here you see the scene we just created. You can toggle to enable and disable any scene by pressing the icons under the status column.
Now we want to set a new scene that will turn off the light at a set time. Once again, select the add scene icon. Press the text display area next to name. Press the clear icon, type in the name of your scene. Press the trigger icon. For this scene, we want to control when the light turns off based on days and time of day. We want to turn off the light every day of the week at 6:00 AM.
Next, we press the add action icon. Press the light icon, then select hall light from the pull-down menu. Press the off icon. When done, press the save icon. Press save to save the scene, here you see the additional scene we created.
If you want to edit a scene, select the scene first, then press the edit scene icon, and make changes as you need. If you want to delete a scene, select the scene first; then press the delete scene icon. You can program a custom scene to turn off lights, and put your thermostat in an energy savings mode, when the system is armed in the Away mode.
Here's how it's done. Press the text display area next to name. Press the clear icon, press the trigger icon. Press the security icon. Press the away icon. Press the save icon. Now press the add action icon. This time we will be setting two actions for this scene. Press the thermostat icon. Select your thermostat from the pull-down menu, in this case main T-Stat.
We want to set this thermostat for energy savings, so we will deselect set mode by pressing the check box icon. Press the set energy check box icon. Press the saving icon. You also have the option to create temperature set points. Press the set point check box, then press the heat point entry window, and for this example enter 62, the lowest temperature you allow when heating your home. Now press the cool point entry window and for this example enter 82, the highest temperature you allow when cooling your home. Press the save icon.
Now we press the add action icon again, this time to turn off a hall light. Press the light icon, then select hall light from the pull-down menu. Make sure the off icon is selected. When done, press the save icon. Press the save icon to save this scene. Press the home icon to return to the home screen.
You can also program a scene that occurs when you unlock your Z-Wave door lock. When the door is unlocked, Tuxedo Touch can disarm the security panel, turn on a light, and put the thermostat back to normal mode. Press the trigger icon. Press the door icon. Select the lock from the drop-down menu, and then select code unlocked. Press the save icon.
For this custom scene, we will also set a condition. Press the add button in the condition column. Press the security icon. Press the away icon. Press the save icon. Next we press the add action icon. We will be setting three actions for this scene. We want to add a security action. To do this, press the add action icon. Press the security icon. Press the disarm icon and enter your security code. Press the Save icon.
We also want to set the thermostat back to normal. Press the add action icon. Press the thermostat icon. Select main T-Stat from the pull-down menu. Deselect set mode by pressing the check box icon. Press the set energy check box icon. Press the normal icon. The set point options are only set for savings mode. Press save icon.
The last action we want is to turn the hall light on. Press the add action icon. Press the light icon, then select hall light from the pull-down menu. Press the on icon. When done, press the save icon. Press the save icon, to save this scene.
Now that our scenes are set we will navigate to the Z-Wave device home screen by pressing the back icon. Here we see all our Z-Wave devices. Some systems will have many more than displayed here. You can organize this screen by room, so you can see only devices used in a certain area.
For this example let's say we want to show devices in or near the hallway. Press the edit room's icon. Press the add room icon and then type in a room name. In this example, we will call it hallway. When done, press the OK icon.
Now we need to select the Z-Wave devices we want to display for this room. Select the thermostat and hallway light. Press the save room icon. Now at the top of the screen, we see all and hallway room icons. Press the hallway icon and you will see the devices we want to see for that room are listed. Press the home icon to return to the home screen.
- Uploaded
- Duration: