How Do I Install an IPCAM-WOC1?
You can install an IPCAM-WOC1 by attaching the camera directly to a wall, ceiling, or back box. Determine a mounting location. Install the box, if used. Mark the locations for screws and secure the camera's base to the mounting surface. Complete the power wiring from the camera to an outlet.

When installing any of the Honeywell Home HD cameras for Total Connect 2.0, it is always recommended that you pair the camera to the Total Connect account prior to mounting it. If you don't, then once you get the camera installed, you'll likely have to stand on a ladder or other surface in order to complete the enrollment process. Enrollment involves holding your phone or tablet up in front of the camera, so that it can scan a QR code that is generated by the Total Connect app so it's not something that can be done remotely. It's also a good idea to use the Total Connect 2.0 app to verify camera positioning prior to tightening all of the mounting hardware, in case adjustments need to be made.
Complete the following steps to install a Lyric IPCAM-WOC1:
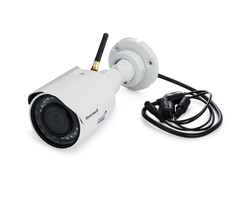
1. Mark the hole locations. It is best to use either a round or a square back box for the camera wiring. The wire bundle that is permanently connected to the back of the camera has multiple connectors as you can see in the image below. The only wire that you really need to run beyond the back box is the power wire. By using a back box, you can leave the connectors you won't use inside the box, and only drill the hole behind the box large enough for the power wire to fit through. The connector for the 8' power cable extension wire is much smaller at the power adapter end than at the camera end, allowing you to keep the hole you need to drill very small. Install the box, and drill a hole through the wall or other mounting surface directly behind where the camera's mounting base will be installed, so that you can route the power wire to an outlet.
Make sure that the camera's base is positioned on the back box cover so that the camera will be aligned properly after the installation is complete. At three spots on the camera's mounting base, there will be holes for screws. These will be drilled into the cover of the back box, with another larger hole in the center that all the wiring dongles will fit through. Don't worry, the camera's mounting base should cover this hole. One of the dongles houses the camera's reset button. If possible, route this outside the box so that you can get to it without having to take the back box apart. Use a pen or pencil to mark the locations of the three (3) screws, as well as the wiring hole.

2. Drill the holes. Use a power drill to create the holes that will be used to screw the camera's base to the mounting surface. When drilling the holes, make sure to account for both the screws and the wall anchors if mounting to drywall with no back box being used. In addition to the three (3) holes for the mounting screws, you will also need to create a hole that the dongles and wiring from the back of the camera will pass through. If using a back box, all of these holes will be in the back box cover. If you will be mounting the camera outside, be sure to use a back box that is made for wet areas, and follow the instructions for assembly so that it will be water tight when finished.
The image below shows a round back box and a blank cover (sold separately). As you can see, this cover is for wet locations and comes with a gasket to mount between the cover and the box to prevent water from getting in. It is a good idea to put some silicone around the hole you make for the power wire, after the wire has been pushed through and is in its final location. This is to prevent water from getting inside around that wire, in the event water makes it past the gasket.

At this point, if you are using a back box, it should be mounted, with the hole for the power wire already drilled. Stick the power wire connector with the small round end through the hole you've made. As you can see in the image above, the back box will likely have some extra openings. It's a good idea to route the reset button through one of these holes so that you can reach it without having to disassemble the cover and the back box.
3. Secure the camera. Insert the wall anchors into the holes that were drilled if you're mounting the camera to a surface that requires them. Route the wiring through the center hole you drilled for that purpose and then tighten down the three (3) screws. Make sure that the camera is positioned properly to view the area to be monitored while performing this step.
If you are using a back box, you'll need to route the wiring through the center hole you drilled in the cover before you mount the cover to the box. Attach the 8' power cable extension to the power dongle on the back of the camera, then complete the process of feeding that wire through the center hole you drilled in the structure behind the back box. Feed the slack through and then position all of the extra dongles inside the box. If you plan to route the reset button through one of the extra holes in the back box, do that now. Finally, attach the cover to the back box and be sure that the screw holes for the camera are lined up correctly so that it will be mounted with the proper viewpoint. Once the cover has been screwed onto the back box, you can then secure the camera to the front of the back box cover using the three (3) screws provided with it. Complete the power wiring by connecting the 8' section of the power extension cable to the 7' section that is attached to the power adapter. You're now ready to power on the IPCAM-WOC1.
Did you find this answer useful?
We offer alarm monitoring as low as $10 / month
Click Here to Learn MoreRelated Products
Related Categories
- Security Cameras
- Security Cameras
- Outdoor Cameras
- HD Security Cameras
- HD Security Cameras
- Low-Light Security Cameras
- 1080P Security Cameras
- Wireless Security Cameras
- Answered
- Answered By
- Julia Ross