How Do I Install The 2GIG CDMAV-A-GC3 Into A 2GIG GC3?
The2GIG CDMAV-A-GC3 is a Verizon cellular communicator for the 2GIG GC3 control panel and provides communication to a central station and Alarm.com.
There are two options to install the 2GIG CDMAV-A-GC3, installing when the system is powered down and installing the communicator when the system is powered up.
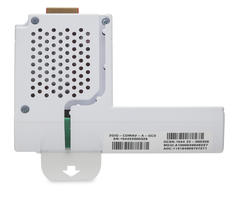
To install the 2GIG CDMAV-A-GC3 into a 2GIG GC3 control panel, when the panel is completely powered down. Remove the hinged door found on the left side of the 2GIG GC3 panel. Insert the 2GIG CDMAV-A-GC3 into the open slot until you feel and hear it click in place. The 2GIG CDMAV-A-GC3 has a built in antenna so there’s no additional pieces to install.
Replace the hinged door and power up the panel. After 30-60 seconds the panel should recognize the cell communicator. Enter the Installer Tool Box by touching the 2GIG icon on the home screen, enter the installer code, 2GIG factory default installer code is 1561. Press Installer Tool Box > System Configuration > Radio Test. Press Radio Test, when test is completed and “Success” appears, tap Done.
To install the 2GIG CDMAV-A-GC3 when the system is powered up. From the Home Screen, select System Settings > Cell Radio Swap > Begin.
Remove the hinged door on the left side of the control panel. Insert the 2GIG CDMAV-A-GC3 until you feel and or hear it click in place.
Replace the hinged door.
Press Done > Radio Test > Start Radio Test
When test is complete, Success will appear. Press Done.
**If replacing an existing 2GIG CDMAV-A-GC3, remove the existing cell communicator before inserting the new one.
Did you find this answer useful?
We offer alarm monitoring as low as $10 / month
Click Here to Learn MoreRelated Products

Related Categories
- Answered
- Answered By
- Connie Michael