How Do I Program a Zone to a 2GIG GC2e?
You can program a zone to a 2GIG GC2e by putting the panel into programming mode and then configuring the zone. This will include adjusting the settings for the zone and auto-enrolling the wireless sensor. Up to 60 wireless zones can be programmed to the 2GIG GC2e Security System.

Programming zones is a very important step when setting up a GC2e System. You need to enroll various sensors with the panel so that the system can properly monitor for intrusion and life-safety events. Each sensor will take up at least one zone for the system. Some sensors will require multiple zones on the system.
Keep in mind that the GC2e supports 345 MHz sensors, including one-way Honeywell 5800 Series Sensors and 2GIG 345 MHz Sensors. It can also support 2GIG eSeries Encrypted Sensors.
Complete the following steps to program a zone on a 2GIG GC2e:
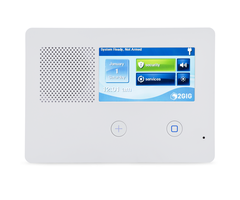
1. Enter System Configuration. On a GC2e System, programming is known as System Configuration. Click the 2GIG logo in the bottom-right corner of the screen. Enter the system's Installer Code. This code is 1561 by default. Choose System Configuration. You will enter System Configuration.
2. Select RF Sensor Number. The first step to programming a new zone on a GC2e is to choose an RF Sensor Number. All RF Sensor Numbers are 2-digits. The numbers 01 thru 48 and 63 thru 74 are available. You can use the arrows to scroll to the number you want, or you can enter the number in the keypad. Press the down arrow once you have reached the desired RF Sensor Number.

3. Program the zone. You will now begin programming the zone. When doing this, the left and right arrows are used to scroll between different settings within the current selection. The up and down arrows are used to scroll between different programming options for the zone. You will go through each selection and set the appropriate option until you reach the end. The different selections and how they are configured is outlined below.
- Select RF Sensor Type: This is also known as the Response Type for the zone. This determines how the system responds when the associated sensor is faulted. See this FAQ for more info on GC2e Sensor Types.
- Select RF Sensor Equipment Code: This is the code 2GIG associates with the model number of the sensor you are programming. Scroll through the list, and find the appropriate option. If you do not see the sensor you are trying to program, just choose the closest equivalent (e.g. another door/window sensor if that's what you are programming). There is an exception to this rule, though. If you are programming one of the new eSeries sensors, then you must choose the exact Equipment Code specified for that sensor. If you do not, the sensor will seem to work, but will come up in an RF Supervision error state. Proper Equipment codes can be found in the installation paperwork for the eSeries sensor, or on page 46 of the Field Training Guide.
- Sensor Acts as Normally Open: In most cases, this is set to 0 for Disabled. You can set to 1 for Enabled if you want the Response Type to occur when zone is NOT faulted (e.g. a door that should be left opened). Please note that this option only appears if you set an RF Sensor Equipment Code of a door/window sensor.
- Enter RF Sensor Serial Number: At this step, it is recommended that you auto-enroll the Serial Number, rather than entering it manually. Press the Shift button, followed by Learn. Then fault the sensor. Its Serial Number should appear on the screen as an "ID #". You can verify that it is correct if you want to. Press OK in the bottom-right.
- Select RF Sensor Equipment Age: This option does not affect the performance of the zone. Choose 0 for New or 1 for Existing.
- Select RF Sensor Loop Number: The Loop Number ranges from 1 to 4, and it determines which function of the sensor is being monitored for the zone. Some sensors can be programmed to multiple zones, with each zone using a different Loop Number along with the sensor's serial number. Refer to the instruction manual for the sensor to determine which Loop Number to use for each zone enabled.
- Select RF Sensor Dialer Delay: In most cases, this is set to 0 for Disabled. You can set this to 1 for Enabled if you want the system to delay sending out an alarm signal in the event that this zone triggers a system alarm. By default, this delay is set to 30 seconds.
- Construct RF Sensor Voice Descriptor: This is what the panel will speak out and display when the zone is faulted. Press the Insert key to add a new word. With the word highlighted, use the left and right arrows to choose between different words. You can also enter the 3-digit code associated with the word you want to use. See Pages 35 - 36 of the 2GIG GC2e Programming Guide for more information. Press the FWD and BACK keys to scroll between added words. If you want to delete a word, highlight the word, and press the box with the X in it. Please note that you can later disable the voice for the zone if you do not want the system to voice announce anything.
- Select RF Sensor Reports: In most cases, this is set to 1 for Enabled. Only set this to 0 for Disabled, if you do not want the zone to be able to report a triggered alarm to the monitoring station.
- Select RF Sensor Supervised: In most cases, this is set to 1 for Enabled. Only set this to 0 for Disabled if you do not want the panel to monitor this wireless zone for RF supervision. Disabling RF supervision is common for sensors that may be carried far away from the panel, such as key fobs or medical alert buttons.
- Select RF Sensor Chime: Set the audible Chime you want the panel to emit when the zone is faulted. There are a total of 13 different Chimes. The option 00 will disable both Chime and Voice for the zone. If you also want the panel to speak the Voice Descriptor that you set earlier, make sure to select a Chime option that includes Voice. Additionally, option 01 will have the panel speak the Voice Descriptor, but not emit a Chime.
4. Apply the changes. Upon pressing the down arrow at the Chime setting, you will reach the summary screen. You can press Edit Current to make changes to the zone you just programmed. You can press Edit Next to configure the next wireless zone in the sequence, which is useful if you are programming multiple sensors.

But if you are done configuring the zone, press Skip in the bottom-right, followed by End in the bottom-right. You will then reach the Summary of System Configuration Screen. Make sure the box for Save Changes is checked. Then press Exit in the bottom-right. The panel will reboot to apply the changes.
Did you find this answer useful?
We offer alarm monitoring as low as $10 / month
Click Here to Learn MoreRelated Products
Related Videos

Related Categories
- Wireless Alarm Control Panels
- Wireless Alarm Control Panels
- Alarm Control Panels
- Alarm Control Panels
- Answered