Where Is the Enrollment Button On the PG9944?
The enrollment button on the PG9944 is found underneath the device's bottom cover, right next to where the batteries are installed. With batteries installed and your panel in its wireless enrollment mode, you must press and hold this button until the LED light on the sensor remains steady.

The DSC PG9944 is a PowerG Image Sensor that works with nearly any system that supports PowerG Sensors. The sensor produces high-resolution images when the system it is programmed with goes into alarm. The images are sent to the panel, and they can be viewed locally if the panel allows it. If the panel is connected with Alarm.com, then one (1) image will be forwarded to that platform for remote viewing. The forwarded image will be available under the "Panel Camera" section of the Alarm.com platform. The "Panel Camera Images" feature must be enabled on the Alarm.com account in order for the images to appear.
Additionally, the end user will need to enable the Panel Camera Alarm Image Uploads feature on the customer version of the Alarm.com website. You can do this by logging into your Alarm.com account through a web browser, choosing the Automation section, and clicking the toggle to enable the feature. The image below shows what it looks like when the feature is enabled.

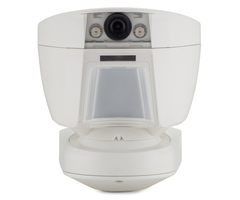
Before the DSC PG9944 can send images to a panel and/or Alarm.com, it must be enrolled with a system. Like all other PowerG Sensors, the PG9944 can be auto-enrolled with a compatible system. This eliminates the need to manually enter the device Serial Number, and allows the user to confirm that the sensor can successfully transmit signals out to the system. In order to auto-enroll the sensor, the user must locate the enrollment button on the device. This button is found underneath the device's bottom cover, and it is located next to the spot where the device batteries are installed. The location of the enrollment button can be seen in the picture near the top of this FAQ.
If you are having trouble finding the enrollment button on the PG9944, understand that you need to remove two (2) screws before you will be able to access the button. As such, a Phillips head screwdriver is required. First you will loosen the outer screw and remove the outer cover as seen in the picture below.

Then remove the screw keeping the battery cover in-place.

And you will have successfully accessed the battery compartment where the enrollment button is located!

In order to auto-enroll the DSC PG9944, the enrollment button must be pressed and held while the system is in its auto-enrollment mode. The process for putting a system into its auto-enrollment mode varies between panels, so make sure to check the instructions for your system. Remember that batteries must be inserted into the sensor during the enrollment process. The enrollment button should be held until the LED light on the sensor remains steady orange. It can then be released. The sensor should then send out a transmission. The panel should recognize the signal and allow you to enroll the sensor. Since the space with the enrollment button is rather thin, you may need an object like a screwdriver to press and hold the button while batteries are inserted.
Did you find this answer useful?
We offer alarm monitoring as low as $10 / month
Click Here to Learn MoreRelated Products
Related Videos

Related Categories
- Answered