How Can I Use a Zooz ZEN16 MultiRelay With a PROA7PLUS?
The Zooz ZEN16 MulitRelay is an excellent replacement for the discontinued MIMOlite. The ZEN16 offers three (3) Form A Normally Open relays, though due to limitations of the PROA7PLUS' Z-Wave controller, all relays will behave in the same manner. This means all relays are controlled as one.

Please Note: The programming information provided in this FAQ applies to the Honeywell Home PROA7PLUS, Honeywell Home PROA7, Resideo PROA7PLUSC, and Resideo PROA7C.
Probably the single most common use for a dry contact relay in the security industry is for the addition of a high-current siren on a low-current all-in-one system. The PROA7PLUS doesn't offer any siren or bell output terminals, and although it can support a Z-Wave siren, these are generally indoor rated, and not as loud as some people would like.
Another consideration is that many users are replacing an older hardwired or hybrid system with a PROA7PLUS, which is feature-rich and easy to operate. But, if the original system used a high-current, outdoor siren a user doesn't necessarily want to give that up. With a Zooz ZEN16, a power supply, and a battery, they won't have to. So, in this FAQ, we're going to concentrate on wiring and programming a ZEN16 MultiRelay for use as a siren output on the PROA7PLUS.
The ZEN16 MultiRelay from Zooz offers three (3) dry contact relays. Relay 1 and Relay 2 support up to 15 Amps of current, and Relay 3 supports up to 20 Amps. For our purposes, any of the relays can be used. The ZEN16 also offers switch inputs that can be used to turn the relays ON and OFF. SW1 controls Relay 1, SW2 controls Relay 2, and SW3 controls Relay 3. We will not be using these switches in our application.
In our diagram, we show a Resideo AD12612 power supply. For 12 Volt operation, it requires a 16.5VAC 40VA transformer, such as the 1361-GT. It also needs a backup battery like the Ultratech IM-1250F1 or Utratech IM-1272F1. If you require more than 1.2 A of current, then we recommend using the Altronix SMP3 power supply instead. It can supply up to 2.4 A of current.
To wire, perform the following:
- Connect the power supply to AC. Connect the transformer terminals to the AC input terminals on the power supply. The 1361-GT has a ground terminal, DO NOT connect this terminal to the power supply. It is used for a separate ground if you have one. A separate ground connection is only necessary if the outlet you use doesn't have its own ground. Do not plug in the transformer until all connections have been made
- Connect negative to the siren. Connect a Black Wire between the DC Negative (-) terminal of the power supply and the negative wire or terminal of the siren.
- Connect negative to the relay. Connect a Black Wire between the DC Negative (-) terminal of the power supply and the Power Negative (-) terminal of the ZEN16*. Alternatively, you can run a jumper wire from the negative of the siren to the negative of the ZEN16 (or vice versa). As long as both the siren and the relay module have a connection to the power supply negative.
- Connect positive to the relay. Connect a Red Wire between the power supply DC Positive (+) terminal and the ZEN16 Power Positive* (+).
- Connect positive to the relay output. Connect a jumper wire from the ZEN16 Power Positive Terminal to one side of the relay you intend to use. In our diagram, we are using Relay 1.
- Connect positive to the siren. Connect a Red Wire from the other relay terminal, again, we are using Relay 1, to the positive wire or terminal of the siren.
- Make battery connections to the power supply. Connect the backup battery to the power supply, making sure to observe proper polarity. Now you can plug in the power supply's transformer.

Programming The Siren Output Using Scenes in Total Connect 2.0:
-
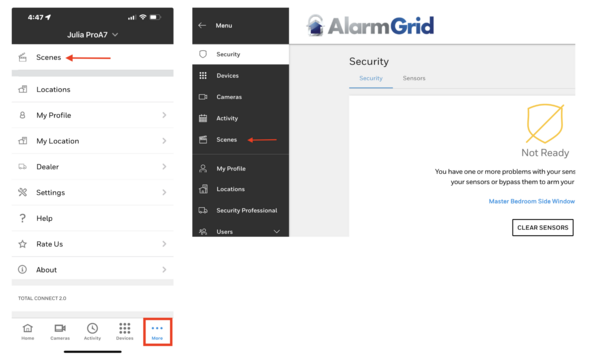
Log into your account. Go to www.totalconnect2.com and log in using the proper credentials. If you are logging in through the TC2 app, tap the More (...) icon at the lower right and then tap "Scenes" at the top of the screen. From the web page, click the Scenes Icon in the menu at the left.
Below accessing Scenes via the TC2 App is shown on the left, and via the website on the right. Once you begin creating the scene, the app, and the website look the same. For the remainder of these screenshots, we will only show the website:
-
Create the ON Scene. Once you're in scenes, if there are no scenes created yet, you'll see a button that says "Create Scene." Once a scene has been created, then you create another one by clicking the Add (+) icon in the upper right:

Give your scene a name, then press "Continue." There is a limit on the number of characters, so choose something that will help you, in the future, identify this scene compared to others:
You have different options regarding how you trigger the scene. We'll show you examples of each below:
In our first example, the device will be triggered based on a schedule. Notice that you only get the option to put in a single time. This means you will have to create a second scene to turn the device OFF, if you want it to turn off automatically, or you can create a scene to allow you to manually turn it off or just go to devices and manually turn it off from there.
The next option is to trigger the device based on another device on the system. This can be based on the system itself or based on a sensor opening. Note that these are radio buttons, so you can only choose one option per scene. Also, once you make a choice, there is no way to deselect that choice. If you choose a Security System Event, and then decide you don't want to go with a Security System Event as your trigger, you'll have to cancel, and start over:
When choosing to activate the device based on a sensor the options available are similarly limited. For each scene, you can only choose a single sensor to activate the device. Once you select a sensor, your only option is to activate the device when the sensor is open, even if it's a smoke detector. Not based on an alarm, not when the zone is closed, and not when it's left open for a specified period. Also, once you make a selection, you can't deselect. So, if I choose Sensor 1, and then I decide I'd rather activate upon Sensor 2 I can make that change. But, if I decide I don't want to activate based on an individual sensor at all, then once again, I have to cancel and start over. There is no way to deselect all Sensors once one has been selected:

The final option is to program the scene for manual activation. The main benefit of doing this is that it gives you the ability to assign multiple devices and actions to occur with a single command. It can be triggered either through the panel's touchscreen or through Total Connect 2.0. If manual activation is the only option you need, be sure not to click on any of the options under "Triggered by a device" as once you do, you can't deselect them without canceling and starting over:
Once you have chosen your trigger, or triggers, click "Continue." The Zooz ZEN16 will be listed with "Other" automation devices. Check it and set it to turn ON. Then click "Continue":

Be sure to "Save" your programming:

-
Program stop trigger. You can't program the device to start and stop with a single scene. So, create a second scene for the stop parameter, following the same steps as shown above.
When you turn an automation device on with an alarm, the options to turn the device off are somewhat limited. There is no option for the device to stay on for a specified period and then turn off automatically. The best option you have is to Trigger the device based on a System Disarm and set the ZEN16 to turn OFF. If an alarm occurs while you are away from home, you'll have to either remotely disarm the system to turn the siren off or manually activate the scene that turns the siren off. In some jurisdictions, it is against local ordinances to allow a siren to sound indefinitely:


Did you find this answer useful?
We offer alarm monitoring as low as $10 / month
Click Here to Learn MoreRelated Products


Related Videos

- Answered
- Answered By
- Julia Ross