How Do I Add a DSC HS2TCHP Touchscreen Keypad to a DSC PowerSeries NEO?
You can add a DSC HS2TCHP Touchscreen Keypad to a DSC PowerSeries NEO by connecting it to the panel and then enrolling it using an existing keypad. The main menu will appear on the DSC HS2TCHP Keypad upon successful enrollment. The HS2TCHP can be auto-enrolled using an existing keypad.

Note: Up to eight (8) total keypads can be used on the DSC HS2016NK, DSC HS2032NK, and DSC HS2064NK PowerSeries NEO Systems. The 128-zone DSC HS2128NK can support up to 16. Remember to observe any power requirements and add an additional power supply if needed!
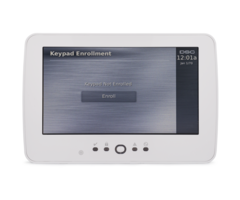
The first thing you will need to do with the DSC HS2TCHP is wire it to the DSC PowerSeries NEO Panel. The keypad can connect to the same four (4) wired terminals as any other hardwired keypad for the system. You will want to power down the panel before making the connections. You can power the panel back on after the connections are made. When the keypad powers on, it will load to the screen shown below if it hasn't yet been enrolled. You will need to enroll the keypad using an existing push-button keypad that has already been set up.

Complete the following steps to add a DSC HS2TCHP Keypad to a DSC PowerSeries NEO System:
1. Power down the panel. Make sure you power down the panel before beginning. Disconnect the backup battery, and unplug the transformer.
2. Open the keypad. Open the keypad by inserting a flat head screwdriver into the two (2) slots at the keypad's bottom one at a time. You should be able to separate the back plate. Also remove the set screw if necessary.

3. Wire the keypad. The DSC HS2TCHP uses a 4-wire connection. We recommend using 18-4 wire. But if you have wire of a similar gauge, then it should still work just fine. Remember that you can use 2-conductor wire and double it up if you don't have any 4-conductor wire on hand. Just make sure to keep track of the colored-coded cables!
On the back of the DSC HS2TCHP, you will see terminals labeled R, B, Y, G. These are the terminals where you connect the wires. R is for red, B is for Black, Y is for Yellow, and G is for Green. You will need a flat head screw driver to make the connections. You will then need to connect the other ends of the wires to the panel. They go to the terminals marked RED, BLK, YEL, and GRN. Match the colors. Make sure the connections are nice and secure!
Note: Remember to run the wire through the keypad backplate before completing the connections!
4. Power on the panel. Power the panel back on by plugging the transformer back in and then reconnecting the backup battery.
5. Enroll the keypad. If the keypad has not yet been enrolled, then you will need to enroll it using an existing keypad. We will assume that you are using a push-button keypad for this task. Press [*] + [8] + [Installer Code] + [902] to access the appropriate menu. Remember that the default Installer Code is 5555. Then enter [000] to have any connected keypads auto-enrolled. If you wired the keypad successfully, then it should auto-enroll. The main system screen will then be displayed on the DSC HS2TCHP. You can exit programming on the push-button keypad by repeatedly pressing the [#] key. You must exit programming before continuing to the next step.
6. Set keypad partitions. If you intend on using the DSC HS2TCHP on a different partition than the default of Partition 1, then you will need to set partitions for the keypad. You can do this from either the alphanumeric keypad you used to program the DSC HS2TCHP, or you can do it from the DSC HS2TCHP Keypad itself. For our example, we'll cover the process using the DSC HS2TCHP Keypad that you just set up. The advantage to using the HS2TCHP itself is that you can easily check the Keypad Slot that was automatically assigned to the device when it was auto-enrolled. This is very important if you aren't sure which Keypad Slot the DSC HS2TCHP Keypad is using.
From the main screen of the DSC HS2TCHP, choose [Options] on the right-hand side. Then select [Keypad Mode]. This will put the DSC HS2TCHP into a "Console Mode" where you can control and program the DSC PowerSeries NEO System in the same way that you would use an alphanumeric keypad.
Once you are into Keypad Mode, input the command [*] + [8] + [Installer Code] to enter programming. Again, the default Installer Code is 5555. You must then select the appropriate programming field. There are (16) possible programming fields for keypads. They are numbered [861] thru [876]. For Keypad Slot 1, you would enter [861], for Keypad Slot 2, you would enter [862], and so on.

As a quick tip, if you aren't sure which Keypad Slot the DSC HS2TCHP Keypad is assigned, then you can use the [860] programming field to check. To do this, you must be using the actual DSC HS2TCHP Keypad. If you try doing this using the alphanumeric keypad that you used to set up the HS2TCHP, then you will get the Keypad Slot for that other keypad instead. Upon entering the [860] programming field, the keypad slot will be displayed on the screen. You can then return to the last screen by entering [#] once. Then enter the corresponding programming field for the Keypad Slot Number you want to configure. Again, these programming fields are [861] thru [876], and the one you enter will depend on which Keypad Slot is being used with the DSC HS2TCHP Touchscreen Keypad. As you can see in our example, our DSC HS2TCHP is assigned Keypad Slot 2.

After selecting the appropriate programming field that corresponds with the Keypad Slot Number you are working with, the screen should display "Select (000) Kypd Part. Mask". Press the [*] key to confirm that option. Use the arrows to scroll to the partition you want to assign the keypad, and press the [*] key to confirm the selection. If you get a long error tone, then that is because no zones are assigned to that partition, and you cannot assign a keypad to an empty, unused partition. After making your selection, press [#] repeatedly to return to the main screen.
If you want to set up the keypad to control multiple partitions, then you must set it as a Global Keypad. The Global Keypad selection is associated with a Partition Number of [00]. If that is the desired selection, enter [00] in the Keypad Partition Mask Sub-Menu, and press [*] to confirm. Please be aware that you should only use the Global Keypad option if you intend on using the keypad across every partition on a NEO that is set up for multiple partitions. If you only have the system configured for one partition, then just assign the keypad to that partition (usually Partition 01). That is a better option than assigning a keypad as a "Global Keypad" for controlling a single partition. Again, press [#] repeatedly to return to the main screen after you have finished programming.

Did you find this answer useful?
We offer alarm monitoring as low as $10 / month
Click Here to Learn MoreRelated Products
Related Videos

Related Categories
- Answered