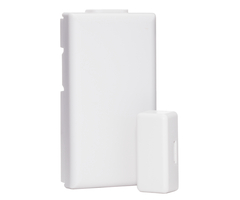
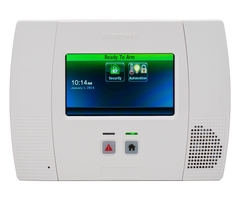
How Do I Add a Honeywell 5811 to a Lynx Touch?
You can add a Honeywell 5811 to a Lynx Touch panel through system programming. In order to access system programming, you will need to know the installer code for the panel, the default being 4112. After the sensor has been programmed, you should test it to make sure that it is working.
The 5811 sensor must have its battery installed prior to learning it into the system. As stated before, you will need the installer code to program the device. If you don't have the installer code, or if you are locked out of programming, you should be able to access system programming using the backdoor method. If your system is monitored by a central station, make sure to let your security company know that you have added a new sensor to the system so that they can update zone information.
Complete the following steps to enroll a 5811 door and window sensor into your Honeywell Lynx Touch panel:
- Access zone programming. From the home screen of the Lynx Touch system, go to Security > More > Tools > enter the installer code (the default code is 4112) > Program > Zones. The system will now be in the zone programming menu.
- Select an available zone. On this menu, find an available zone, and click on it to highlight that zone. Then select "Edit" at the bottom of the screen.You should now be in the programming menu for the zone selected. You can also click the "Add New" button at the bottom of the screen, which will take you to the next available zone number, and put you into the "Edit" screen.
- Auto-learn the serial number. Select the “Serial Number” field in the top left of the screen. This will display a keypad and put the system into learn mode. Move the 5811’s magnet away from the sensor, wait a couple seconds and then move it back. The system should beep once. Perform this process two more times. The system will beep twice on the second successful execution of this action and three times on the third. After successfully faulting the sensor three times, the system will have learned the device in and jump back to the zone programming screen.
- Complete sensor programming. On this menu, unless there are specific requirements, such as not wanting this device to report alarms to the monitoring station, the only options required are the “Device Type”, “Zone Response” and “Zone Descriptor” fields. The Device Type will determine what the sensor is being installed to (window or door?). The Zone Response determines how the sensor responds when triggered, such as whether it provides a delay, or an immediate alarm. The descriptors serve as the name of the zone, and may be spoken when chime is enabled, or an alarm occurs.
- Return to the main menu. Once all programming is completed, click "Save" in the bottom right corner of the screen. Click the back arrow in the upper right corner until the system returns to the main home menu. Make sure to select "Yes" when prompted "Allow Installer to reenter programming?"
- Test the sensor. Once on the home page, take your sensor and magnet. Hold them together. Then, move the magnet away from the sensor. If the sensor was programmed properly, the panel should display the zone as being faulted. Return the magnet to the normal position, and the fault should disappear from the display.
If you need any additional help enrolling the 5811, the following video should help:
Did you find this answer useful?
We offer alarm monitoring as low as $10 / month
Click Here to Learn MoreRelated Products
Related Videos

Related Categories
- Wireless Alarm Systems
- Wireless Alarm Control Panels
- DIY Wireless Security Systems
- Transmitters
- Wireless Door Sensors and Window Alarm Sensors
- Wireless Garage Door Alarm Sensors
- Honeywell LYNX Touch
- Answered
- Answered By
- Joe Gonnella