
How Do I Change the Name of a Sensor on the IQ5 Hub System?
To change the name of a sensor on the IQ5 Hub, swipe down and touch Settings, then Advanced Settings, and enter your Master Code. Next, touch Edit Sensor, then tap the edit icon next to the sensor you want to rename. Change its name, and then touch Save to update the sensor on the panel.
Why Change a Sensor's Name
The IQ5 Hub (available in AT&T LTE and Verizon LTE) shows each sensor's name on the panel, in alerts, and in the Alarm.com app. A clear name like "Front Door" or "Kitchen Window" makes it easy to tell which sensor is open, faulted, or in alarm at a glance. Changing the name only updates the label, so the sensor stays paired and keeps all of its programming.
This is handy when you have moved a sensor to a new spot, want a more descriptive name than the one chosen during setup, or are tidying up the zone list on your security system. If you are adding a brand new sensor rather than renaming one you already have, see our guide on how to add a sensor to the IQ5 Hub instead.
Before You Begin
This tutorial uses the Master Code (1234 by default, or your own if you have changed it) to reach the sensor list, since it goes straight to Edit Sensor. The Installer Code (1111) and Dealer Code (2222) can also edit sensors, but they take a different path through the menus. Only sensors already learned into the panel can be renamed, and every field except the sensor's DL or Sensor ID can be edited, so you are free to change the name as often as you like.
Change the Sensor Name
-
Swipe down and touch Settings. Swipe down from the top of the screen to open the Settings Tray, then touch SETTINGS.
 Swipe down from the top of the screen to open the Settings Tray.
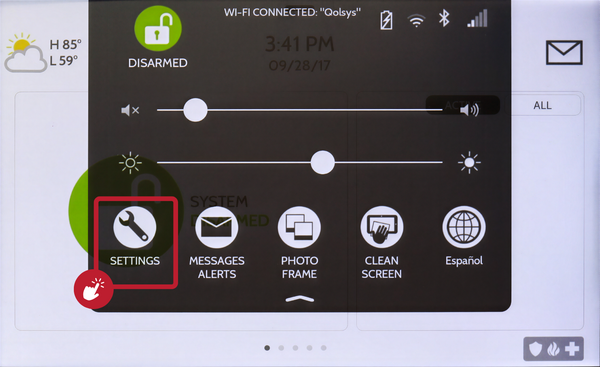 Touch Settings in the Settings Tray.
-
Touch Advanced Settings and enter your Master Code. Touch ADVANCED SETTINGS, then enter your Master Code (1234 by default). This tutorial uses the Master Code, since it takes you straight to Edit Sensor. The Installer and Dealer codes can also edit sensors, but they follow a different path. The panel advances automatically after a valid code.
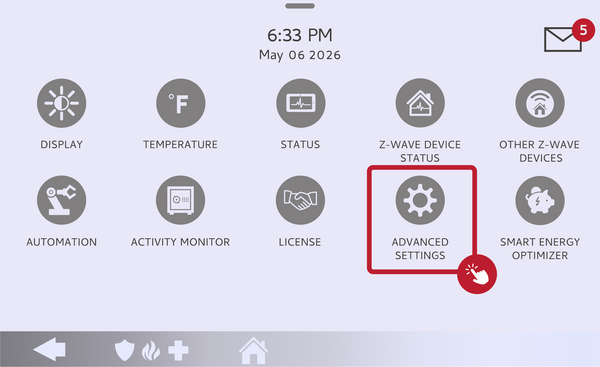 Touch Advanced Settings.
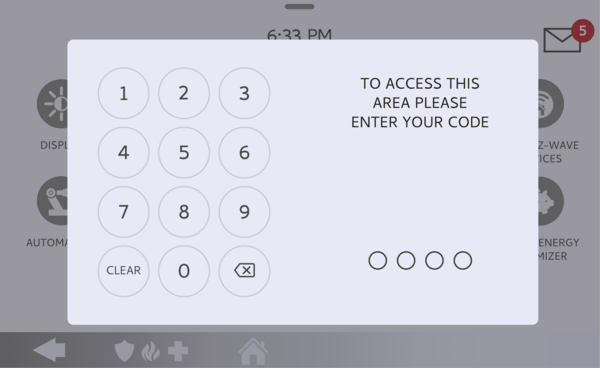 Enter your Master Code (1234 by default).
-
Touch Edit Sensor. Touch EDIT SENSOR to bring up the list of sensors already learned into the panel.
Touch Edit Sensor to see your sensor list. -
Tap the edit icon next to your sensor. In the list of sensors, tap the pencil, or edit, icon next to the sensor whose name you want to change. This opens that sensor's editable fields.
Tap the edit icon next to the sensor you want. -
Change the name and save. Choose a new Sensor Name from the preset list, or edit the Custom Description field to type your own label. Touch SAVE to apply the change. The panel updates the name and it syncs to your account.
Change the Sensor Name or Custom Description, then Save.
Tips
The Sensor Name list uses preset words so the panel can announce the sensor by voice, while the Custom Description lets you add a specific label the panel displays. For the clearest results, pick a preset name that fits and add a Custom Description when you want extra detail, such as "Master Bedroom Window." If a renamed sensor does not update in the Alarm.com app right away, give it a few minutes to sync.
Changing the name of a sensor on the IQ5 Hub keeps your zone list clear and your alerts easy to read. For help renaming a sensor or managing your sensors on the IQ5 Hub, contact the Alarm Grid support team. We are here Monday through Friday from 9:00 AM to 8:00 PM Eastern Time. Email us at support@alarmgrid.com, call us at 888-818-7728, or visit our website and chat with a live support agent.
Did you find this answer useful?
We offer alarm monitoring as low as $10 / month
Click Here to Learn MoreRelated Products


Related Categories
- Home Security Systems
- Home Security Systems
- Apartment Security Systems
- Monitored Home Security Systems
- DIY Wireless Security Systems
- Small Business Security Systems
- Wireless Touchscreen Alarm Panels
- Smart Home Controllers
- Answered