How Do I Disarm My Honeywell Home PROA7PLUS?
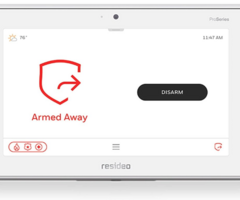
You can disarm your Honeywell Home PROA7PLUS by clicking the Disarm button on the front of the panel, and then entering a valid code. Confirm that the system is disarmed afterwards. Other methods for disarming include using a keypad, a key fob, or TC2. This also applies to the PROA7PLUSC.

Before getting into the fine details of armed versus disarmed, here's how you can quickly tell if the system is armed or disarmed from the main panel. Above the display screen, there are two (2) LED status lights. They are located to the left and to the right of the panel's built-in camera (PLUS version panels only). The light on the right-hand side is used to indicate arming status. If the light is green, then the system is disarmed. But if the light is red, then the system is armed. The light may also be orange to indicate that there is a trouble condition, or the light may be off to indicate that the system is disarmed and not ready to arm. So, having the Status LED light showing orange, green, or off means that the system is disarmed.
Also, if multiple partitions are set up on the system, then the right-hand Status LED light does not represent the status of the entire system, but rather only of the selected partition. Just because one partition is armed/disarmed does not mean that the same status necessarily applies to the other partitions on the system. Make sure to keep that in mind. You can also check the current arming status of the system (or the selected partition if multiple partitions are in use) by examining the shield on the left-hand side of the home screen. The shield will indicate that the system/partition is armed or disarmed. If the system/partition is armed, then the shield will also show whether it is armed away or armed home (also called armed stay). Long story short, use the shield or the LED to the right of the camera to quickly determine armed or disarmed status for the system or for the selected partition.
When you disarm your PROA7PLUS or PROA7PLUSC, you are taking your system out of a secured armed state. When a system is disarmed, all non-24-hour security zones will be unable to cause an alarm on the system or initiate an Entry Delay. Really, the only that will happen when a non-24-hour security zone (e.g. an Entry/Exit Zone, an Interior Zone, a Perimeter Zone) is faulted is that the panel will Chime and announce the Zone Description(s), and that's assuming that Chime and Voice are both enabled. Other than that, no action will be taken.
It's very different when a system is armed, as activating one of those zones could be an entirely different story. Depending on its Response Type, faulting a security zone may trigger an Entry Delay period, in which the system must be disarmed within a short period of time or else an alarm will occur. That is how an Entry/Exit Zone or an Interior w/ Delay Zone will operate. For other Response Types, such as Perimeter, a zone fault will trigger an immediate alarm, with zero chance to disarm first. Remember though, Interior Zones are bypassed when the system is Armed Home, also called Armed Stay. Interior Zones are only active when the system is Armed Away. For Perimeter Zones, an alarm will be triggered if faulted while Armed Home (Stay) or Armed Away.
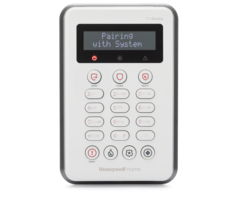
There are many ways that you can disarm a PROA7PLUS or PROA7PLUSC. The main way is to just disarm at the main panel, which we will discuss step by step at the end of this FAQ. But the other alternative methods deserve some mention as well. If you have an external keypad set up with the system, then you can use that to disarm. The available keypads for the PROA7PLUS and PROA7PLUSC are the PROSIXLCDKP Alphanumeric Keypad, the PROWLTOUCH, and the PROWLTOUCHC. Just like disarming from the main panel, disarming from a keypad will require you to enter a valid code. Though if you have a handheld key fob set up with the panel, then you can use that to disarm with the simple press of a button. Another way to disarm is to do so remotely using Total Connect 2.0 (TC2). Both the mobile app and the web version allow you to disarm. Of course, the panel must be monitored in order for it to be set up with TC2. You can also set the panel to disarm as part of an automatic smart scene that is triggered when a predetermined action is taken. This is very popular to set up with Z-Wave Smart Locks. Lastly, you can use TC2 to schedule a time for the system to disarm automatically. This requires functional Z-Wave and a monitoring plan that includes automation services. Scheduled disarming is currently only possible for Partition 1.
One other note regarding the PROA7PLUS and PROA7PLUSC is that these are multi-partition systems, with four (4) partitions that can be set up individually. When partitions are set up, each partition is controlled (i.e. armed and disarmed) individually. This means that you can essentially arm/disarm a section of the security system, without changing the arming status for the rest of the system. If you disarm from the panel or a touchscreen keypad, then you will be able to select the partition you want to arm/disarm. However, you must make sure the code you are using has authority for the partition you are trying to control. Also, a PROSIXLCDKP, as well as any key fob, can only control the partition that it is assigned to. On the other hand, you can select different partitions to control within TC2.
For the rest of this FAQ, we will focus on disarming a PROA7PLUS or PROA7PLUSC from the panel itself. For our explanation purposes, we will assume that the system (or the desired partition) is already armed. Complete the following steps to disarm a PROA7PLUS or PROA7PLUSC:
1. Select the partition. If multiple partitions are being used, then you must select the partition that you want to disarm. From the main screen of the panel, right above the shield on the left-hand side, there will be a dropdown bar that you can use to choose a partition. Only partitions that are active on the system will be available. There can be up to four (4) partitions. Choose the partition you want to disarm. If you are switching partitions, then you will be required to provide a code first. Provide a code with access to the partition you selected, or provide the system's Master Code (default 1234, but almost always changed for security purposes).
If no additional partitions are set up, then the system is considered a single-partition system, and you can skip this step because the only available partition (Partition 1) is already selected. In that scenario, you are technically controlling Partition 1, and since that is the only partition, you are really controlling the entire security system. You will know that no additional partitions are set up because there will be no dropdown bar above the shield logo on the home screen.
2. Disarm the system/partition. Click the black Disarm button. A keypad will appear. Enter in the system's Master Code (default 1234, but usually changed), or any user code with authority over the selected partition. The system should disarm.
3. Confirm the disarm. After the disarm is performed, the main screen will show that the selected partition is disarmed. Additionally, the LED light on the right-hand side of the front panel camera will change from red to green.
Did you find this answer useful?
We offer alarm monitoring as low as $10 / month
Click Here to Learn MoreRelated Products


Related Categories
- Alarm Keypads
- Alarm Keypads
- Security Key Fobs
- Security Key Fobs
- Wireless Alarm Keypads
- Wireless Touchscreen Keypads
- Honeywell 5800 Key Fobs
- Honeywell SiX Key Fobs
- Answered