
How Do I Enable the Check-in and Check-out on the IQ5 Hub?
To enable Check-in/Check-out on the IQ5 Hub, swipe down and touch Settings, then Advanced Settings, and then enter your own Installer Code. Next, touch Installation, then Installer Settings, and then check the Check-in/Check-out box with the panel's Wellness Page already enabled on first.
About Check-in/Check-out
Check-in/Check-out on the IQ5 Hub (available in AT&T LTE and Verizon LTE) adds Check-in and Check-out buttons to the panel's Wellness Page. When a visiting nurse or caregiver arrives, they tap Check-in and the panel takes their picture as a record of the visit; they tap Check-out when they leave. This creates a simple visit log with photos, which is why it is a popular add-on for aging-in-place and home-care setups built around your security system.
The feature is disabled by default, and it appears greyed out until the Wellness Page is enabled, since the Check-in and Check-out buttons live on that page. That dependency is the usual reason this setting looks locked: the Wellness Page has to be on first. Once both are enabled, the buttons show up on the Wellness Page and are ready for a caregiver to use with no code required.
Before You Begin
Check-in/Check-out is in the Installer Settings, which require the Installer Code (1111 by default) or Dealer Code (2222 by default). The steps below use the Installer Code. The Wellness Page must be enabled for this to be selectable, so turn it on first if needed. See our guide on how to turn on the Wellness Page on the IQ5 Hub for that step.
Enable Check-in/Check-out
-
Swipe down and touch Settings. Swipe down from the top of the screen to open the Settings Tray, then touch SETTINGS.
 Swipe down from the top of the screen to open the Settings Tray.
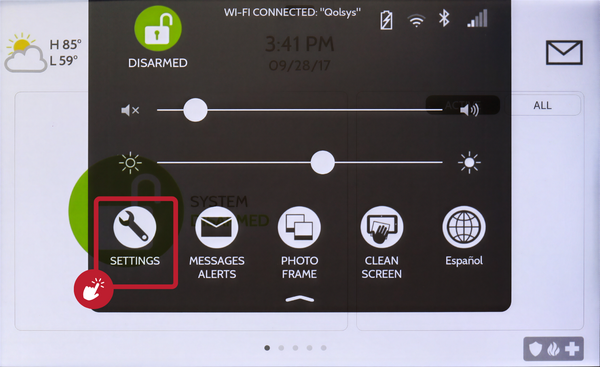 Touch Settings in the Settings Tray.
-
Touch Advanced Settings and enter your Installer Code. Touch ADVANCED SETTINGS, then enter your Installer Code (1111 by default). The Dealer Code (2222) works here too. The panel advances automatically after a valid code.
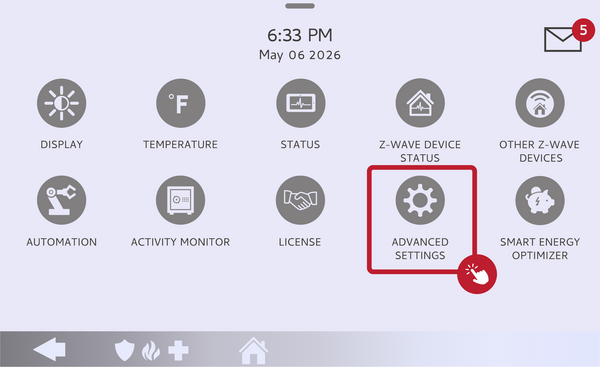 Touch Advanced Settings.
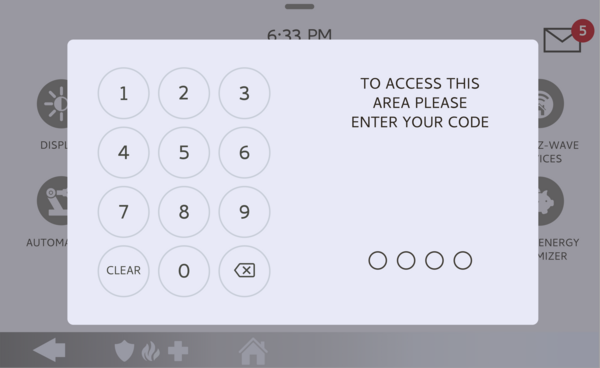 Enter your Installer Code (1111 by default).
-
Touch Installation, then Installer Settings. Touch INSTALLATION, then open INSTALLER SETTINGS and find the Check-in/Check-out setting, within the Wellness Page options.
Open Installer Settings and find Check-in/Check-out. -
Check the Check-in/Check-out box. Check the Check-in/Check-out box to turn it on. The Check-in and Check-out buttons now appear on the Wellness Page. If the box is greyed out, enable the Wellness Page first, then check it.
Check the Check-in/Check-out box.
Tips
Check-in/Check-out is most useful in a care setting where a nurse, aide, or family member visits regularly, since the panel photo gives you a verifiable record of who came and when. Because it lives on the Wellness Page, it pairs naturally with Wellness Support, which turns a pendant into a quiet medical alert, so the two often go together in a home-care build. Keep in mind the whole wellness feature set, including this page, is unavailable while Partitions are enabled.
Enabling Check-in/Check-out on the IQ5 Hub gives caregivers a simple, photo-logged way to record their visits. For help with Check-in/Check-out or the Wellness Page on your IQ5 Hub, contact the Alarm Grid support team. We are here Monday through Friday from 9:00 AM to 8:00 PM Eastern Time. Email us at support@alarmgrid.com, call us at 888-818-7728, or visit our website and chat with a live support agent.
Did you find this answer useful?
We offer alarm monitoring as low as $10 / month
Click Here to Learn MoreRelated Products


- Answered