How do I install a Honeywell GSMV4G on a VISTA-10P?
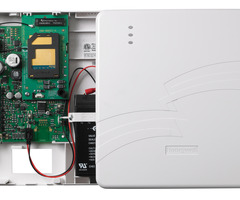
The GSMV4G has its own plastic enclosure so to install it on a VISTA-10P, you just need to mount the plastic enclosure on a wall near the VISTA-10P alarm control panel and then make a wired connection between the alarm control panel and the cellular alarm communicator.
The connection needed is just like adding a wired alarm keypad to a VISTA-10P. The GSMV4G connects to the same four ECP terminals as your system's keypads. We recommend making the connection as a home run from the communicator directly to the security system although, technically, you can daisy-chain it off of a keypad or wireless receiver that's already wired to the VISTA panel.
You will need a length of 4-conductor wire and we recommend using 18 or 22 gauge wire for the connection. You'll need a wire from the third terminal on the communicator to fifth terminal on the alarm panel. Then, connect a wire from the fourth terminal on the communicator to the fourth terminal on the panel. Next, you'll need a wire from the fifth terminal on the GSMV4G to the seventh terminal on the VISTA-10P. Finally, connect the last wire from the sixth terminal on the communicator to the sixth terminal on the control panel.
After making the four wire connection between the panel and the communicator, you will need to wire the AC transformer (which is included with the GSMV4G) to the communicator and then plug that transformer into a standard wall outlet as the transformer provides the power for the communicator. You can either use a two wire connection to connect the first two terminals on the GSMV4G to the two screw terminals on the included AC transformer or you can use the shared transformer method. With this method, you would need to replace the existing panel transformer with the transformer that comes with the GSMV4G and then make a two-wire connection between terminals 1 and 2 on the VISTA-10P to terminals 1 and 2 on the communicator. With this setup, the transformer that comes with the GSMV4G is feeding power to the panel and the communicator (in parallel) and therefore you don't need another spare outlet for the communicator transformer.
Once you have the transformer wired properly, plug it into a standard wall outlet and your GSMV4G will power up. You should also connect the included back up battery so that the communicator will still work during a power outage.
Pop the plastic cover back into place to complete your GSMV4G cellular alarm communicator installation. With the GSMV4G connected to your VISTA-10P, you can sign up for one of Alarm Grid's no-contract monitoring plans to activate your AlarmNet monitoring service.
Did you find this answer useful?
We offer alarm monitoring as low as $10 / month
Click Here to Learn MoreRelated Products


Related Categories
- Answered
- Answered By
- Sterling Donnelly