How Do I Program the Honeywell 5806W3 to the 2GIG GC2?
You can program the Honeywell 5806W3 to the 2GIG GC2 by accessing the panel's System Configuration Menu and then following the process for enrolling a new sensor. During this process, the sensor's serial number can be auto-enrolled with the GC2 and the sensor's settings can be configured.
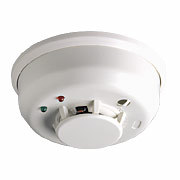 The Honeywell 5806W3 uses photoelectric technology to detect the presence of smoke in the area. Unlike the more robust Honeywell 5808W3, the device does not utilize heat or freeze detection. It is very important to test the 5806W3 after programming it to the 2GIG GC2 Alarm System.
Complete the following steps to program the Honeywell 5806W3 to the 2GIG GC2:
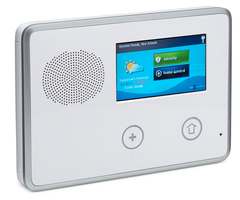
1. Open System Configuration. Begin with the 2GIG GC2 on its main screen with the system disarmed. Press the 2GIG logo in the lower-right corner of the screen. Provide the Installer Code to continue (default is 1561). Select the System Configuration option to access the System Configuration Menu.
2. Pick a Sensor Number. Every zone for the GC2 System needs its own unique Sensor Number. Use the left and right arrows on the screen to scroll through the list of numbers. Stop when you find a number that has not been assigned a zone on the system. Press the down arrow to continue.
3. Adjust the settings. The main part of enrolling a sensor on the 2GIG GC2 is adjusting the device settings. Within each option, use the left and right arrows to locate the appropriate selection. Then use the down arrow to move to the next option, or press the up arrow to return to the previous option. Continue on until you reach the end of the list. The following selections should be made for a Honeywell 5806W3:
- Sensor Type: Choose either "(09) 24-Hour Fire" or "(16) 24-Hour Fire Verification". These options work the same, except (16) will require that the smoke detector is activated a second time after a 30 second period before a system alarm will occur. The (09) option will trigger an immediate alarm upon activation.
- Equipment Code: The 5806W3 is not found within the GC2 equipment code list. Instead, choose "0859 - HW Smoke 5808W3", as it will provide the same function.
- Serial Number: The best way to ensure proper enrollment is to auto-learn the Serial Number for the sensor. To do this, first press the "Shift" key. Then select "Learn". The screen will indicate that the system is now awaiting an RF signal transmission. The 5806W3 can then be activated by pressing its test button. This can be done by using a paper clip or some other thin object to press the button on its front.
- Equipment Age: This does not affect the performance of the 5806W3 in any way. Choose (0) for "New" or (1) for existing.
- Loop Number: Choose Loop 1.
- Voice Descriptor: The voice descriptor is what name the GC2 will speak out when the sensor is activated. You should provide a voice descriptor that will allow you to easily identify the sensor. Some examples could include "Bedroom Smoke" or "Hallway Smoke". Pages 38 and 39 of the 2GIG GC2 Programming Guide describe this feature in greater detail.
- Sensor Reports and Supervision: Set both of these options to "enabled".
- Sensor Chime: This option can be "disabled", since an alarm will occur when the sensor is activated anyway.
4. Save the changes. On the summary screen, press "Edit Next" to continue or "Edit Current" to adjust any of the settings mentioned in Step 3. Then press "End" in the bottom-right corner of the screen. Another summary screen will follow. Ensure that the box next to "Save Changes" is checked. Finish by pressing "Exit" in the bottom-right corner". The system will reboot, and the changes will be applied.
Did you find this answer useful?
We offer alarm monitoring as low as $10 / month
Click Here to Learn MoreRelated Products
- Answered