Adding Hardwired Zone to DSC PowerSeries NEO Security System
Related Products


Related Categories
Description
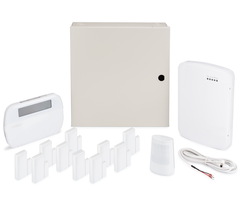
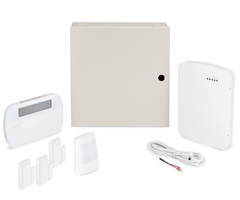
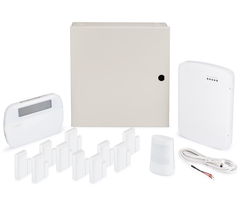
In this video, Michael from Alarm Grid shows you how to add a hardwired zone to a DSC PowerSeries NEO Security System. As a hardwired security panel, the DSC PowerSeries NEO can readily support wired sensors.
Every wired zone on the DSC PowerSeries NEO must have an end of line resistor (EOLR). This includes zones that are not actively being used. Any wired zone without an end of line resistor will be displayed as open. The resistor value to use is a 5.6k ohm resistor, which is color coded green, blue, red, gold. These resistors come included with the panel. Normally Closed (NC) sensors use a resistor that is wired in series. Normally Open (NO) sensors use a resistor that is wired in parallel.
When you wire a sensor to the NEO, you are essentially choosing which zone the sensor will use. Conventional hardwired sensors are not enrolled with the NEO using a serial number. The system simply sees the zone, and it responds accordingly when the connected sensor is faulted. How the system responds depends upon the Zone Definition that has been set for the zone. You need to go into programming and set each Zone Definition accordingly. Every possible Zone Definition option has its own 3-digit code that is used for assignment purposes. Enter the 3-digit code in the appropriate programming field to configure a zone with the proper definition. You can see a complete list of all the possible Zone Definitions in the reference manual that comes included with the NEO.
Remember that some hardwired sensors will only require a 2-wire connection, while others will utilize a 4-wire connection. A sensor that uses a 2-wire connection is strictly sending zone status transmissions (open or closed) to the panel. When a sensor uses a 4-wire connection, it uses 2 wires for zone status, and 2 wires for power. In other words, a 4-wire sensor will draw a small amount of current from the sensor, while a 2-wire sensor is simply a mechanical device that will not draw any electrical current from the panel.
https://www.alarmgrid.com/faq/how-do-i-program-a-hardwired-zone-to-a-dsc-powerseries-neo
http://alrm.gd/get-monitored
Transcript
Hi, DIYers. This is Michael from Alarm Grid. And today, I'm going to show you how you would add a hardwired zone to a DSC PowerSeries NEO security system. We have a wired motion sensor here that we're going to be using for our demonstration purposes. But first, I want to talk a little bit about the NEO. The NEO is a hardwired system, and it has onboard zones for you to add hardwired sensors. This one has eight hardwired zones on there. Each zone is set up with an end-of-line resistor that tells it that the zone is closed. So you need to have those at each zone, even if there's a zone that you're not using with the system. If you need to go beyond eight wired zones, then you can get a zone expansion module to add additional zones. But in our case, we're just adding one zone at zone number one so we don't need that expansion module. But we do have our sensor here. And we already have it wired up at the sensor itself. We did a four-wire connection. Now, just to be clear, some zones are only going to use a two-wire connection, in which case that's just transmitting a zone status. A zone status is being transmitted between the sensor and the panel. That's common for door and window contacts, where it just needs to know whether it's open or closed. But in our case, we have a powered sensor, like a motion sensor. Another example would be a glass break detector. They use both power and zone status transmissions. So we're going to have two wires for power, which are the red and black wires, and then we have two wires for zone status, which are, in our case, the green and the white wires. So we already have ours I set up, and we do have an end-of-line resistor that's wired in series. So that way, it'll know when the zone's closed. Remember, you need to have a resistor at each zone. The NEO comes with 5.6k ohm resistors. That's color code green, blue, red, gold. Those are included. So make sure you have an end-of-line resistor at each zone. So we just wanted to show the wiring at the motion sensor. Since this is a motion sensor, it's using a four-wire connection with two wires for power and two wires for zone status transmission. So we have the red wire going to positive power, the 12 volt; the black wire going to the negative ground connection. Those are both for power. And then for zone status transmission, so we have the white or yellow wire-- in this case, it's white-- it's coming into the common terminal. And then we have a resistor wired in series. So we took the resistor and we put one end into the normally closed terminal, and then we used a B connector and a crimping tool to crimp the green wire incoming with the resistor at the other end. So the green wire coming in on one of the zone status transmission wires isn't connected to one of the sensor terminals, it's wired in series with the resistor going into the terminal. So that's how you would set up a four-wire connection. Remember, if you're just doing a two-wire connection, what you might use with a door and window contact or a non-powered device, it's just going to do with zone status wires. There'll be two wires for zone status, and there won't be any power wires involved for the sensor. So for the power connections, we're going to connect to the aux port right here on the panel. We're going to do move this backup battery out of the way because that's kind of in the way. But we've got here. So we're starting at the third one for positive. Actually, I put it into the fourth one there. Sorry about that. So we've got the third one here for positive, and that's for the red wire. And really, color doesn't matter. As long as you're matching the color at the sensor and the panel, then you'll be good to go. But in our case, we are using proper traditional colors, so red goes to positive power. And then we have the black ground wire for your negative power. That's going to go into the negative box terminal. And we got that in there, and it's tightened down, so they're good to go. And then we're doing the two data connection wires. And I do want to point out that each zone on the NEO uses an end-of-line resistor. These zones aren't set up, so they're just set up at the panel. But our resistor is at the sensor here, end of the line. And they're there 5.6k ohm resistors. So that's color code-- it's green, blue, red, gold is the one you want, and they come with the NEO system. So just make sure to include those. Otherwise, it'll show zone open and you don't want that. So we're going to connect the first one here. We're doing zone one, and we're doing its common terminal, and we've got the first data connection here. Inserted it. Tightening it down. And then we have the common connection here, the other zone data connection. Open that up, and just insert it into the slot, and tighten it down. OK. And our sensor is nice and secured. All the connections are good, and so we're going to power up our NEO system. We're going to start with the backup battery so we don't have any scary sparks this time. There's still sparks, but what can you do? So we're going to do that. And then we're going to plug-in the transformer to provide full power. So we have our NEO system powered back on. I'm just going to show you the programming that's needed for a new hardwired zone. It's mostly setting the zone definition and assigning any partitions. So first, we're going to enter into programming, so that's * 8. It's going to ask us for our installer code, which we have ours at the default of 5555. And then we're going to enter 001 for zone definitions. And then you're going to want to find the three-digit zone number of the one that you're using. We have ours setup at zone number 1, so that's the default one, so we can just press * to confirm. And then it's going to ask us for the three-digit zone definition. Now, you should look in the manual for your NEO system to see the complete list of zone definitions. But if you scroll through them, you can see a couple delay options, like entry-exit delays. You can see an instant. You see interior. So we'll go with that. We'll go with interior, and we'll press * to confirm it. And then it's going to take us the next zone, but we don't need to set up a second zone right now, so we'll just press the # key to go back. And we'll repeat that until we're back at the main menu. So that's how you would assign a zone definition. I just want to quickly show you how you would assign a partition if needed. So and we see our camera guy's moving around, and so that's why it says there's an open zone on the keypad. But anyway, so you get into programming, * 8, and you enter the installer code, 5555. And that's how you get into programming again. And so we need to do partitioning. So we're going to go to 201. This is for partition 1. 202 would be partition 2; 203, partition 3; et cetera, et cetera; to partition 8 on most DSC NEO systems. Some Power Series NEOs will only have six partitions. So 201 through 206 or 201 through 208, depending what you need. But we went to 201 for partition 1 is what we wanted to do. And so we're going to press * to select. You can go through and select-- the numbers are organized by groups of 8, so you have the first eight zones, then you have 9 through 16, 17 through 24, et cetera. But we're working on zone number 1. Remember, we assigned it to the on-board slot 1. So zone 1. We press the * key to continue. And then you're actually just toggling. Well, you enter the * key to change it, but you do N for no or Y for yes. We want ours to yes. Going back out a bit. OK. There we have zone 1 set to yes. We toggled it. There. Zone 1 is yes. You see it there on the screen. Good. And if we press the arrow keys, we can toggle to the next one-- zone 3, zone 4. So you see that they're all yes. That's fine. We were just setting up 1, so we can back out to the main screen here. And so you want to toggle that to yes for the partition you want to do. Say we wanted to do it no, and we were doing it for partition 2. Say we didn't want it to be enabled, we'd have it set to N, which we see there. And we're not going to toggle that. We're going to leave that alone. We're going to just # to exit. But make sure all the partitions are correct, so that way, it's only responding on the partitions that you want to work with. So that's how you would add a hardwired zone to a DSC PowerSeries NEO security system. If you have any questions about the DSC PowerSeries NEO, or about alarm monitoring in general, send an email to support@alarmgrid.com. And if you enjoyed this video, give it a thumbs up below to like the video. And remember to subscribe to our channel for updates on future videos. Hope you enjoyed the video. Thank you.
- Uploaded