How Can I Configure Apple HomeKit on a PROA7PLUS Panel?
To configure Apple HomeKit with a PROA7PLUS be sure the panel is on the latest firmware (03.1868.32.0+). From the Home Screen, tap the menu icon (≡), scroll to Settings > Apple HomeKit, and enter a valid code. Tap "Reset HomeKit," then "Pair Controller to HomeKit." Follow the onscreen prompts.
As of Firmware Version 03.1868.42 the Honeywell Home PROA7PLUS, and the Resideo PROA7PLUSC support integration with Apple HomeKit. By default, this feature is disabled. To enable it, a dealer can do so via AlarmNet360, or a user with the Installer Code can enable it in panel programming through the panel touchscreen or a PROWLTOUCH or PROWLTOUCHC keypad.
Important Note: The Honeywell Home PROA7 and the Resideo PROA7C do not support integration with Apple HomeKit. Early documentation from Resideo listed them as compatible, but this was an error.
What You'll Need:
- A PROA7PLUS or PROA7PLUSC panel with firmware version 03.1868.32.0 or higher.
- A PROWIFI or PROWIFIZW module installed in the panel, with a connection to WIFI enabled and configured. The panel must remain connected to WIFI for the integration to continue working.
- An iOS device with the Home App installed. To use HomeKit for manual control or automation when you are away from home, you will need a network-connected HomeKit Hub that stays on the premises. An Apple HomePod, AppleTV (Gen 4+), or an iPad can serve as a hub.
- iPad® and iPhone® must be on iOS® 10+
- Apple TV® must be on tvOS™ 9.0+
To pair the PROA7PLUS or PROA7PLUSC to Apple HomeKit, follow these steps. They assume that the panel is on a firmware version that supports HomeKit, and that it already has the included PROWIFIZW module installed and is connected to the same WIFI network as the iOS device being used to pair. The screenshots shown are from an iPhone:
- Enable HomeKit in panel. From the panel's or a PROWLTOUCH's main screen tap the menu icon (≡) at the bottom-center then scroll to Tools > Enter the Installer Code (default is 4112) > Programming > Advanced Settings. Scroll down to the Enable HomeKit option. Toggle the blue switch to the right (ON) position. Be sure to "Save" before exiting. To exit click the left arrow (<) in the upper left repeatedly until you exit programming.
-
Reset HomeKit. Although at this point, you haven't actually paired your system with HomeKit, it's a good idea to perform a reset. From the panel or touchscreen keypad's main page click the menu icon (≡) then scroll down to Settings > Apple HomeKit > Enter the Installer or the Master Code (defaults are 4112 and 1234 respectively) then select Reset HomeKit. You will be prompted with a "Cancel" or "Continue" option. Press "Continue". You'll see a spinning progress indicator, then be returned to the Apple HomeKit screen. You can stay on this screen for the next step.
-
Pair with HomeKit. Within the iOS device, open the Home app. Choose the (+) icon, then tap "Add Accessory":


From Step 2 you should still be on the panel's HomeKit screen. If you are, you can skip to the next paragraph. If not then on the panel or touchscreen keypad, navigate to Apple HomeKit by selecting the menu icon (≡) then scroll down to Settings > Apple HomeKit > Enter the Installer or the Master Code (defaults are 4112 or 1234 respectively).
Select "Pair Controller to HomeKit" (see screenshot in Step 2). A QR Code will be displayed on the panel and a window will pop up on the iOS screen where you can scan the QR Code with the device's camera.
If you can't scan the QR Code, you can choose "More Options". Any HomeKit-capable devices connected to the WIFI network within the vicinity should pop up in a list. The ProSeries panel should be among the devices displayed. It will show up as ProSeriesXXXXXX where XXXXXX is the last six digits of the MAC address (I have edited the screenshot to obscure this info). Select the panel from the list. You'll be prompted to enter a code. This is the 8-digit number you can see displayed in the upper-right corner of the QR Code displayed on the panel or touchscreen keypad. In the screenshot, the code is 51013420. If the ProSeries panel doesn't show up as an available device, be sure it's powered on and connected to the same WIFI network as the iOS device being used.
Once you have scanned the QR Code, or selected the ProSeries panel from a list and entered the proper code, you'll be prompted to add the panel to your network. Select "Add to 'Apple Home.'" Next, you'll begin describing the panel and each sensor for HomeKit.
On the panel or touchscreen keypad, you'll see a "Success" message. You can tap "Close" and press the (<) key in the upper-left portion of the screen, repeatedly, until you exit programming. From this point forward, everything will be done on the iOS device.
- Configure devices in HomeKit. The panel and each sensor will be paired with HomeKit. During the initial setup, HomeKit will communicate with the panel to gather a list of all compatible sensors. You'll need to add each sensor you want to use with HomeKit and provide information about it as shown in the following screenshots. Remember, life-safety devices are not supported in HomeKit.


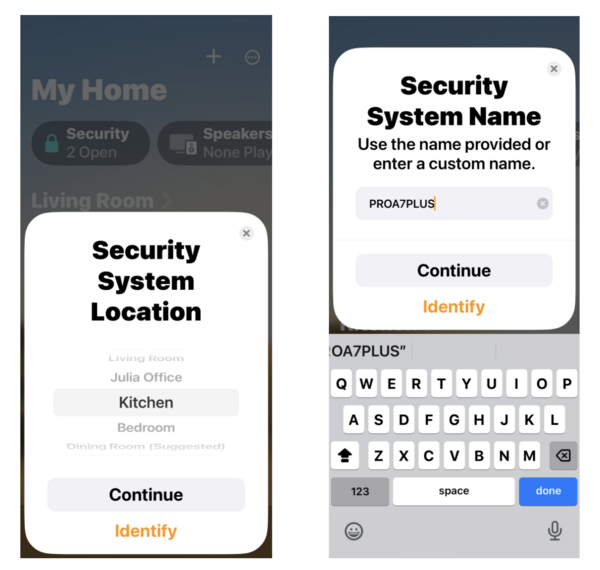
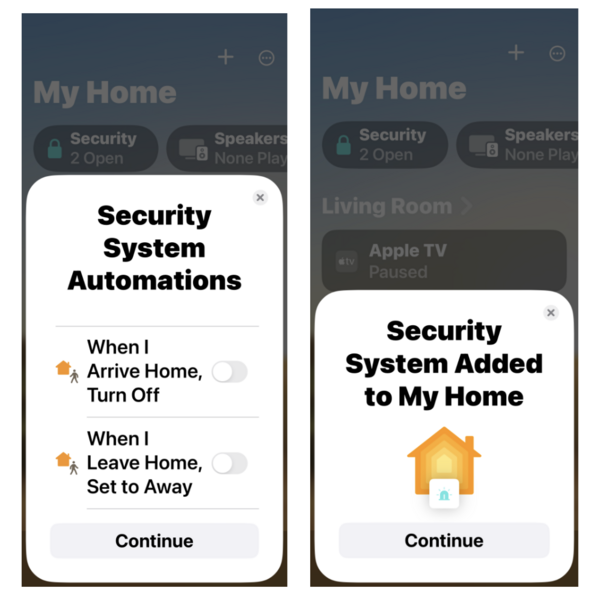
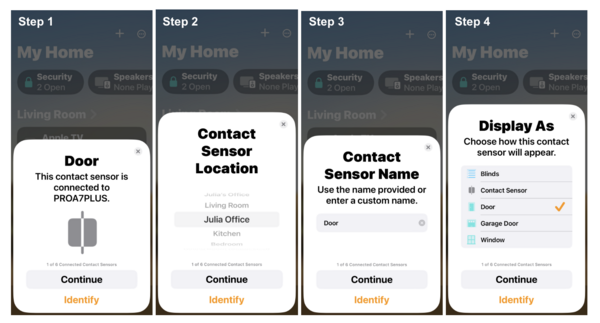
Once you've gone through these steps for the security panel, you'll be taken through similar steps to configure each sensor within the security system. Answer each of the following prompts for each sensor as it comes up.
Once the panel and all compatible sensors have been configured, you'll see a completion message. Press "Done." You're now ready to begin using HomeKit.


Did you find this answer useful?
We offer alarm monitoring as low as $10 / month
Click Here to Learn MoreRelated Products

Related Videos

Related Categories
- Answered
- Answered By
- Julia Ross