How Do I Add a Qolsys IQ Remote To The IQ Panel 2 In Access Point Mode?
In locations with no WIFI service or weak signal, enable Access Point (AP) Mode within the Qolsys IQ Panel 2. Set the AP SSID and Password for the network. Using the IQ Remote, join the AP network then pair the remote with the panel. Finally, test the IQ Remote in its proper mounting place.


The Qolsys IQ Remote talks to the Qolsys IQ Panel 2 via WIFI signaling. In some locations, no WIFI service may be available. It's also possible in large buildings that the WIFI signal may not be strong enough to provide an adequate connection between the panel and the remote. In these cases, the Qolsys IQ Panel 2 has a built-in Access Point that can be enabled to provide a connection between the two. Please Note: When the panel Access Point is enabled, the panel no longer has the ability to connect to a 5 GHz WIFI network. If dual-path connectivity is desired, be sure there is a 2.4 GHz WIFI signal available.
When performing the process outlined below, make sure the panel and the remote are close together: Follow these steps to pair the Panel and the Remote in AP Mode:
1. Enable AP Mode. In order for AP Mode to be available, the system must have WIFI enabled. To enable it, press the gray bar at the top of the Qolsys IQ Panel 2 screen. Go to Settings > Advanced Settings > Enter Installer or Dealer Code (1111 or 2222 respectively by default) > Installation > WIFI. Make sure the "Activate WIFI" box is checked at the top right of the screen.
From there, press the back arrow at the bottom left of the screen one time. Then in the top left, press Installation > Devices > WIFI Devices > Access Point Settings. Click the check box at the top of the page to enable the WIFI Access Point.
2. Set the SSID. A default SSID will be displayed. We suggest that you change this to something you can recognize as being provided by the IQ Panel 2. The SSID name can be 1 - 32 characters in length, and it can contain upper and lowercase letters and numbers. But no spaces are allowed. The only special characters accepted are - (dash) and _ (underscore).
3. Set the password. The password should be a minimum of 8 characters. It will only accept commonly used characters. It should not contain a space at the beginning. It must contain at least one letter and one number. It should be easy to remember, yet hard to guess. When you are finished, press the Home icon at the bottom of the screen to return to the Home page.
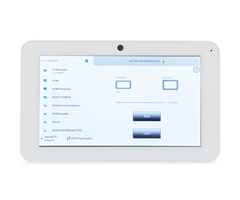
4. Configure the Remote. When the IQ Remote first powers up, it should have WIFI enabled. If not, select the check box for "Activate WIFI" at the top of the screen. From the list of available networks, find the SSID you created for the panel's Access Point. Select it. When prompted, enter the proper password. Then hit Connect.

5. Pair the Devices. From the home screen of the IQ Panel 2, press the small gray bar at the top center. Then go to Settings > Advanced Settings > enter the installer or dealer code (the default code is 1111 or 2222 respectively) > Installation > Devices > WIFI Device > IQ Remote Devices > Pair. The IQ Panel 2 will now be in pairing mode.
Once the IQ Panel 2 is in pairing mode and the IQ Remote is connected via the Access Point, immediately press the "Pair" button on the IQ Remote.If successful, the IQ Remote will be paired with the IQ Panel 2. When initially paired, the IQ Remote will download and install a "patch" file. This process will take several minutes. Up to 3 different IQ Remotes can be paired with a single IQ Panel 2 System.
6. Test the Devices. Once the patch file is installed and the IQ Remote completes the pairing and syncing process, take the IQ Remote to its final mounting location. Test the Remote and the Panel to ensure proper operation and good wireless signal range.
Did you find this answer useful?
We offer alarm monitoring as low as $10 / month
Click Here to Learn MoreRelated Products


Related Videos

Related Categories
- Home Security Systems
- Home Security Systems
- Business Security Systems
- Business Security Systems
- Apartment Security Systems
- Small Business Security Systems
- Monitored Home Security Systems
- DIY Wireless Security Systems
- Answered
- Answered By
- Julia Ross