
How Do I Add a Thermostat to the IQ5 Hub Alarm System?
To add a thermostat to the IQ5 Hub, swipe down and touch Settings, then Advanced Settings, and enter your code. Next, touch Installation, then open Z-Wave Devices, and select Add Device, then Include. Put the thermostat into pairing mode, then name it and touch Add to complete the setup.
About Adding a Thermostat
The IQ5 Hub (available in AT&T LTE and Verizon LTE) pairs with a compatible Z-Wave thermostat so you can manage your heating and cooling from the panel. You can add up to 10 thermostats, and adding one uses the same inclusion process as any other Z-Wave device. Once your first thermostat is paired, a Thermostat Page appears automatically on the panel's main interface, and you simply swipe over to access it. From there it becomes part of your home automation, ready for schedules and scenes.
Once the thermostat is added, you can control it right from the touchscreen. Our guide on how to adjust your thermostat from the IQ5 Hub walks through setting the temperature, mode, and fan. If you want the bigger picture first, our overview of the thermostats the IQ5 Hub supports covers device limits, control features, and compatible models.
Before You Begin
Adding a thermostat is done in Advanced Settings, which uses the Installer Code (1111 by default) or Dealer Code (2222 by default). Have your thermostat installed, powered, and within Z-Wave range of the panel before you start, and keep its manual handy so you know where its pairing button is. Each thermostat needs to be C-wire powered or otherwise supported per its own instructions to pair reliably.
Add the Thermostat
-
Swipe down and touch Settings. Swipe down from the top of the screen to open the Settings Tray, then touch SETTINGS.
 Swipe down from the top of the screen to open the Settings Tray.
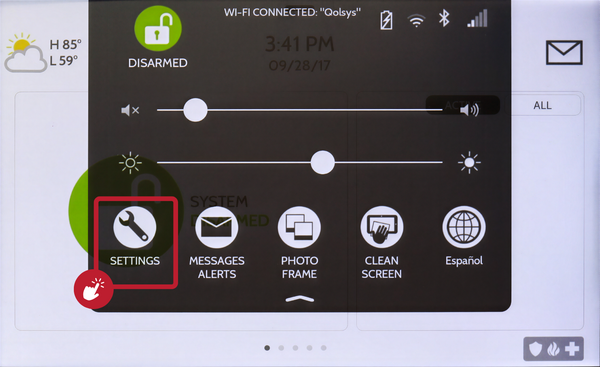 Touch Settings in the Settings Tray.
-
Touch Advanced Settings and enter your code. Touch ADVANCED SETTINGS, then enter your Installer Code (1111 by default) or Dealer Code (2222 by default). The panel advances automatically after a valid code.
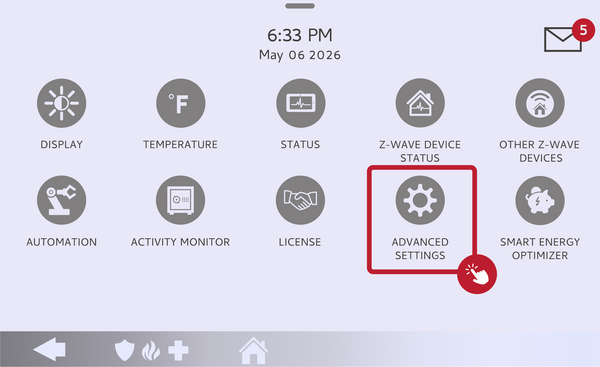 Touch Advanced Settings.
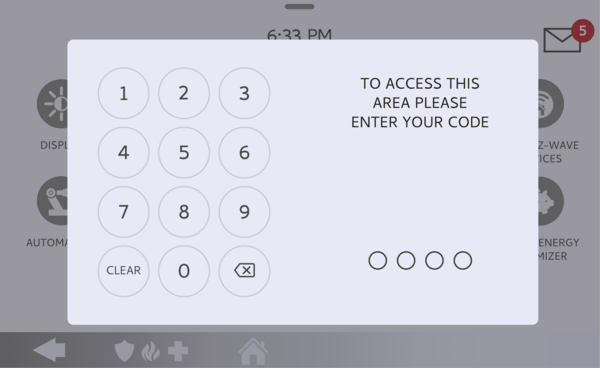 Enter your Installer Code (1111) or Dealer Code (2222).
-
Touch Installation. On the menu that appears, touch INSTALLATION, the drill icon in the top-left corner, to open the installation and programming options.
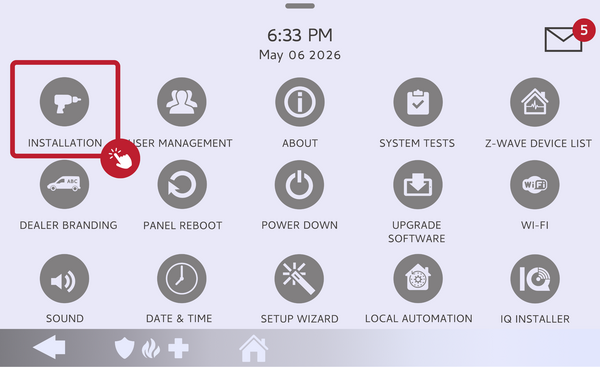 Touch Installation.
-
Open Z-Wave Devices and select Add Device. Touch DEVICES, then Z-WAVE DEVICES. On the Z-Wave Devices page, select ADD DEVICE to start the inclusion process.
Open Z-Wave Devices, then select Add Device. -
Touch Include and pair the thermostat. Touch INCLUDE, then put the thermostat into pairing mode by pressing its Pair or Learn button when the panel prompts you. Check the thermostat's own manual for the exact button and location. The panel finds the thermostat and begins adding it.
Touch Include, then press the thermostat's Pair button. -
Name the thermostat and touch Add. Give the thermostat a clear name, such as "Downstairs Thermostat," then touch ADD to save it. The Thermostat Page now appears on the home screen, ready to use.
Name the thermostat and touch Add to save.
Tips
For the smoothest pairing, add the thermostat while it is close to the panel if possible, since Z-Wave range can be limited by walls and distance. If the panel does not find the thermostat, confirm it is powered and in pairing mode, then try again. A thermostat that was previously paired to another controller may need to be cleared first using the Clear Device option before it will include. Once added, you can rename or remove it anytime from the same Z-Wave Devices menu.
Adding a thermostat to the IQ5 Hub brings your heating and cooling onto the same screen as your security system. For help pairing a thermostat or choosing a compatible model for your IQ5 Hub, contact the Alarm Grid support team. We are here Monday through Friday from 9:00 AM to 8:00 PM Eastern Time. Email us at support@alarmgrid.com, call us at 888-818-7728, or visit our website and chat with a live support agent.
Did you find this answer useful?
We offer alarm monitoring as low as $10 / month
Click Here to Learn MoreRelated Products


- Answered